


There are numerous scenarios when data synchronization between the two databases is needed, such as distributing data to different locations, integration of data from different locations into a central repository, or just a simple synchronization between a test and production database.
The recommended solution is to use database replication.
However, even with database replication there’s a need to check whether all the data is synchronized and to synchronize it if needed.
Another situation where data synchronization is needed can be when data gets accidentally deleted from a test database, and it needs to be recovered by inserting the data from the production database.
Here are several methods that can be used to compare and synchronize databases:
- Use SQL with the Union all statement to find the records that don’t match in 2 identical tables:
SELECT
       MIN(TableName) AS TableName,
       ID,
       Name,
       lastname,
       Address,
       City
  FROM(
    SELECT
           'Table A' AS TableName,
           Customers.id,
           Customers.Name,
           Customers.lastname,
           Customers.Address,
           Customers.City
      FROM Customers
    UNION ALL
    SELECT
           'Table B' AS TableName,
           CustomersOld.id,
           CustomersOld.Name,
           CustomersOld.lastname,
           CustomersOld.Address,
           CustomersOld.City
      FROM CustomersOld)tmp
GROUP BY
         ID,
         Name,
         lastname,
         Address,
         City
HAVING COUNT(*) = 1
ORDER BY
         id;
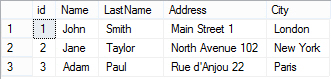
For the Customers table:
And the CustomersOld table:

The script returns the following results:
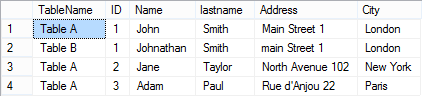
When the Name for ID=1 in the CustomersOld table is changed to John, so that the records become equal, SQL returns the following:

When comparing data in a table, this method provides enough information to start with. However, it doesn’t provide any help with data synchronization – it has to be manual, record by record. Another disadvantage of this method is that SQL for each table needs to be modified, according to its structure. It also cannot be used on text, ntext, and image data types. To summarize – if several tables needs to be compared and synchronized – this method requires a lot of time and, due to the manual synchronization it requires, is very prone to errors.
- Use Data Compare in Visual Studio
It compares data in the source database and the target database and creates a synchronization script for the tables selected for synchronization.
In addition to the fact that Visual Studio Ultimate or Premium edition needs to be installed, programming knowledge is needed too. Also, this feature cannot compare and synchronize data in the following scenarios:
- Table column names in source and destination are not identical
- Case-sensitive table and view names
- Tables don’t have identical primary key, unique index, or unique constraint
- Views don’t have identical unique, clustered index
- Use SQL Server’s TableDiff
TableDiff.exe is already in the COM folder of the SQL Server installation. It compares differences in the source and the destination tables and views, generates a script that can be executed to synchronize the data.
Use the following command to compare the Person.Address tables in the source and the destination database and to generate a synchronization script named differencesPersonAddress.sql:
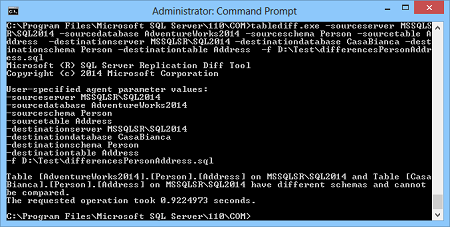
tablediff.exe -sourceserver SQLSERVER2016 -sourcedatabase AdventureWorks2014
-sourceschema Person -sourcetable Address -destinationserver SQLSERVER2016
-destinationdatabase AdventureWorks2016 -destinationschema Person
-destinationtable Address -f e:\differencesPersonAddress.sql
In case the structure of the tables is different, e.g. one has the column named PostalCode, and the other column named PostalCd, comparison and synchronization won’t be possible and the following message will be shown:
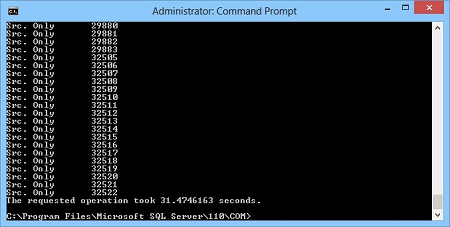
The disadvantages of TableDiff.exe are that there’s no GUI –it can be used only from the Command prompt or in a batch file, there are not many comparison and synchronization options, the tables need to have at least one primary key, identity, or ROWGUID column. One of the challenges that will be encountered using tablediff.exe is that it cannot automatically compare all the tables in a database. So, additional code needs to be written, read system tables to get the list of tables in a database and iterate through the list.
ApexSQL Data Diff is a SQL Server data comparison and synchronization tool which detects data differences and resolves them without errors. It can compare and synchronize live databases and native or natively compressed database backups and generate comprehensive reports on the detected differences. In case the table or column names that need to be compared have different names, those can be easily mapped. For tables without primary keys and unique indexes, any column can be set to be the custom key used for the comparison.
To set up the process, please follow these steps:
-
Start ApexSQL Data Diff
-
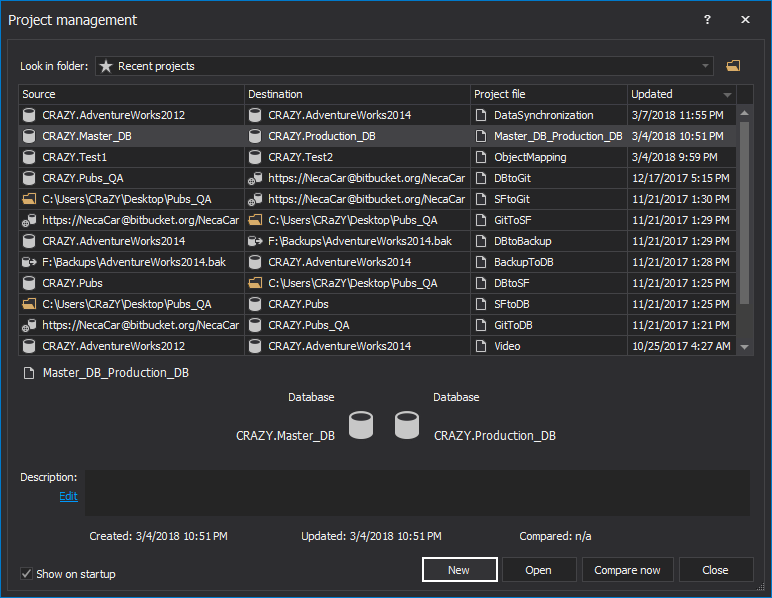
Click the New button in the Project management window:
-
On the Source side:
- Select Database from the Source drop-down list
- Select the source server, from the Server drop-down list or type its IP address\name
- Specify the authentication method for that SQL Server instance (and a valid set of credentials, if SQL Server authentication is chosen)
- Select the source database from the Database drop-down list
-
On the Destination side:
- Select Database from the Source drop-down list
- Select the destination server, from the Server drop-down list or type its IP address\name
- Specify the authentication method for that SQL Server instance (and a valid set of credentials, if SQL Server authentication is chosen)
-
Select the destination database from the Database drop-down list

-
Click the Compare button in the bottom-right corner of the New project window
-
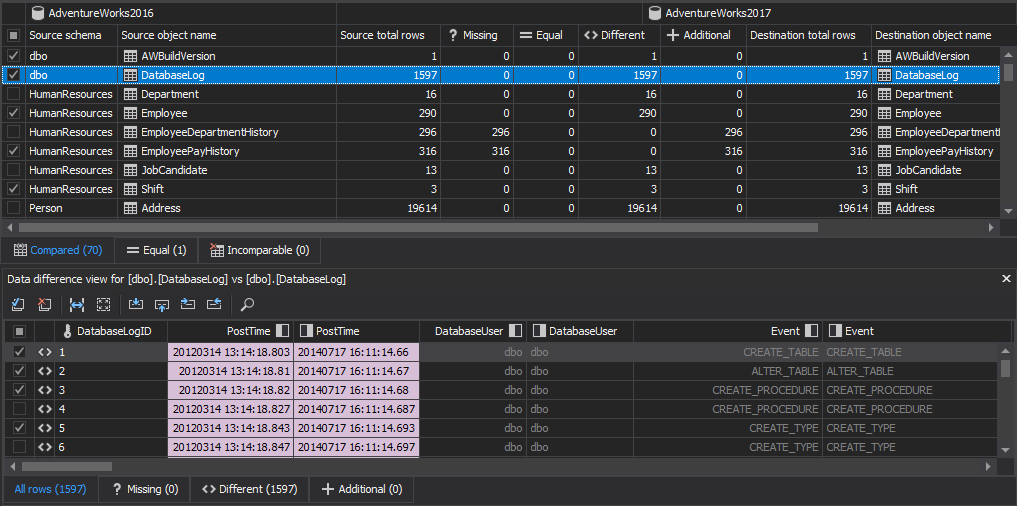
After the comparison process is finished, results will be shown in the Main grid and by default, all objects and their corresponding rows are checked:
-
Check/uncheck the desired objects/rows that should be included/excluded in the synchronization
-
In the Home tab, click the Save button to save the project file that will contain information about selected objects and options:

The saved project file will be used later for the automation of this process.
-
In the Home tab, click the Synchronize button to start the Synchronization wizard

-
Under the Output options step, choose the Synchronize now action, in order to perform direct synchronization to the destination database:

-
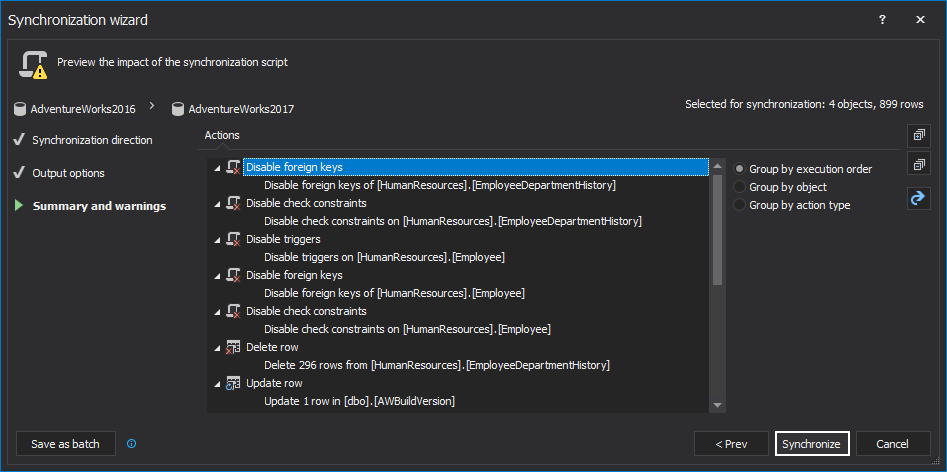
In the last step of the Synchronization wizard, potential warnings and execution actions will be shown:
-
Click the Synchronize button in the bottom-right corner
-
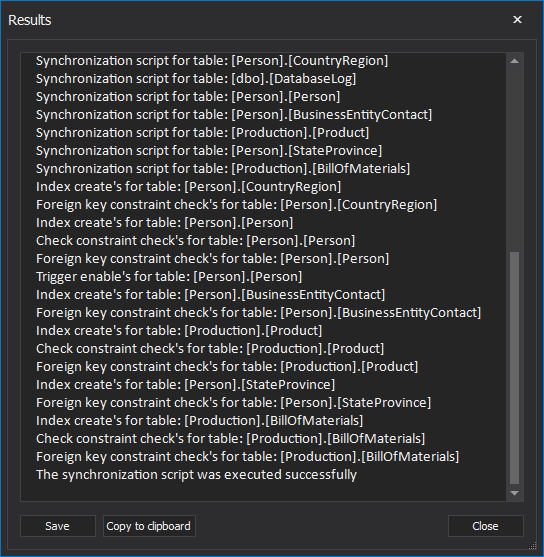
Once the synchronization process is over, information about the successfulness of the synchronization process will be shown in the Results window:
Automating data sync process
After the initial synchronization was executed successfully, let’s move on with automating the process by using the created project file in the PowerShell script.
SQL Server authentication was used in this example, but its login password is encrypted with the saved project file. Find out more about ways of handling login credentials.
In the first part of the PowerShell script, ApexSQL Data Diff location and its parameters will be set:
#ApexSQL Data Diff location and its parameters
$datadiffLoc   = "ApexSQLDataDiff"
$datadiffParams = "/pr:""MyProject.axdd"" /sync /v /f"
The next part will call ApexSQL Data Diff and process out its parameters:
#initiate the data compare and sync process
(Invoke-Expression ("& `"" + $datadiffLoc +"`" " +$datadiffParams))
As an addition to this PowerShell script, the utilize “no differences detected” return code can be set, so that on each data comparison it will check if there are any data changes to synchronize and if not, the further process is aborted.
Scheduling data sync process
After the PowerShell script is created and everything is automated as needed, the process can be scheduled in one of the several ways. Find out more about ways of scheduling ApexSQL tools.
There’s no need to manually compare and synchronize data anymore. Use SQL data comparison tool ApexSQL Data Diff to set all synchronization options, map the tables and columns with different names, create custom keys for comparison in the GUI. Schedule it to run unattended and all that needs to be done afterwards is to check SQL Server job history in the morning.
April 4, 2013


