


Once you have your continuous integration (CI) and or continuous delivery (CD) aka Database lifecycle management process built, configured, successfully testing and ready to roll, the next decision point is when to run it and how.
There are three main choices
Manual
Manually triggered jobs don’t meet the definition of “continuous” but I’ll include it here as this method as, at a minimum, it is a precursor to fully automated “continuous” processing, at least for testing the process.
A typical manual build process is for developers to check in all of their code and for one to “Babysit the build” and watch for any problems. The developer who breaks the build, usually gets assigned build duty the next night 😉
Even when CI/CD workflow pipelines have been up and successfully running, it is important to have the ability to run the job manually for a variety of reasons including
- To be able to re-run a job that had previously failed, and been fixed.
- To test new changes to the database and/or the build process itself.
- And to run “off-schedule” builds, perhaps that were particularly large, complex while the whole team is available to review results vs overnight, for example.
So, any CI/CD workflow pipeline should always have a manual mechanism, regardless of whether it is fully automated, scheduled, triggered etc. or not
To initiate your CI/CD workflow manually, you should be able to kick this off with ideally a single mouse-click. Examples include clicking a .BAT file, execute a PowerShell script, and clicking some button on DLM workflow pipeline client.
Scheduled
Once your CI/CD workflow has been built and tested, you can set it up to run on a schedule. This would meet the requirements, at least at the low end, of “continuous” integration, since a build that is done consistently, on a schedule, meets the classic definition of the word. (although we’ll discuss how that might not meet the “technical” definition of the word in the context of CI, CD, DLM etc.)
Accomplishing this is a simply matter of scheduling your job whether it is a BAT file, a PowerShell script or a CI process implemented via a build server like Jenkins. Once configured, your job will kick off on schedule and run unattended.
Without a designated Build-Babysitter, the team can still be notified immediately of any problems as most CI/CD workflows include a Notification step, on error. At worst, the team will be able to review the failure log the next morning, fix issues and re-run the job manually.
Jobs can be run more frequently though. If instead of running nightly, a more iterative integration process is required, the job interval can be reduced to 2x a day, or even hourly
Depending on how frequent you schedule your builds there can be a fine line between a scheduled build process and a triggered one, which we’ll discuss next.
On commit
Although many consider running scheduled builds to meet the standards of “continuous” integration, purists might argue that it isn’t true CI, unless changes are integrated in real time, so they can be immediately tested. This can be accomplished by building every time a new change is committed.
One of the many benefits of a build server like Jenkins, is the ability to automatically initiate a workflow on commit. That means that when a change is committed to the repository, it would automatically trigger an existing workflow, without any additional work. This is all done under-the-hood by the Build server software by interacting with the source control repository directly. Build triggers can be set up for other events like branching, depending on the particular Build server vendor, but we’ll focus on the simplest event, a new commit. Once set up, your DLM system would truly be continuous, in that every single commit would trigger a workflow that might drop and totally re-create your QA environment. This would ensure that your testers would be working on database changes in real time, reducing the latency between creating bugs and duping/fixing them.
But even without purchasing and deploying a 3rd party Build server, we can achieve essentially the same end, with our existing set of database development management tools. In this case, we’ll use ApexSQL Diff a tool for comparing and synchronizing database schema between various data sources such as live database, backups, source control repository, etc.
Rolling your own On-commit trigger
Although, our custom solution may lack the sophistication to detect commits at the exact moment when they happen. We can check for changes between the repository and a baseline, our QA database for example, and infer new commit(s) if there are any changes. This poor man’s solution is both effective and simple and easy to set up and accomplishes the same goal.
ApexSQL Diff has a small but powerful feature that allows it to serve not only as the workhorse of database continuous integration and delivery, but also the trigger mechanism
To set up ApexSQL Diff for this role simply requires us to utilize a Command line interface (CLI) for the ApexSQL Diff console application, available with the Professional Edition of ApexSQL Diff.
Once implemented, ApexSQL Diff will behave slightly differently, as it will now throw off a non-0 return code, even if the comparison was executed without errors, but only if the comparison set produced no changes. With this slight modification, we can now, not only use ApexSQL Diff to compare databases/repositories, but to communicate to the calling process, if the comparison set had no changes, allowing the calling process to abort
Conversely, we can get what we are really looking for, which is to determine when they have changed. So, if ApexSQL Diff compares a repository vs the baseline database and returns 0, we now know this means it has processed the comparison without errors and the comparison set is different, otherwise it would have returned a code of 102 for “No changes”. If the repository and the baseline database aren’t the same, we know that this was because of new commits
In the Appendix you can see a PowerShell example of how to interrogate this return code and branch accordingly
Empowered with this feature we can set up ApexSQL Diff to run on a schedule
-
If there were no changes,
- ApexSQL Diff will return an error code of 102 for “No changes” and close
- The calling script or application, after receiving the 102 return code, will also abort
-
If there were changes,
- ApexSQL Diff will create a synchronization script
- and then raise a return code of 0, before closing
- When the calling script, process consumes the return code of 0, it will branch and continue, executing the next step in the DLM workflow pipeline
By reducing the interval, at which the scheduled process is initiated, say to 1 hour (or even less) we can essentially simulate a “Commit trigger”, to initiate our build process on a commit. If our DLM workflow pipeline took 10 minutes to execute, from start to finish, then we might schedule the interval every 15 minutes.
Use case
In the CI workflow pipeline we have designed, we want to pull all of our objects and static data from our source control repository “on commit” to re-build our QA environment, then run unit tests against it. Our QAs can then manually review it.
To do this we are going to create a PowerShell script to execute all of the steps in our CI workflow pipeline, in sequence. Then we will set this process to run on a schedule, in our case, 15 minutes.
Note: For a full worked example, including source code of a complete DLM workflow pipeline, please stay tuned, as this article will be posted shortly on the Solution center, and the link will be added here
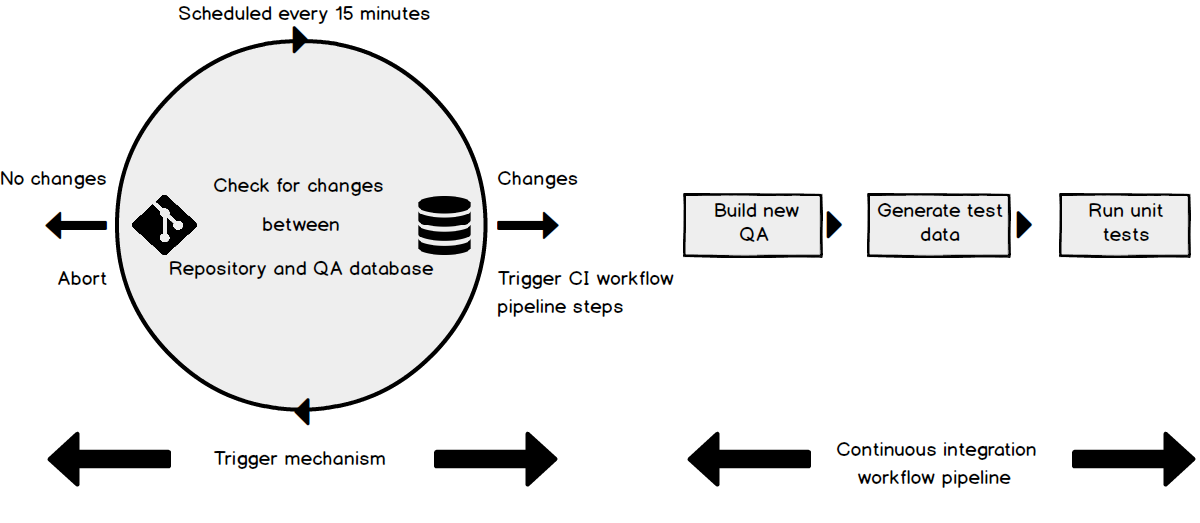
The first step of the process will “trigger” the rest of our CI workflow pipeline to execute on changes. If no changes are detected, the entire process will go back to sleep, only to be initiated again 15 minutes later
To build the initial “trigger” step we will set up ApexSQL Diff to compare our source control repository to the QA database. If changes are detected, ostensibly from a commit, it will trigger the remainder of our CI workflow pipeline, otherwise the whole process will abort. Specifically:
- If no changes are detected, then ApexSQL Diff will return 102 and abort. The calling process, upon receiving the 102 return code will similarly abort. Only to be initiated by the scheduler again in 15 minutes
- If changes are detected, ApexSQL Diff will return 0 to the calling process. Upon receiving this return code, effectively the trigger, the CI workflow process will continue to execute the remaining steps
Appendix
Here is the PowerShell code that functions as the trigger to the rest of the workflow process. It instantiates ApexSQL Diff and executes a comparison using a project file (that has preloaded data source info for our repository source and QA database target). It will return one of 3 things
- 102, if the process executed successfully but no changes were detected
- 0 if the process executed successful, but changes were detected
- An error code related to some other errors. See here for a list of all error return codes
The code demonstrates how to branch, based on the three results.
For the first example, success but no changes, the script will abort. This will be the same in the 3rd example, on error. In the 2nd example, on success but changes are detected the script will not abort, allowing downstream process to continue. Alternatively, you could explicitly call another script, in this scenario, whereas not calling it would be the equivalent of aborting.
#check if ApexSQLDiff is installed
$DiffInstallPath = Get-ItemPropertyValue -Path "HKLM:\SOFTWARE\Microsoft\Windows\CurrentVersion\Uninstall\ApexSQL Diff*" -Name "InstallLocation"
if(-not $DiffInstallPath)
{
    #ApexSQL Diff is not installed
    Write-Output "ApexSQL Diff installation not found. Install ApexSQL Diff to continue"
    exit
}
$diffLocation = $DiffInstallPath + "ApexSQLDiff.com"

#create timestamp variable for the log file
$today = (Get-Date -Format "MMddyyyy_HHmmss")

#build ApexSQL Diff compare parameters
$projectFile = $PSScriptRoot + "\" + "Compare.axds"
$outputLog = $PSScriptRoot + "\" + "CompareLog_$today.log"
$exportXML = $PSScriptRoot + "\" + "SchemaDifference.xml"
$compareParameters = "/pr:""$projectFile"" /rece /f /v /ot:x /xeo:d s t is /on:""$exportXML"" /out:""$outputLog"""

#compare the database with repository
(Invoke-Expression ("& ""$diffLocation"" $compareParameters"))

$returnCode = $LASTEXITCODE

#differences detected
if($returnCode -eq 0)
{
    Write-Output "Differences detected, call the next script.`r`nError code: $returnCode"
    #trigger next script
}
#there are no differences or an error occurred
else
{
    #no differences detected
    if($returnCode -eq 102)
    {
        Write-Output "No differences detected.`r`nError code: $returnCode"
        continue
    }
    #an error occurred
    if($returnCode -ne 102)
    {
        Write-Output "An error occurred during the application execution.`r`nError code: $returnCode"
        continue
    }
}
Downloads
Please download the script(s) associated with this article on our GitHub repository
Please contact us for any problems or questions with the scripts.
January 13, 2017


