


Performing regular database back-ups is a crucial part of any disaster recovery plan. There are many aspects that should be taken into consideration when planning long term backup strategies. It is necessary to choose the backup type and backup location and to plan how frequently to perform the backups. Additionally, the processes of verification or encryption could also be included in the plan.
For systems that contain multiple servers, automation of the process is a must. It is difficult to keep track of all the parameters, details and settings, and that is where the SQL backup policies come in handy. All of the settings could be precisely defined and applied using a single backup policy. Furthermore, the policy can be reused according to your needs or could be set up to run automatically.
There are a few ways to define and uphold the SQL backup policy. Native solutions include the configuration of SQL Server Agent or SQL Server maintenance plans.
Creating and managing SQL backup policies with SQL Server Agent
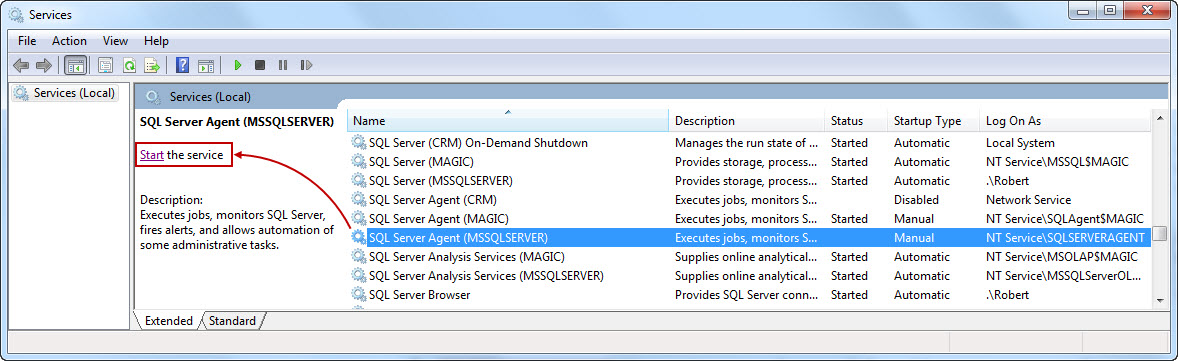
To use the SQL Server Agent job for SQL policy management, it is necessary to make sure that the SQL Server Agent Service for the respective instance is up and running. The Agent Service is running if the SQL Server Agent node in object explorer can be expanded. If this is not the case, the SQL Server Agent service needs to be started manually. Go to the Control Panel/Administrative Tools/Services. Locate the SQL Server Agent service for the specific instance, mark it, and click Start the service.
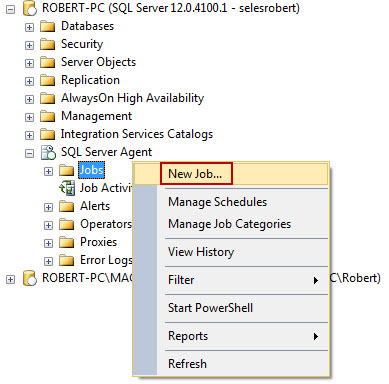
As the agent service is running, the SQL backup policy can be defined by creating SQL Server Agent jobs and scheduling them to run automatically according to your needs. Each job consists of one or more steps that are executed in the specified order. The steps are actually the T-SQL queries.
- Create the new agent job by expanding the SQL Server Agent node, right clicking on Jobs, and selecting New Job…:
- On the General page, the name for the new job should be provided. Optionally, Owner, Category, and Description could also be specified.
- On the Steps page, click on New… button to define the new step for the job.
-
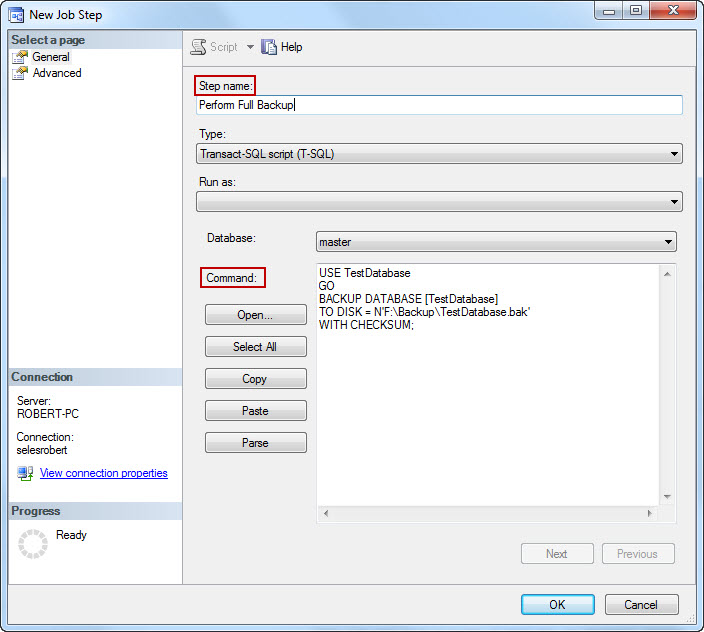
In New Job Step, enter the Step name, and provide the backup script in the Command field. Depending on the backup type that needs to be performed (full, differential, or transaction log backup), the following scripts could be used:
- Script for full database backups:
- Script for differential backups:
- Script for transaction log backups:
USE TestDatabase
GO

BACKUP DATABASE [TestDatabase] --Database that is backed up
      TO DISK = N'F:\Backup\TestDatabase.bak'--Backup path and backup name
WITH CHECKSUM;
BACKUP DATABASE [TestDatabase]
        TO DISK =   N'F:\Backup\TestDatabase.bak'
        WITH DIFFERENTIAL;
        WITH CHECKSUM;
GO
BACKUP LOG [TestDatabase]
TO DISK = N'F:\Logs\TestDatabase.log';
GO
Note that it is necessary to create at least one full database backup, in order to be able to perform differential, or transaction log backups.
-
Click Ok when done:
-
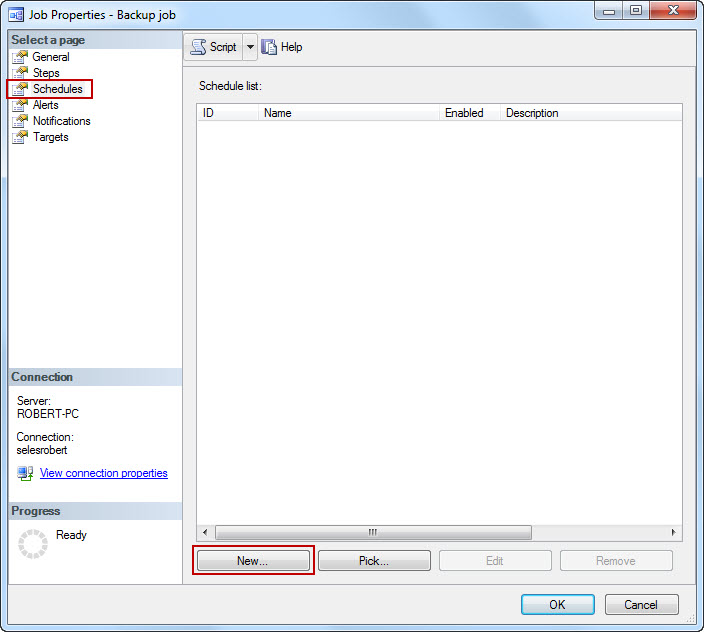
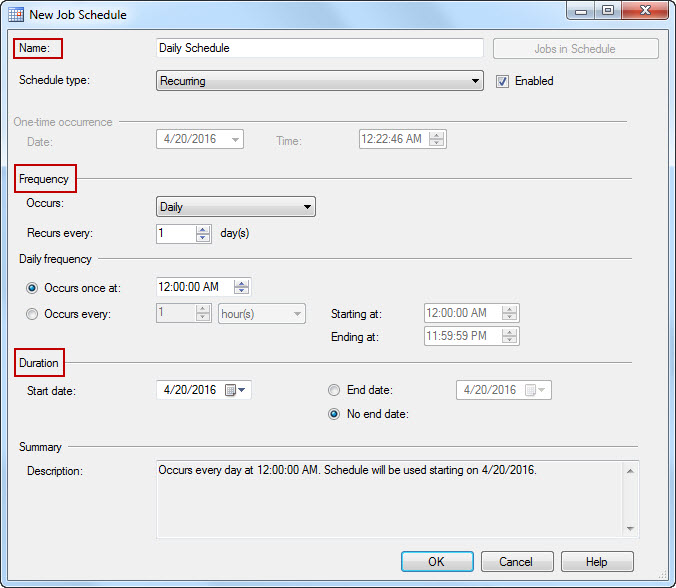
It is possible to set the schedule for the created job on the Schedule page in Job Properties. To create a new schedule, click on New…:
-
In New Job Schedule window, the name, frequency, and duration of the schedule could be specified. For this example, we will use the daily schedule, that will start immediately, with no end date. Click Ok when all required parameters are set:
- Optionally, Alerts and Notifications could be set for the job. Click Ok when done.
-
To run the job, expand the Jobs node, right click on the created job, and click Start Job at Step…:
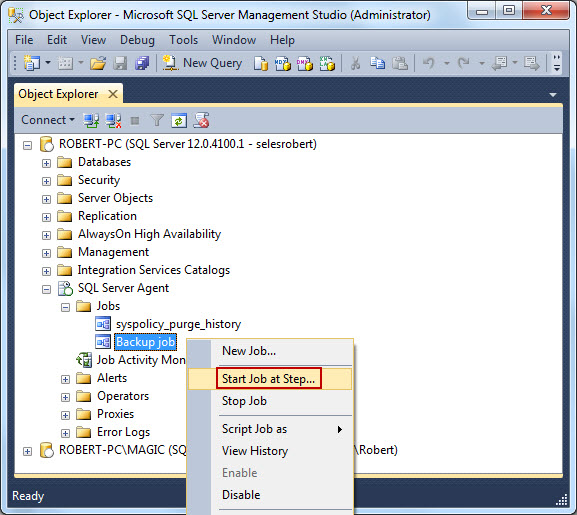
-
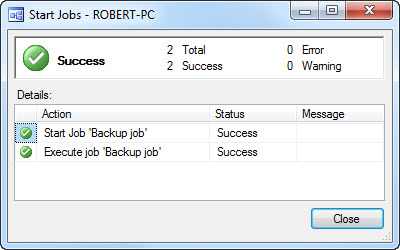
If the job is configured and executed properly, the success message should be displayed. The job defined in the example should automatically perform a full backup of the TestDatabase on the path F:\Backup, every day on 12 AM:
Backup policies and SQL Server Maintenance Plans
If we want to avoid using complex T-SQL scripts needed for the job definition, we can still create and manage policies by using SQL Server Maintenance Plans. Maintenance Plans provide a simple user interface and could be configured by the less experienced users. On the other hand, they lack the fine customization that could be achieved by using T-SQL scripts.
There are two ways to create the SQL backup policy by using SQL Server Maintenance Plans:
- Create a new plan manually
- Create a new plan with Maintenance Plan Wizard
To create a new plan manually:
-
Expand the Management node in Object Explorer. Right click on Maintenance Plans, and select New Maintenance Plan… Provide the name for the maintenance plan:
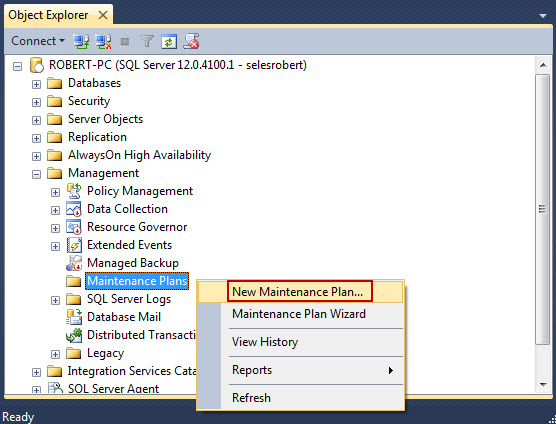
-
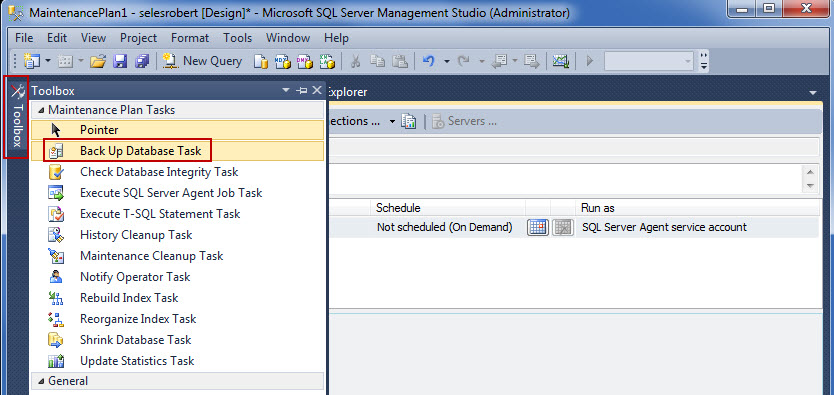
On the upper left, click on the Toolbox tab, and select Back up Database Task:
- Right click on the created task, and select Edit…
-
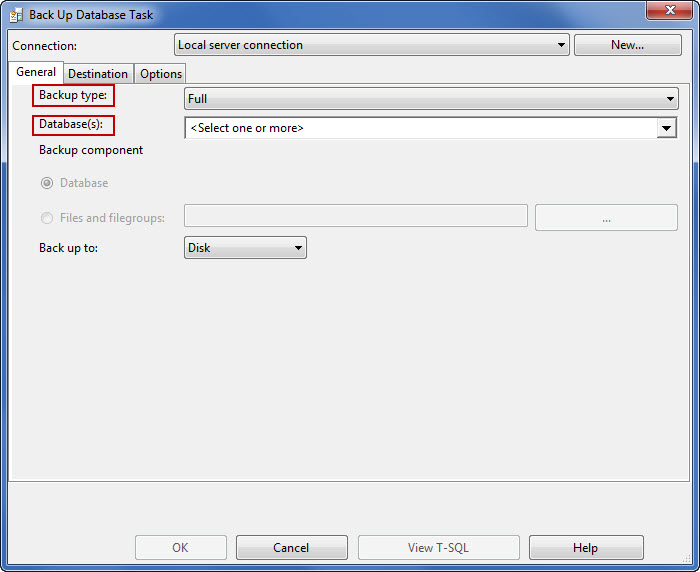
In the General tab of the Back Up Database Task, you can choose the backup type that you want to use (full, differential, or transaction log backup), and specify the databases that you want to back up:
- In Destination tab, the path for the backups should be provided.
-
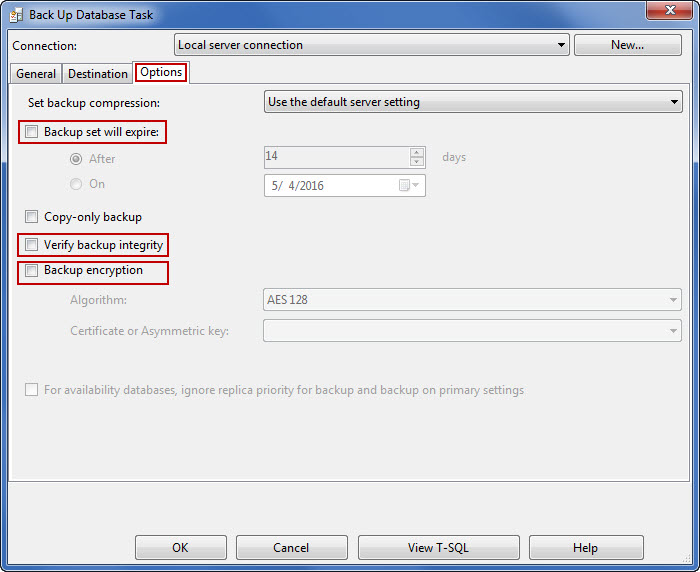
In Options tab, actions such as backup compression, backup expiration, backup encryption, and backup integrity verification can be added to the task. Click Ok when done:
-
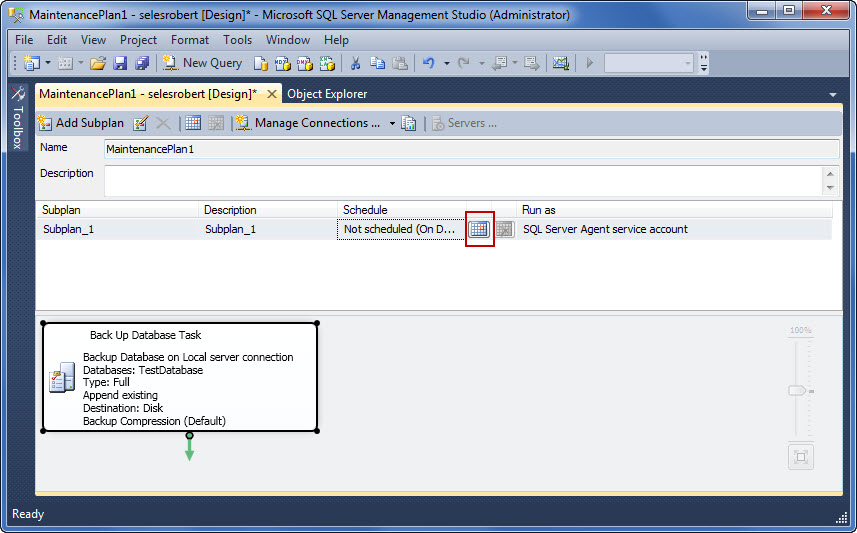
To set up the schedule for the task, select the Schedule button in the Subplan_1 row. Set the schedule according to your needs:
- Save the plan by right clicking on the upper left tab (MaintenancePlan1 in this case), and selecting Save Selected Items.
-
Saving the plan automatically creates the new Job for the SQL Server Agent with the parameters provided in the maintenance plan. To run the created job, expand SQL Server Agent and Jobsnodes, right click on the job, and select Start Job at Step…:

- If all actions complete without errors, you should get Success message
Another way to create a new plan is by using Maintenance Plan Wizard:
-
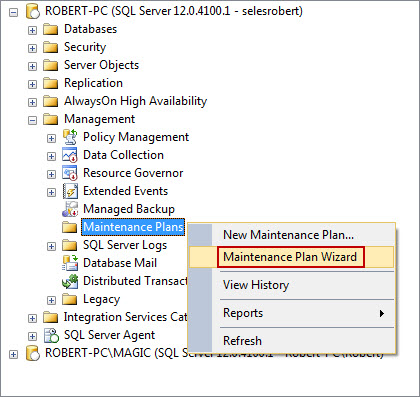
Right click on Maintenance Plans under Management node in Object Explorer. Select Maintenance Plan Wizard option:
-
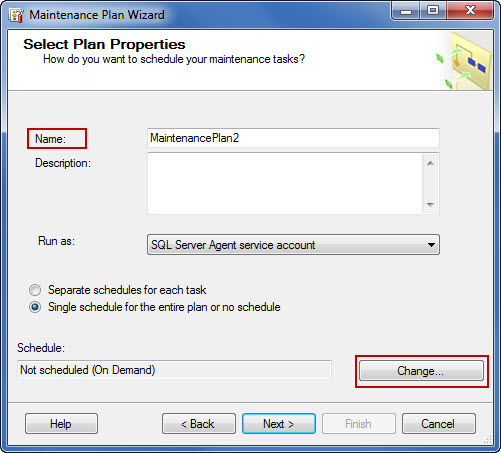
In the first step of the wizard, the name for the maintenance plan must be provided. Specify if the schedule needs to be set for each task separately, or all tasks need to run with a single schedule. If it is decided to use a single schedule for the entire plan, click the Change… button, and set the preferred schedule. When done, click Next:
-
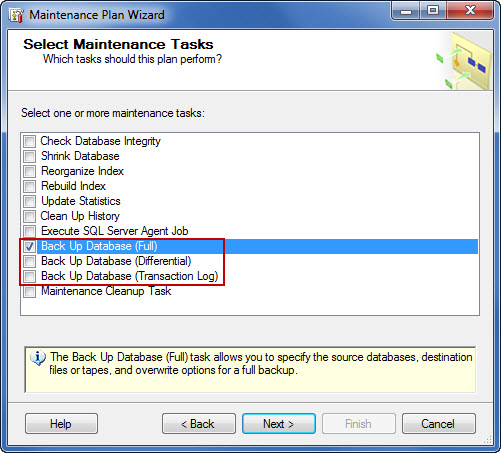
The second step lists all maintenance tasks that could be integrated into the plan. The database backup tasks are also listed. Check the box in front of the backup task(s) that should be used with this plan. Optionally, more than one maintenance task can be chosen to be included in the plan. Click Next when done:
-
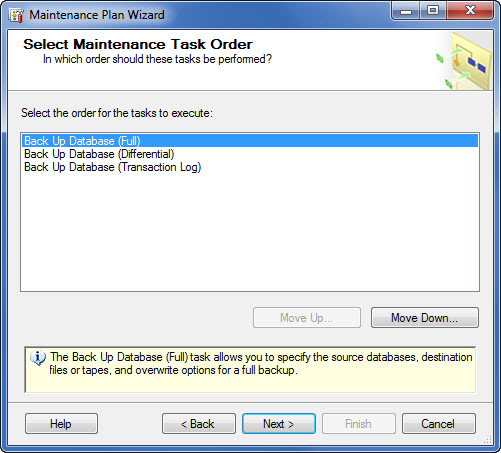
The third step allows you to specify the order for the task execution:
-
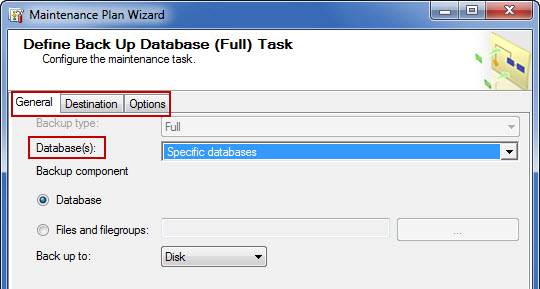
The configuration step is the same as step 6 from the previous example. In the General tab, the databases that should be backed up are selected; in Destination tab, the destination is specified; and in Options tab, additional actions such as compression, expiration, verification and encryption can be included in the task. If more than one task is selected in the previous step, the wizard will run the configuration step for each task. Click Next when done:
- Select Report Options step allows the user to save the maintenance reports, or to send them to the specified email address.
-
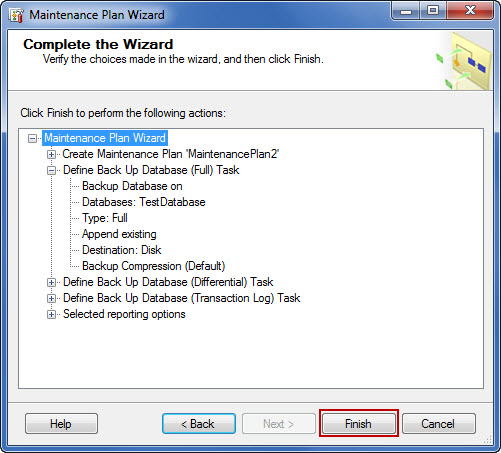
The final step lists all actions included in the maintenance task, along with the options for each of them. If everything is displayed as planned, click Finish:
- The Success message is displayed after the maintenance plan is created.
-
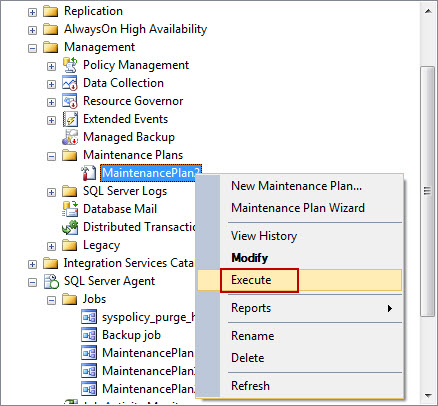
To execute the created maintenance plan, expand the Management and Maintenance Plansnodes in Object Explorer, right click on the created plan, and select Execute:
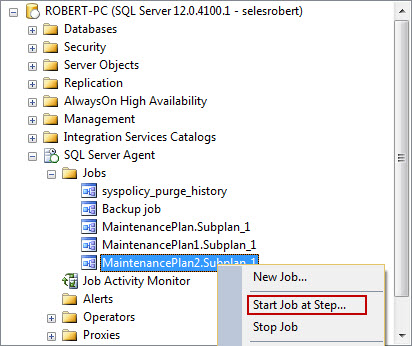
- Alternatively, you can expand SQL Server Agent and Jobs nodes, right click on the created maintenance plan, and select Start Job at Step…:
April 22, 2016 -
The configuration step is the same as step 6 from the previous example. In the General tab, the databases that should be backed up are selected; in Destination tab, the destination is specified; and in Options tab, additional actions such as compression, expiration, verification and encryption can be included in the task. If more than one task is selected in the previous step, the wizard will run the configuration step for each task. Click Next when done:


