


From time to time, DBAs find themselves in a situation where a SQL Server database becomes too large for their production environment and needs to be shrunk in size in order to free space and allocate it back to the system.
Before shrinking a SQL Server database or database files, it is very important to understand how the process works and what are the immediate consequences of the shrinking process.
Shrinking a SQL Server database is a process in which unused space that was previously in use at some point is being removed from the database. SQL Server performs this process by moving pages of data from the end of the database file to the front of it (as if in a book), filling up free space in the front pages and freeing pages closer to the end of the data file. With this, data pages at the end of the data file (that are now unused) can be reallocated back to the system, freeing the previously reserved space as a result. The shrinking process is always moving in that specific direction, from the end of the file towards the front.
When to perform SQL Server database shrink
Many SQL Server experts advise against SQL Server database shrinking, especially as a frequent and pre-scheduled maintenance action. Nevertheless, there are some critical situations where it is considered as the only valid or applicable solution:
- After a big archiving job
- After dropping large amount of tables
- After substantial changes in a table’s data types
In general, shrinking a SQL Server database is most effectively used to downsize a database file size after operations that have resulted in a very large amount of unused space; such is DROP and TRUNCATE table operations.
How to check the current size of database files
In order to display the data and log files information for a SQL Server database and check the disk space information:
- Create a standard report for the database in SQL Server Management Studio, or
- Execute ‘sp_spaceused’ stored procedure from a query
- Perform a SELECT operation over sys.database_files
-
To check data and log space information for a database from SSMS, perform the following steps:
- Start SSMS and connect to the SQL Server database engine
- In the Object Explorer panel locate the database in question, and use right mouse click to bring up the context menu
- Choose Reports / Standard Reports / Disk Usage
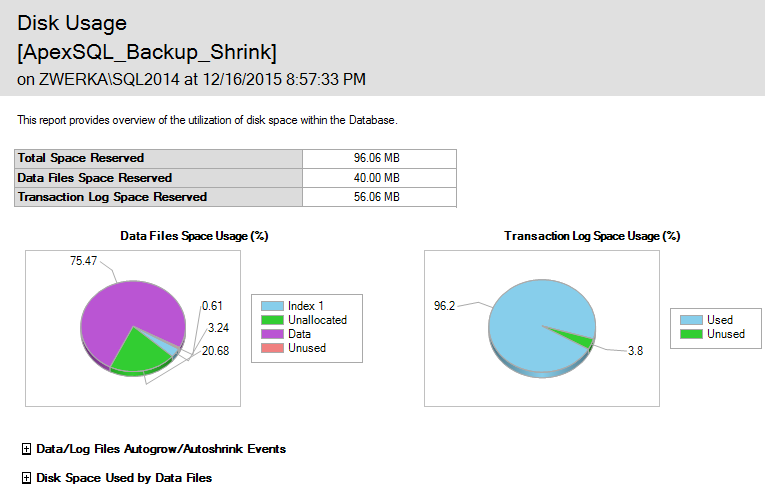
-
As an alternative to getting the data size information from SSMS, the information can be acquired by executing the ‘sp_spaceused’ stored procedure against the database
Running the stored procedure is a more convenient option, since it allows running the check against a specific table only
USE ApexSQL_Backup_Shrink;
GO

EXEC sp_spaceused N'Table_1';
GO
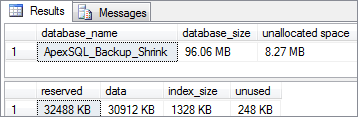
Here is an example of the results after executing specified stored procedure

-
Third option, as previously stated, is to execute the SELECT operation against the sys.database_files
USE ApexSQL_Backup_Shrink;
GO

SELECT file_id
	,NAME
	,type_desc
	,physical_name
	,size
	,max_size
FROM sys.database_files;
GO
Here is an example of the results when executing specified SELECT statement

What to consider before performing a SQL Server database shrink?
Before deciding to shrink a database, it is important to be aware of all limitations and restrictions of the database shrinking process, as well as a possible negative impact on the database and SQL Server performance.
Limitations:
- It is not possible to perform SQL Server database shrinking while a database backup process is running, and vice-versa.
- A database cannot be shrunk indefinitely. When the database was initially created, the minimum size of a database has been specified and shrinking a database can not make it smaller than this value. Even a completely empty database cannot be shrunk below 1GB if the initial minimum size has been set to 1GB
Cons:
- Shrinking a SQL Server database completely ignores logical index fragmenting, and results in massive fragmentation of all indexes. This can have a negative impact on query performance since it will take longer to ‘locate’ fragmented indexes. Performing an immediate index rebuild may solve this issue, but not completely, since it will partially negate the shrinking process and create some ‘unused’ space again to properly defragment indexes, which, to some extent, negates the results of database shrink
- Shrunken files will inevitably grow again as most production databases have at least ‘some’ activity. This means that the database file will be increasing in size, and this process takes times and utilizes not-so negligible amount of resources, which can produce performance impacts on performance-intensive environments
- Performing shrinking of multiple databases on multiple occasions may result in disk fragmentation (file system fragmentation) which can cause performance issues
- The process of page allocation will be written as an activity in the transaction log file, which can result in massive transaction log file growth, especially on databases in the full recovery model
- Subsequent shrinking and transaction log files growth will slow down database startup, restore and replication time
How to shrink a database using T-SQL
- Connect to the database engine via SSMS or other management tool.
- Execute the DBCC SHRINKDATABASE against the database in question
Note: to determine percent of maximum remaining free space in files after the shrinking process is finished, it is required to specify the % value.
e.g. Shrinking database ApexSQL_Backup_Shrink with maximum 25% remaining free space in files
DBCC SHRINKDATABASE (
		ApexSQL_Backup_Shrink
		,25
		);
How to shrink a SQL Server database with SQL Server Management Studio
- Start SSMS and connect to the SQL Server database engine
- In the Object Explorer panel locate the database in question, and use right mouse click to bring up the context menu
- Navigate to Tasks / Shrink / Database
- In the Shrink database dialog, details about database size will be provided, and an option to choose if files will be reorganized before the unused space is released
Note: if Reorganize files before releasing unused space option is checked, it will be possible to choose percent of maximum remaining free space in files after the shrinking process is finished. When this option is selected, the result will be the same as when executing DBCC SHRINKDATABASE and specifying a target percent option. If this option is not selected, the result will be the same as when executing DBCC SHRINKDATABASE with TRUNCATEONLY option.
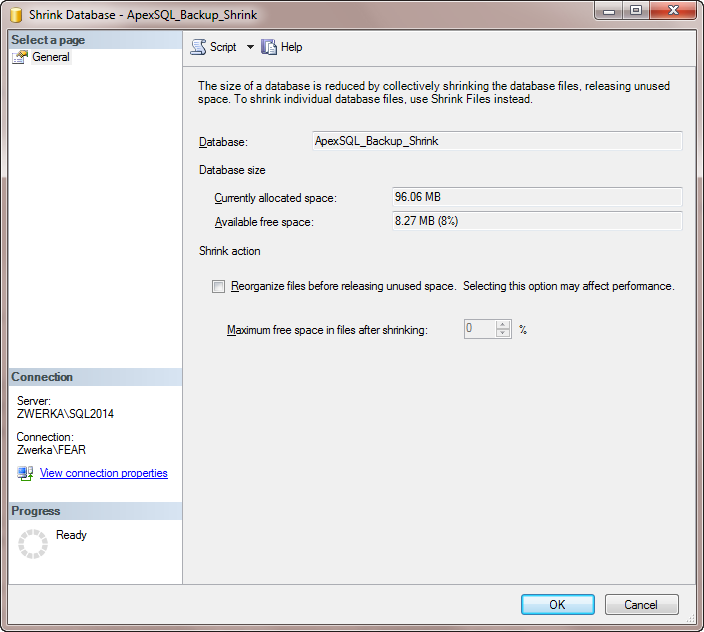
- Click on OK button to complete the shrinking process
January 4, 2016


