


In various scenarios, a SQL Server restore a database to a point in time might be required. Typically, the following situations require this type of recovery:
- A data corruption occurred by a user malicious action. For example, a user or DBA might delete or update the contents of one or more tables by mistake, drop database objects that are still required during an update to an application, or perform a large batch update process that fails
- A database upgrading process goes awry or a database upgrade script fails
- A complete database recovery after a media failure cannot be performed, because the required transaction log and database backups are missing
In either situation, a point-in-time recovery can be used to return the database data and database object to its functional state prior to detrimental action has been performed.
The ability to perform this kind of recovery depends on a recovery model set for the database. The database must be in either the Full or Bulk-Logged recovery model. In case the Simple recovery mode was used, this recovery method is not possible.
Note that in case of using the Bulk-Logged recovery model some errors may occur and recovery to a point in time might fail. An error will be thrown in case when any bulk-logged operations were performed. As such operations are minimally logged, there is not sufficient data in a particular transaction log.
Restore a database using SQL Server Management Studio
SQL Server Management Studio itself provides a mechanism to perform a database restore to a point in time. To do that, locate the database which will be restored in the Object Explorer, select the Task option in the context menu, point to Restore and then click the Database menu item.
This will open the Restore Database dialog – on the General page, use the Source section to specify the source and location of the backup sets to be used for the restore process. Additionally specify a different database name in the Destination section in order to perform a restore to another database.
Use the Timeline option to open the Backup Timeline dialog, also known as The Database Recovery Advisor feature. This dialog provides options to locate and specify backups to restore a database to a point-in-time. It ensures that only backups that are required for restoring to selected point in time are selected. Desired point in time is always used from a log backup.
Check out the knowledgebase article for additional information about creating and maintaining a full chain of transaction log backups – the chain of transaction log backups since a full database backup exists, or a full database backup, then differential database backups and then the transaction log backup chain from there up to the point in time you want data recovery.
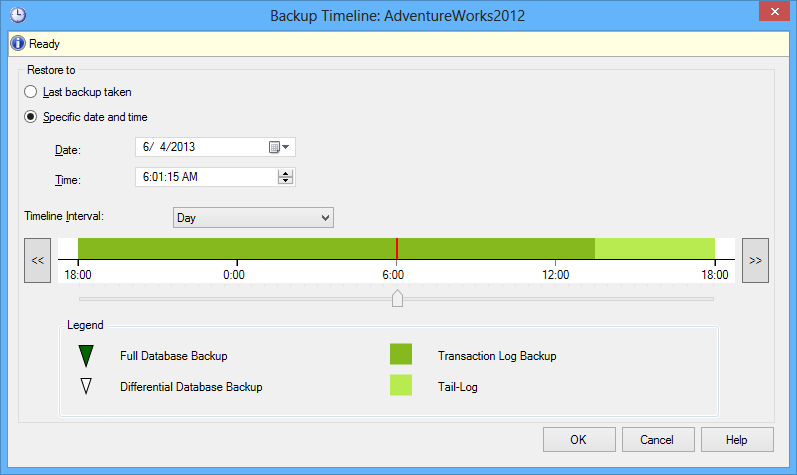
After selecting and confirming desired point in time, restoring process may be started.
Restore a database using T-SQL
This method also requires a full chain of transaction logs up to and including the transaction log that contains the point in time needed to be recovered.
The basic T-SQL for restoring to a point in time is:
RESTORE LOG database_name
FROM <backup_device>
WITH STOPAT = time, RECOVERY…
The WITH STOPAT clause ensures that restore process does not restore transactions committed after specified time (point in time) and at the same time an error will be raised if a data backup is too recent for the specified target time.
Here is an example of T-SQL which restores database to a point in time. The FILE parameter is used in case of multiple file sets in the backup device. In this example, 2nd backup set is the full database backup to be restored, followed by 3rd and 4th backup sets containing transaction log backups.
-- Restore full database backup
RESTORE DATABASE AdventureWorks2012
   FROM AW2012Backups
   WITH FILE=2, NORECOVERY;

-- Restore transaction log backup which is a part of the full chain
RESTORE LOG AdventureWorks2012
   FROM AW2012Backups
   WITH FILE=3, NORECOVERY, STOPAT = 'June 3, 2013 6:00 PM';

-- Restore transaction log backup which contains a point in time
RESTORE LOG AdventureWorks2012
   FROM AW2012Backups
   WITH FILE=4, NORECOVERY, STOPAT = 'June 6, 2013 6:00 PM';
RESTORE DATABASE AdventureWorks2012 WITH RECOVERY;
GO
Now that we described both SSMS and T-SQL recoveries, let us look at the costs of such recovery approach. There are two major disadvantages:
- All used database backups and transaction backups must be restored back which is a huge time-consuming process
- The database being recovered is unavailable for users until the recovery process completes
- The success of the recovery process is uncertain until it’s finished (e.g. in case of bulk logged operations occurrences or, if using T-SQL, incorrect specified target time)
The easy way
On the other hand, just reading online transaction logs, transaction log and database backups, in order to perform recovery to a point in time, is another option.
ApexSQL Log is a SQL Server recovery tool capable of reading transaction log data and recovering lost database data by rolling back transactions to their original state.
To perform the recovery to a point in time using ApexSQL Log:
-
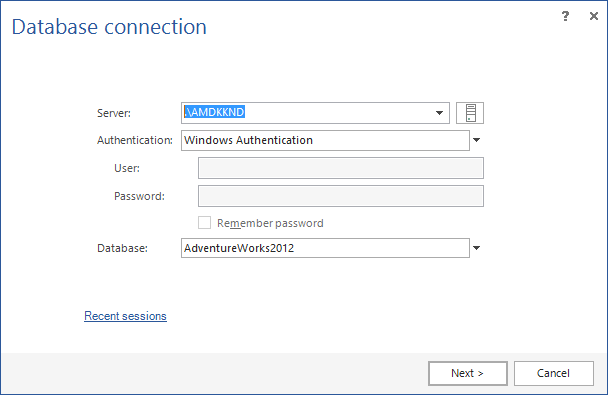
Connect to the database which will be restored
-
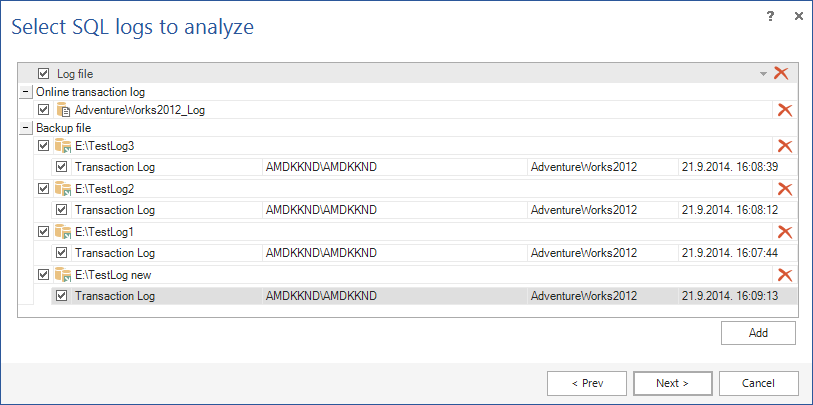
In the Select SQL logs to analyze step, add any transaction log backups and/or detached transaction logs containing the needed data – creating the full chain and providing transactions up to the point in time we want to restore.
-
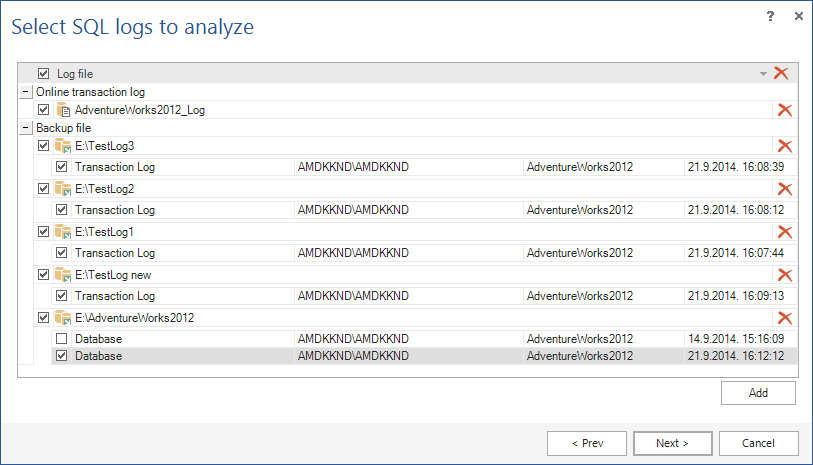
In the same step provide the full database backup which will be used as the start point from which the full chain of transactions starts
-
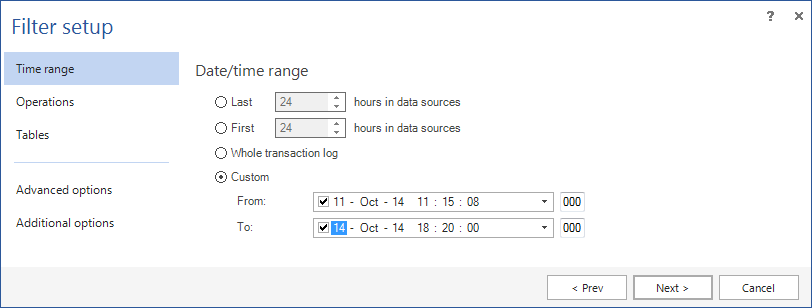
Using the Time range tab, specify the point in time which is the target for the recovery process – using the Custom option, by specifying only the From value as the target. This will narrow down the search and reading process to exactly required time point
- When all this is set, in the Result viewing options dialog click Open results in grid option
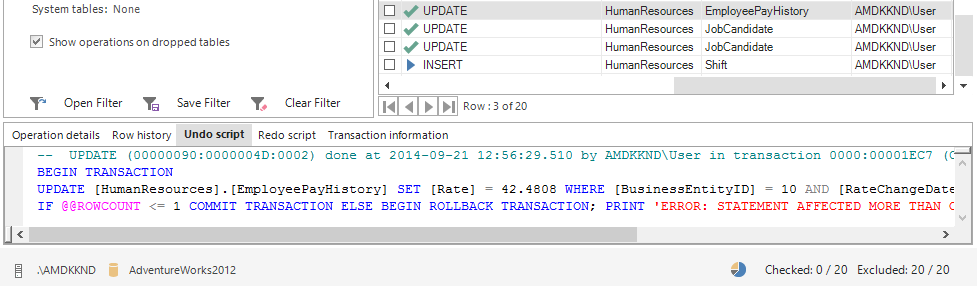
All transaction needed to be rolled back will be shown in the ApexSQL Log’s main grid when the process finishes
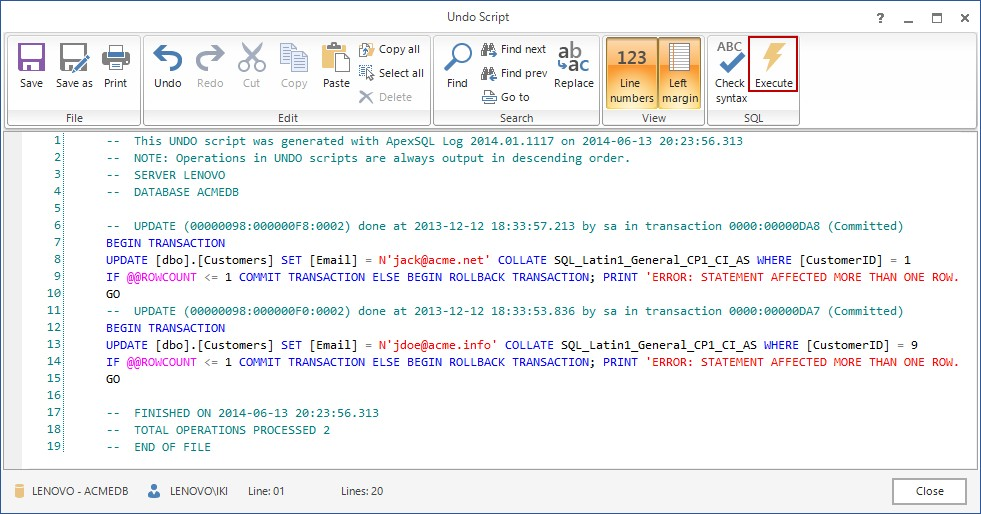
Now, all that is left is to create the undo script and execute it on the database. To do that, use the Create undo script option on the main toolbar. It will open the Undo script dialog containing the resulting undo script which may be executed immediately (using the dialog) on the connected database, or saved for later use or analysis.
Comparing to the recovery to a point in time performed via SQL Server Management Studio or T-SQL, ApexSQL Log provides visually more details (each transaction can be reviewed) and what’s more important:
- The database and transaction log backups being processed are not being applied/rolled back to the database but read, analyzed and only the final undo script is being applied, so the process is faster
- During the process, the database being restored is available as a live database
In the second part of the article series, we’ll introduce another two solutions with different approaches on how to perform a point in time restore – using ApexSQL Restore and ApexSQL Manage
Downloads
Please download the script(s) associated with this article on our GitHub repository.
Please contact us for any problems or questions with the scripts.
June 20, 2013


