


Introduction
Running and maintaining multiple SQL Server instances can often be a formidable challenge, especially if these instances run on multiple servers. It is easy enough to set up a SQL Server agent job for each server to automate the backups, but what happens if there are 20, 30, or 100 servers that need maintenance? In this scenario, configuring agents on each server would take forever, and monitoring the entire setup would prove to be a nightmare for any administrator. Of course, there are several solutions for this scenario:
- It is possible to configure Central Management Server, to define server groups, and to add one or more servers to these server groups. This way, T-SQL statements or Policy-Based Management policies could be executed on all registered servers from a Server Group at the same time. The main flaw of the CMS setup is complex monitoring and limited automation. Furthermore, only Windows Authentication is allowed when using CMS setups.
- You could create a multiserver environment. If using this solution, the Master server (MSX), and one or more Target servers have to be configured using SQL Server Agent. In this setup, jobs are initially defined on the master server. The defined jobs are then passed to, and executed on target servers automatically. The reports on the jobs that run on target servers are sent back to the master server, which makes the monitoring much easier.
Central Management Server and Server Groups
In order to configure this setup, you have to install the Central Management Server (CMS) first. Mind that you will not be able to manage databases on this server itself by using central script execution or PBM policies. Therefore, the best practice is to use a machine that does not require database maintenance as a Central Management Server. The entire process consists of a few basic steps: creating the CMS, defining new server groups, and registering new servers in these groups. Here are basic instructions for the setup using SSMS:
- Log in to a server that you want to use as a CMS
- Go to the View menu, and click Registered servers
- In Object Explorer, connect to all servers that you want to include in this setup. Be sure to use Windows authentication for all of them.
-
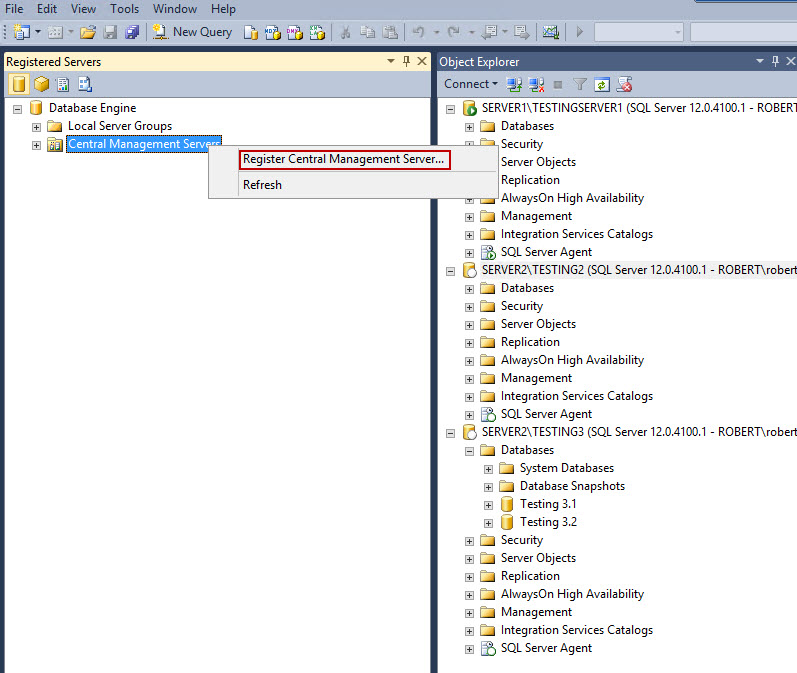
Right click on Central Management Servers, select Register Central Management Server…
-
In the Server name field, select the server that you want to use as a CMS from the dropdown menu. Optionally, you can replace the name of the registered server, or add the description for it. Click on the Test button to make sure that the connection with the server runs properly. If you get the message “The connection was tested successfully”, click the Save button to complete the CMS registration.

-
To create the server groups, right-click on your CMS. Select New Server Group…

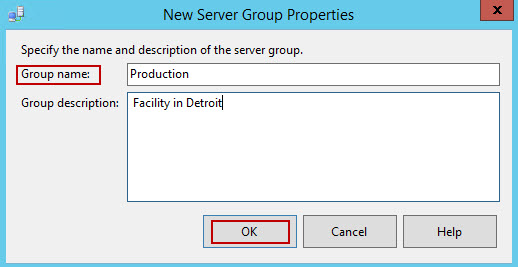
- Specify the Group name, and Group description (optionally)
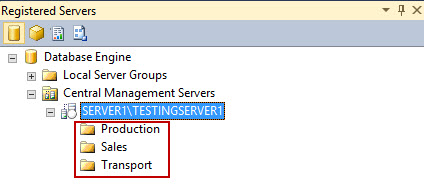
- By repeating steps 6 and 7, you can add as many groups as you need. IN this article, 3 groups are defined: Production, Sales and Transport
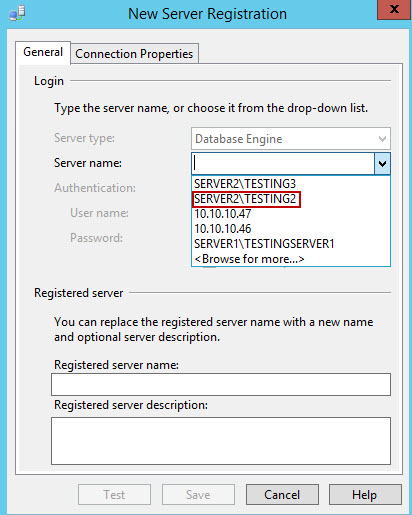
- To add new servers to defined server groups, right click on the server group, and select New server registration… From the dropdown menu in Server names, select one of the servers that you want to add to the group. Enter the registered server name and description if needed, Test the connection, and Save changes. By repeating this step, additional servers can be registered and sorted amongst server groups.
-
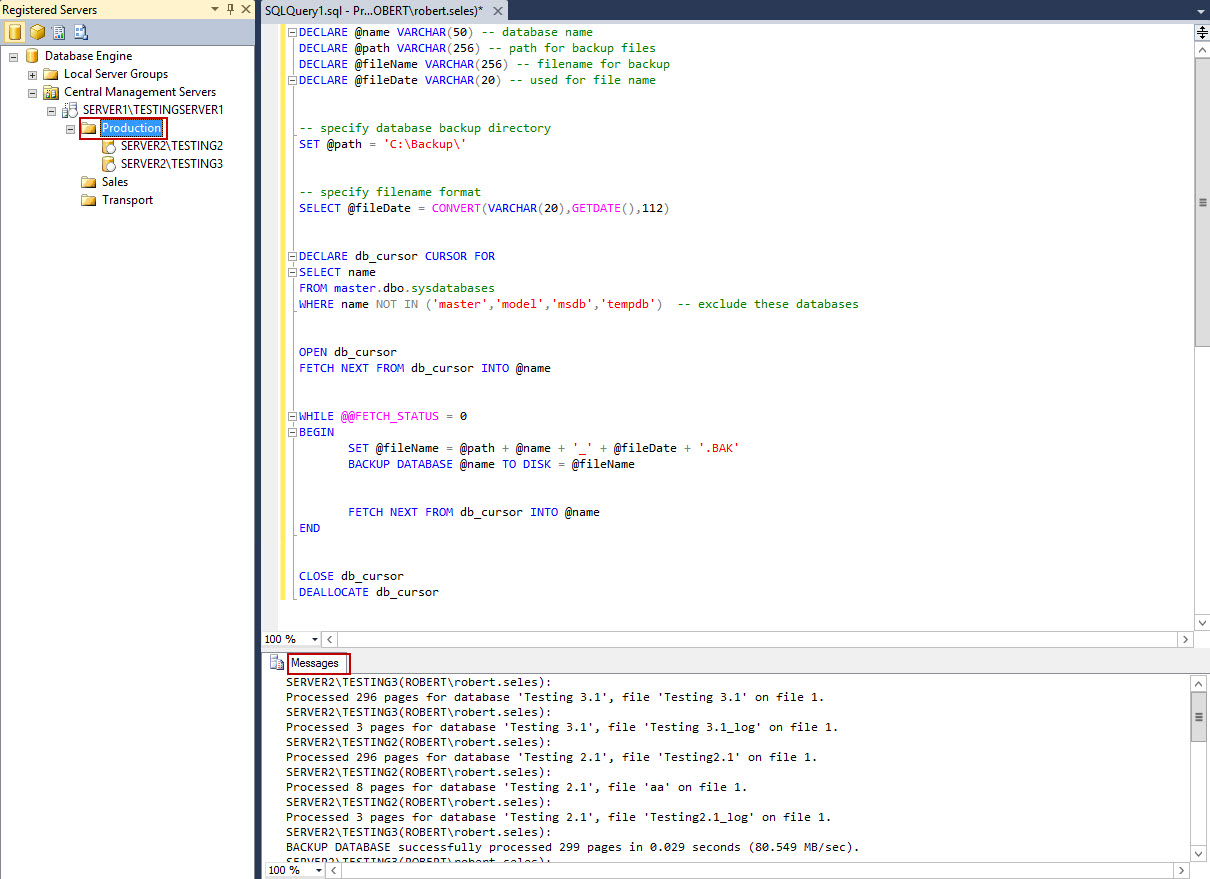
All types of queries can be run against any of the defined server groups, including backup queries. By right-clicking on a group, and selecting New query, you can define the query that runs against all servers in the selected group. In the example, the Backup query is run against all servers in the Production group. The results of the query are displayed in the lower screen, in Messages.
- Simple PBM policy can be used to monitor the status of backups. Create the policy that you want to evaluate, and run it against single, or all server groups.
Backups in a multiserver environment
To create a multiserver environment, you need to assign the master server (MSX), and to add one or more target servers (TSX) to it.
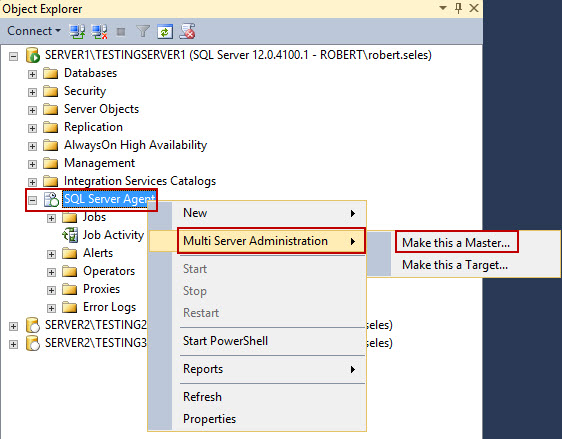
- Connect to the server instance that you want to use as a master server
- Right click on SQL Server Agent, select Multi Server Administration, and Make this a Master.
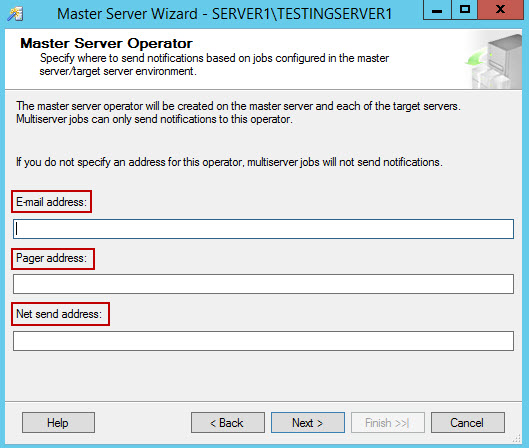
- The option will start the Master server, configuration wizard. In the first step of the wizard, addresses for the notifications could be set: E-mail, Pager, or Net send address.
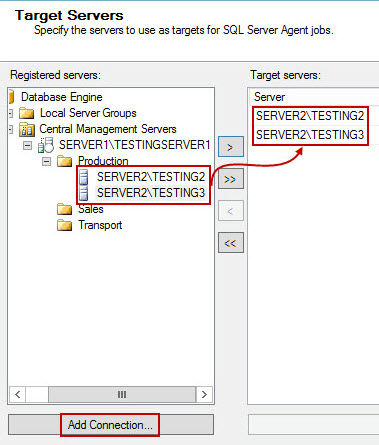
- The next step assigns the target servers. All registered servers are displayed on the left. Each of them can be used as a target server, simply by adding them to the list on the right window. If you want to add more target servers, that are not yet in the list, you can use Add connection button. Unlike the CMS setup, a multiserver environment allows SQL Server authentication when adding target servers to the list.
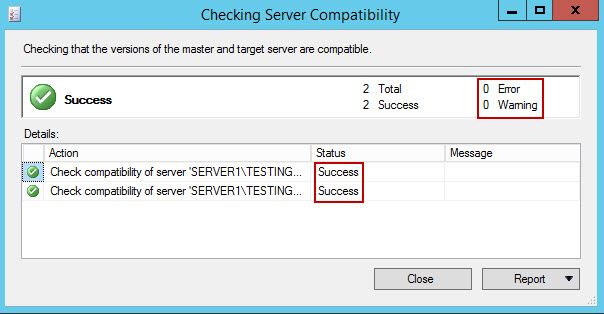
- After all servers are added, wizard checks the compatibility between master and target servers. If all processes complete successfully, click Close.
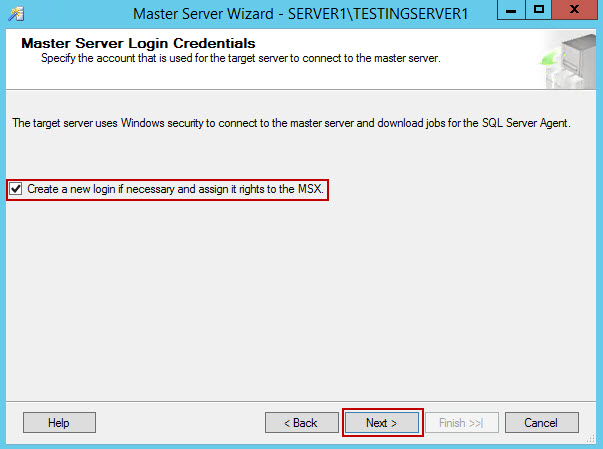
- Optionally you can specify new Login to use when connecting to target servers
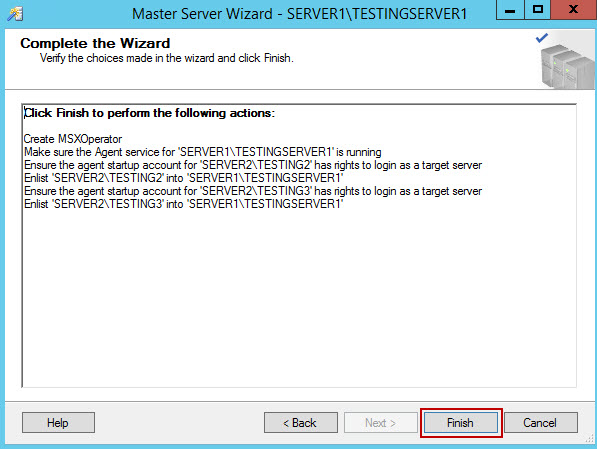
- In final step, the list of pending actions is displayed
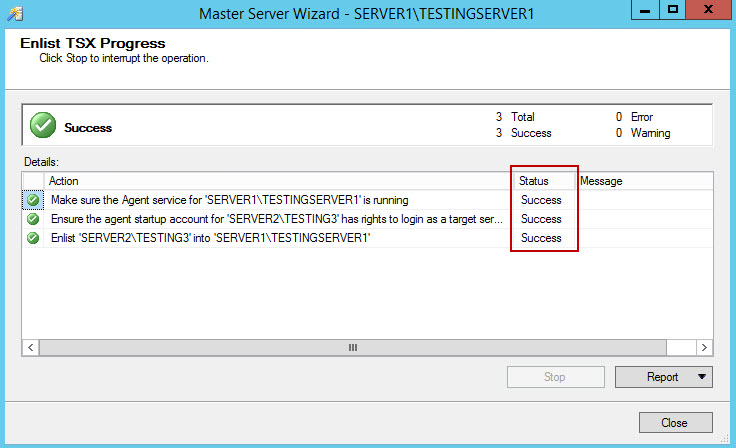
-
The wizard runs the actions from the previous step, and If all complete successfully, click close. Should you get an error, you might need to modify startup account for the target server(s), and grant it additional permission, or to make a new account. I also had to change the registry value for MsxencryptChannelOptions from 2 (default) to 0.
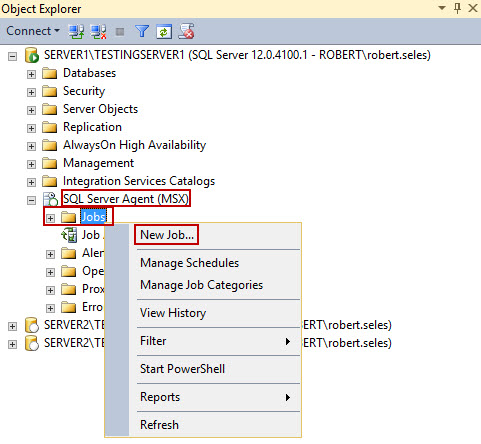
- After the multiserver environment setup completed successfully, we need to create backup jobs that will run on target servers. To create a new job, connect to the server that is used as MSX, expand SQL Server Agent (MSX), right click Jobs, and select New job.
-
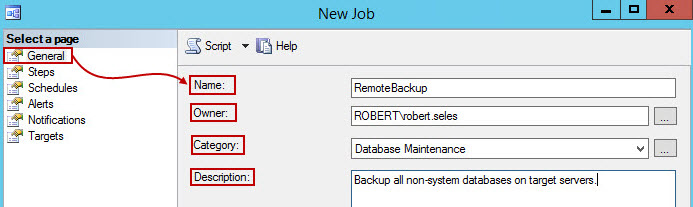
In the New Job window, General tab, the Name, Owner, Category, and Description for the job are specified.
-
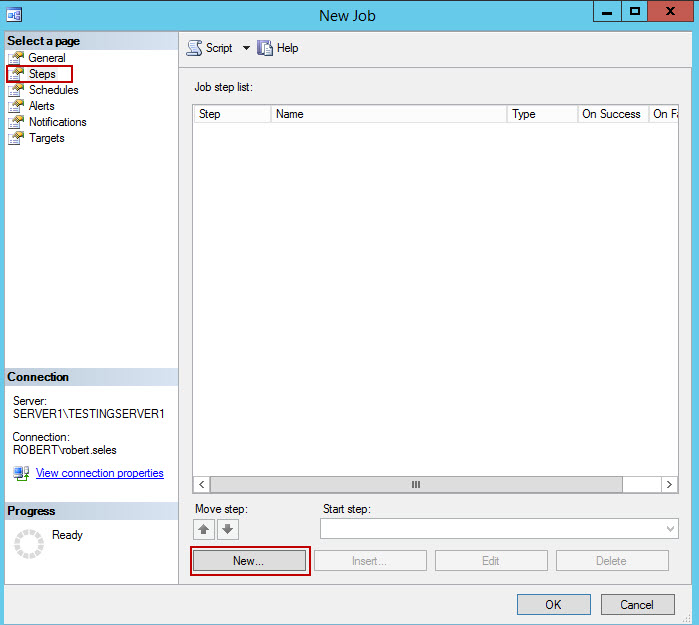
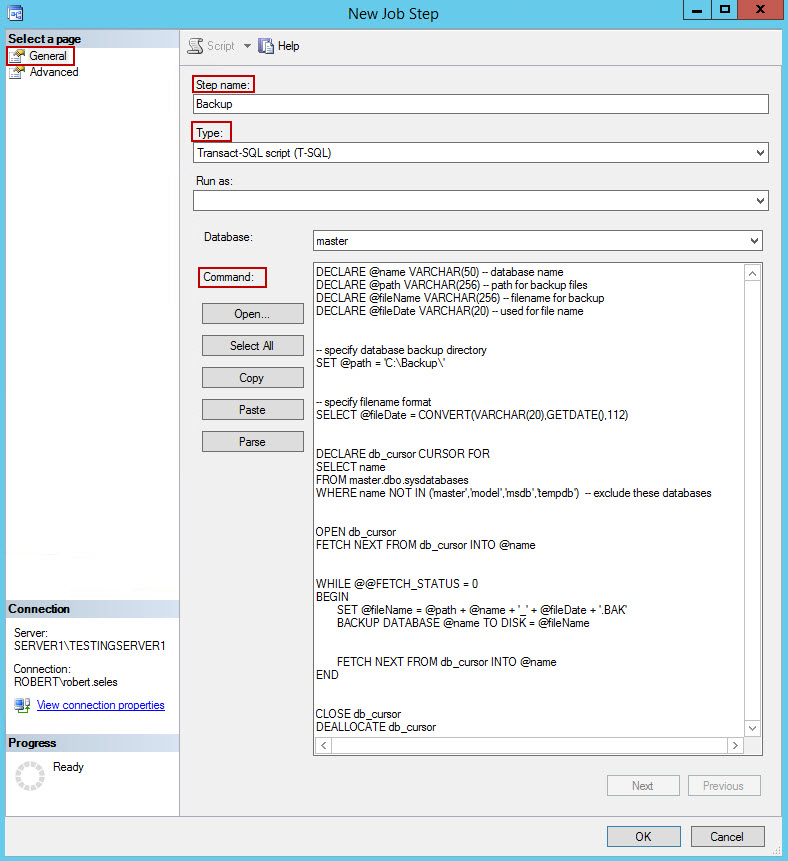
In Steps tab every step of the procedure needs to be defined. To add the first step, click New.
-
The Step name, Type, and Command need to be defined for the step. For this step, we are using the T-SQL script that backs up all non-system databases in C:\Backup\ folder. When done, click Ok. If additional steps are needed for the job, repeat this step until the job is configured according to your needs.
- Schedules, Alerts, and Notifications could also be specified for the job
-
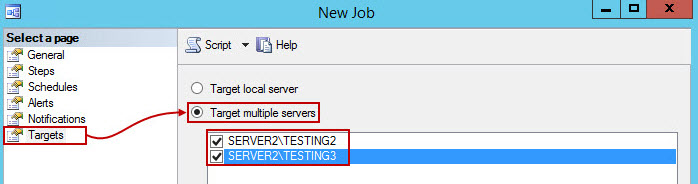
Finally, in Targets tab, select the Target multiple servers radio button, and check the boxes in front of the servers that need to be backed up. Click Ok when done.
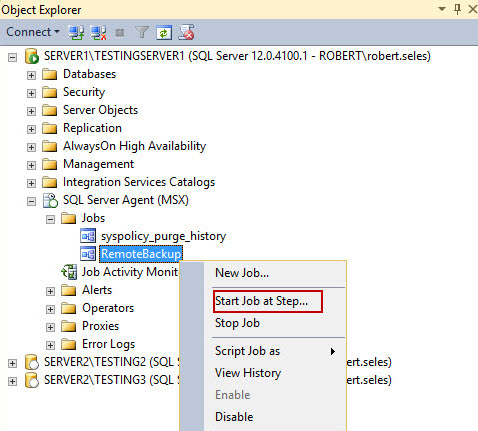
- To run the created job, expand SQL Server Agent (MSX), and Jobs. Right click on a job that needs to be done, and select Start Job at Step.
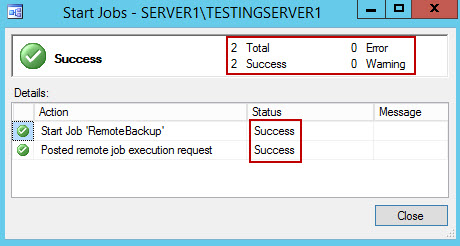
- If all is done properly, the job will execute all defined steps, and display the Success message
April 15, 2016


