


Challenge
In some cases, source control systems are not an option for a particular SQL developer team, due to cost concerns, lack of approval etc., but the requirements for such a system, or close approximation, for managing changes across the developer team can still be a priority.
In such cases, the team needs to think of another way of “uploading” their database changes in one place, comparing and even synchronizing them. One approach is to create a folder that is located on a shared network location, to which all developers have access and essentially use this as a “poor man’s source control repository.
In the following team example, everyone works with their own local copy of a database for development purposes but they will write all changes to a shared, central file folder:
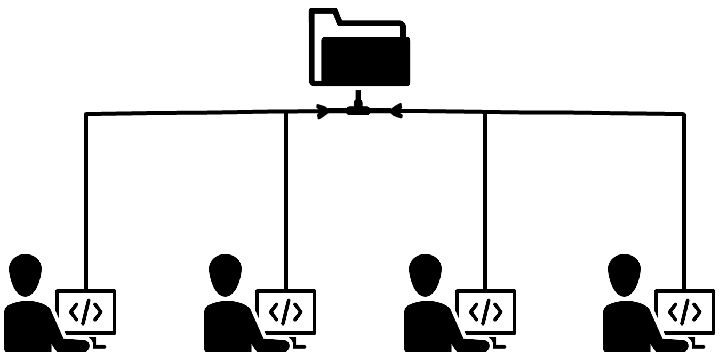
This shared folder will contain scripts of all database objects e.g. the whole database schema.
The challenge now is to keep the shared folder up to date with changes made by all developers
If any developer makes any change to their local database, they’ll need a tool that will compare the current state of their local database against the shared script folder to update those changes on the shared folder, and to also update their local development database with changes from all of the other developers on their team, via the shared folder.
Once differences are reviewed, they should be able to select specific/all objects that he wants to synchronize to a shared script folder. Additionally, the whole process should be able run unattended, when developers want to perform synchronization on a click or to schedule it. In that case, it would be useful to have date stamped comparison reports and output files that would contain all information about changes.
Solution
In this article, a tool – ApexSQL Diff will be shown as a tool that is up for this challenge, as it offers comparison of databases to script folders. It can be automatized using its CLI and scheduled to be run at specific time/date unattended.
In this example that will be described in this article, the comparison will be scheduled every 30 minutes, if there are any differences between a shared script folder and a database, a synchronization will be executed to update the shared folder, this “poor man’s” source control repository, with changes from one of the developer’s local databases. Additionally, a text file can be created that will contain server and database names for all developers and the created script will iterate through all of them, and conduct the comparison and synchronization process for each developer database.
Along with the performed synchronization, ApexSQL Diff will create date stamped HTML comparison reports of the changes and the output summary files.
Installation topography
The installation setup can be done in two different ways:
-
If one installation of ApexSQL Diff will control all synchronizations to a shared script folder, the whole setup will be:
- This single instance of ApexSQL Diff will need to be able to see all of the local SQL Servers used by developers, on the network
- Login to each individual developer database is required. Windows authentication is used in our example
- Compare the current local database against the shared script folder
- If there are differences, perform the synchronization process
- Move to the next developer database
- If a new developer is added or one leaves the team, the list that contains server and database names can be easily edited to add/remove a server/database
- If there is a need that each developer has ApexSQL Diff installed on his machine, then each developer needs to set this process to be run on a schedule, at a specific time, that will slightly different from other developers, to avoid collisions. For example, if one developer sets it to run each every day at 3 PM. The other developers can pick different times
In the example below, code is used to iterate thru a file which has a list of local databases by SQL Server name.
Set up and how it works
Before setting up the process, if a shared script folder is not created check out the article on exporting SQL data sources, so that a whole database is exported in one script folder.
The whole process can be setup first from the application’s GUI in following steps:
- Run ApexSQL Diff
-
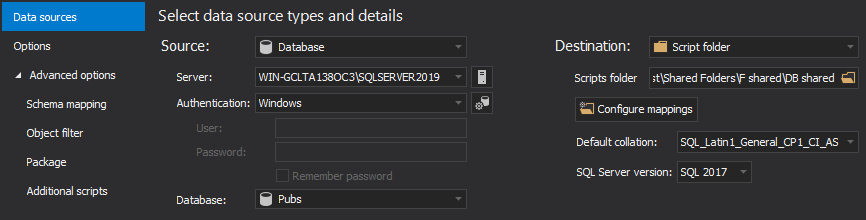
Select a database as a source and script folder as a destination in the New project window:

Quick tip:
If a database was exported to a script folder or if a database was compared and synchronized against empty script folder, the SQL Server version will be automatically loaded, but if this is the first comparison and synchronization, you should specify the same version as the version of a compared database
-
Click the Options tab and the following options in the Synchronization options section, will ensure that synchronization process is error free:

- Once everything is set, click the Compare button from the bottom-right corner of the New project window to initiate the comparison process
- After the comparison process is done, in the Results grid all compared objects will be shown by default:
-
Additional filtering of compared objects can be done from the Object filter panel on the left side of the main window:
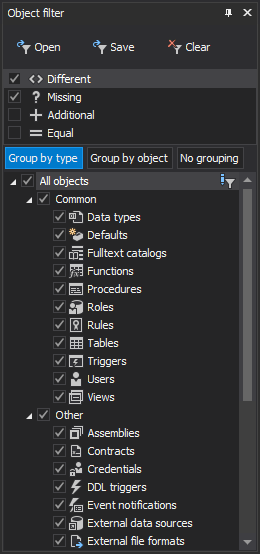
In this case, added and equal are unchecked, in order to not delete any objects that exist only in the script folder, e.g. another developer might have added these objects and we don’t want to remove them, and to not show equal objects.
-
Check all desired objects for the synchronization process and from the Home tab, click the Save button, so that the whole setup so far can be saved to a project file that will be used for automating the process:

The same project file with its settings can be used to process all databases, as the only thing that will be changed are the databases from the text file.
-
Once the project file is saved, click the Synchronize button from the Home tab to start the Synchronization wizard:

- Once it’s started, the first step will show the synchronization direction and by default it will synchronize from source to destination
-
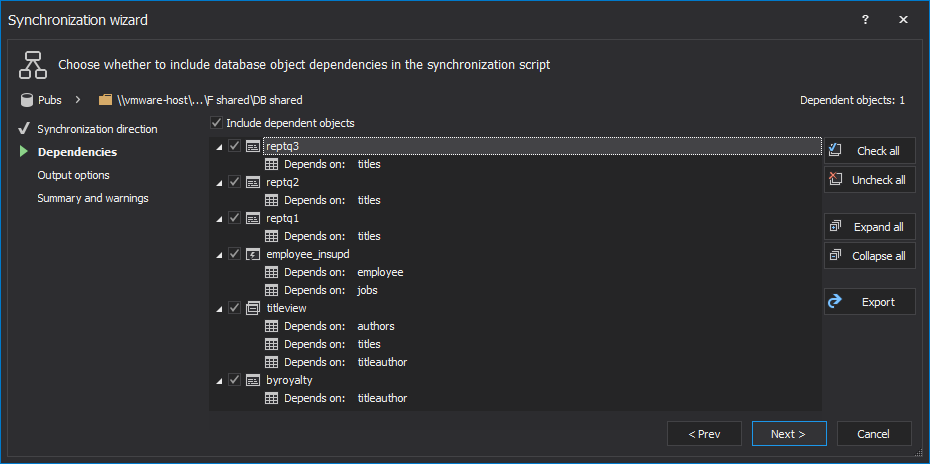
In the next step, any potential dependencies and dependent objects will be analyzed and if any dependent objects are found it will be shown:
-
In the Output options step, select the Synchronize to script folder action from the drop-down list:
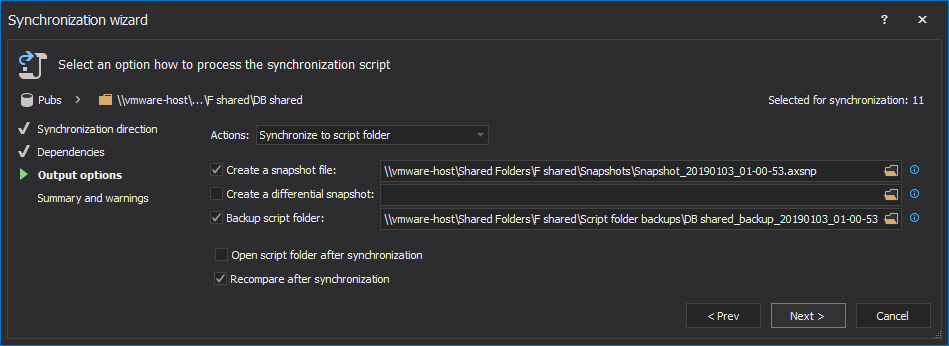
Additionally, check to create a snapshot file and backup of the script folder before the synchronization process starts, so if needed the previous state of the script folder can be rolled back.
-
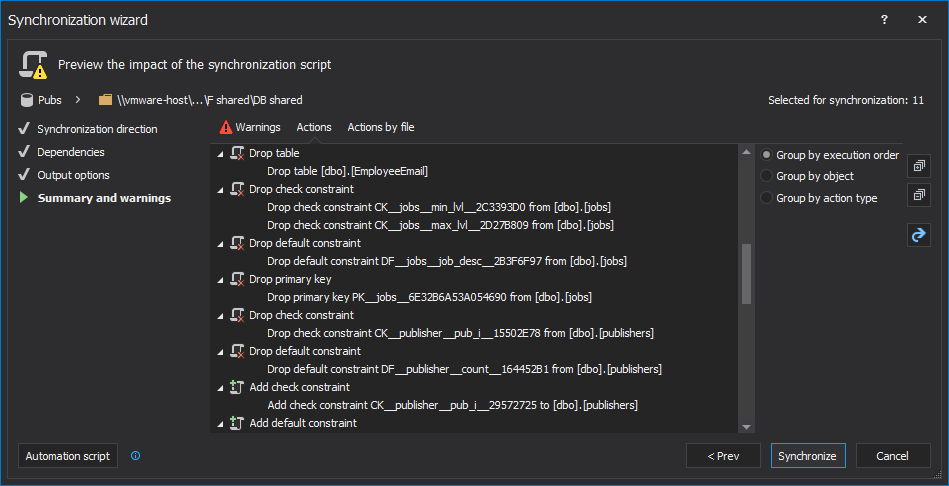
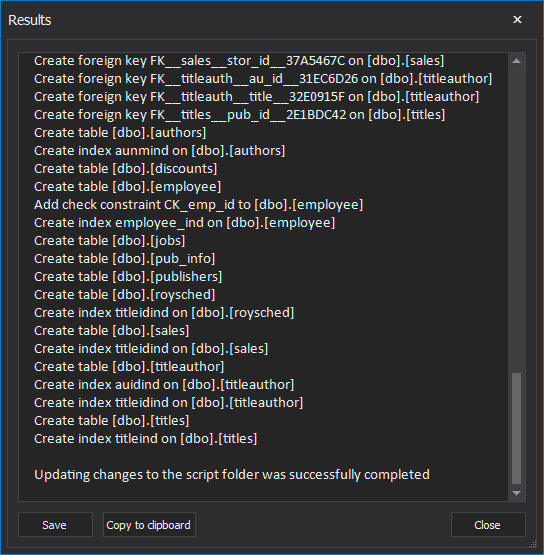
In the last step of the Synchronization wizard, actions and potential warnings can be reviewed before the synchronization process starts:
-
If everything is in order click the Synchronize button from the bottom-right corner of the Synchronization wizard and once the synchronization process is finished, the Results window will be shown:
Automation
Now, when the first synchronization to a shared script folder was finished successfully, along with creating the project file that contains all needed settings, the whole process can be automated by creating a PowerShell script.
In our example Windows authentication was used to connect to a database, but if you choose SQL Server authentication your password will be encrypted in the previously saved project file. To learn more about handling login credentials, check out the article about ways of handling database/login credentials.
We’ll now show you only the important parts of the PowerShell script, while the whole script can be downloaded below and you can use for your purposes. If you want to learn how to automatically create folders for storing all outputs, set up their locations, along with the root folder, check out Appendix A.
Let’s define location of ApexSQL Diff and text file that contains server and database names that will be used to process and
#location of ApexSQL Diff and its parameters, date stamp variable is defined, along with tool’s parameters
$diffLocation   = "ApexSQLDiff"
$serverDbsLocation = "servers_databases.txt"
Now, let’s define ApexSQL Diff’s parameters, along with the date stamped and return code variables:
#application's parameters, date stamped and return code variables:
$stampDate = (Get-Date -Format "MMddyyyy_HHMMss")
$diffParameters = "/pr:""SFSync.axds"" /ots:m d /ot:html /hro:s d t is /on:""$repLocation\ReportSchema_$stampDate.html"" /out:""$outLocation\OutputSchema_$stampDate.txt"" /sync /v /f"
$returnCode = $LASTEXITCODE
The last important part of the PowerShell script is setting up the function that will go through each server/database from the text file and call the ApexSQL Diff application to executing its parameters:
#go through each database and exeute ApexSQL Diff's parameters
foreach($line in [System.IO.File]::ReadAllLines($serverDbsLocation))
{

    $server   = ($line -split ",")[0]
    $database = ($line -split ",")[1]

    #calling ApexSQL Diff to run the schema comparison and synchronization process
    (Invoke-Expression ("& `"" + $diffLocation +"`" " +$diffParameters))

}
Additionally, all potential outcomes can be defined and each one can be processed in specific way. If you’re interested in defining these potential outcomes, learn more about it from article on Utilizing the “no differences detected” return code.
E-mail system
In addition to previous automation of the process, e-mail system can be set to inform you about any changes or errors. To learn more about it, check out the article on How to setup an e-mail alert system for ApexSQL tools.
Scheduling
Since the whole process is now automated with a PowerShell script, the process can be now easily scheduled in a couple of ways. Learn more about the ways of scheduling ApexSQL tools.
Reviewing outputs
Once the whole system is up and running for a while, all created outputs can be reviewed anytime by all developers, since the folder that contains HTML reports and output summaries is located on a shared network location:
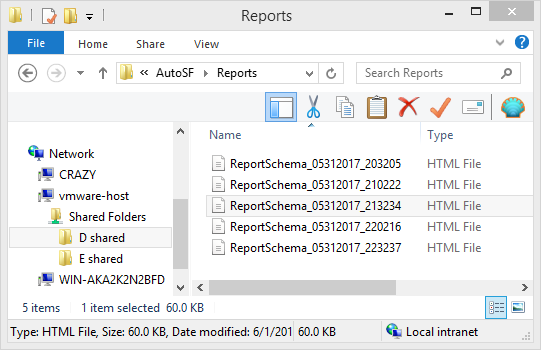
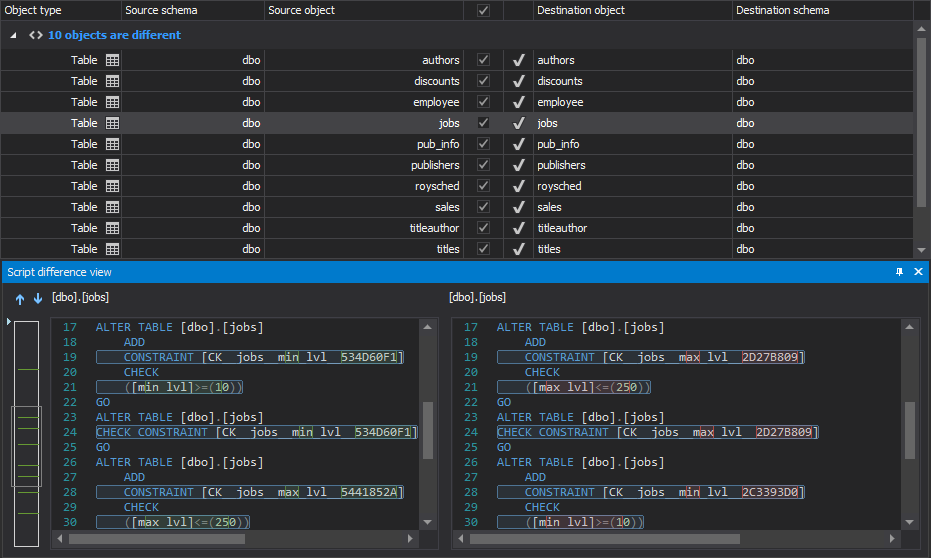
If there is a need to review a specific HTML report, it can be easily identified as all of them are date stamped and by opening it, all comparison differences can be reviewed:
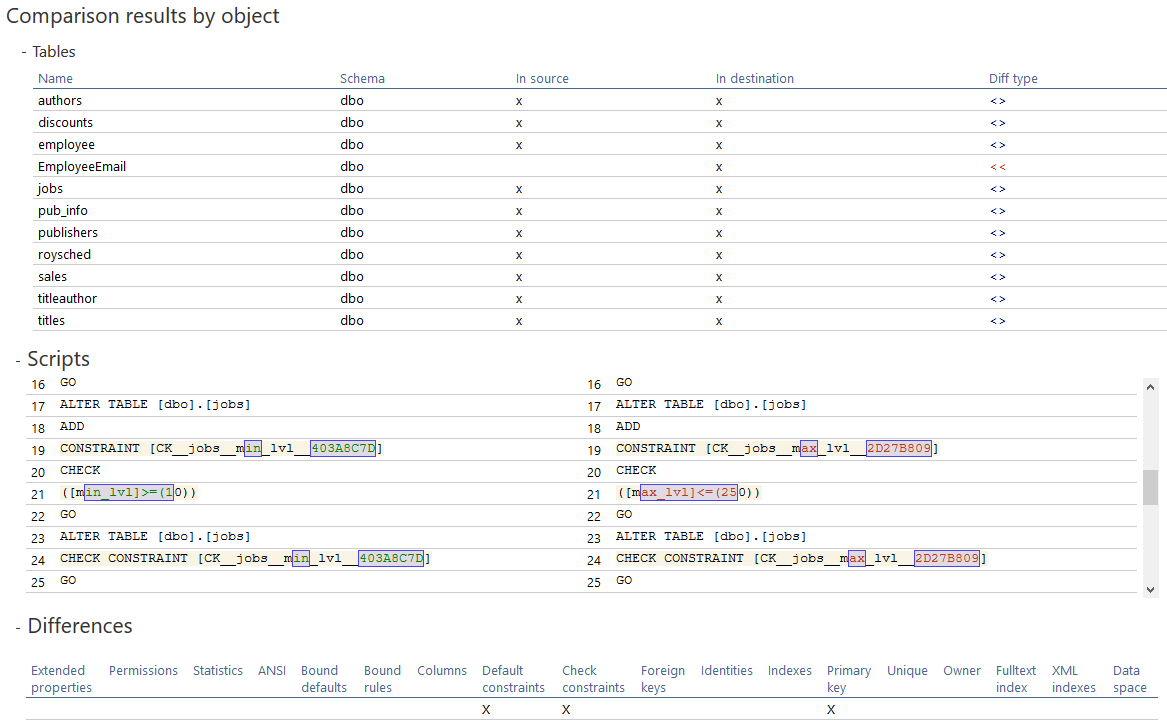
If an e-mail system was set up and an e-mail was received with a subject “ApexSQL Diff synchronization error”, the latest output summary will be attached in received e-mail and it can be analyzed to see what went wrong. Once the attached output summary is opened the following is shown:
An issue occurred during application execution at 05312017_214538.
Return code: 2
Error description: Switch ‘of’ is not recognized
With a quick check of the common return error codes in the article General usage and the common Command Line Interface (CLI) switches for ApexSQL tools, it can be concluded that the /of is invalid switch and it doesn’t exit.
By identifying who run the last synchronization, checking out the CLI switch used as a parameter and comparing it with CLI switches in the article ApexSQL Diff Command Line Interface (CLI) switches, we can quickly identify that /of is not a valid switch and that /on switch should be used instead.
Downloads
Please download the script(s) associated with this article on our GitHub repository.
Please contact us for any problems or questions with the scripts.
Appendix A
In addition to explained automation process, we can also create a function that will check and create needed folders for all outputs:
#existence check and creating of Outputs and Reports folders
function CheckAndCreateFolder
{
    param
    (
        [string] $rootFolder,
        [switch] $reports,
        [switch] $outputs
    )

    $location = $rootFolder

    #set the location based on the used switch
    if ($reports -eq $true)
    {
        $location += "\Reports"
    }
    if ($outputs -eq $true)
    {
        $location += "\Outputs"
    }
    #create the folder if it doesn't exist and return its path
    if (-not (Test-Path $location))
    {
        mkdir $location -Force:$true -Confirm:$false | Out-Null
    }
    return $location
}
The next thing is to define the root folder and locations of the outputs folders:
#root folder
$rootFolder = " \\vmware-host\Shared\AutoSF"
|
Quick tip: In this case, the root folder should be located on a shared network location (next to the shared script folder), so that all developers could easily review all outputs |
#location for HTML reports
$repLocation = CheckAndCreateFolder $rootFolder -Reports

#location for schema output summaries
$outLocation = CheckAndCreateFolder $rootFolder -Oinstalutputs
June 5, 2017


