


Challenge
As it was explained in article on How to automatically compare and synchronize SQL Server database objects with a shared script folder, this article will explain the solution for the reverse process, when changes needs to be pulled from a shared script folder to a local database. This might be helpful if a developer returns from vacation and wants to catch up to the team with all changes or if a build has been tweaked, as part of a recent test/delivery and the latest version needs to be re-propagated directly to all developers via their local development database.
As explained in the mentioned article, a setup is created where all database changes that developers made on their local database are uploaded to a shared script folder.
Now, the challenge is to maintain all developer local databases updated with latest changes that a shared script folder could contain:
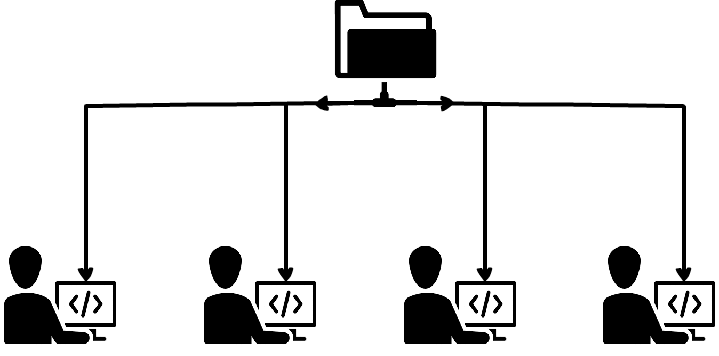
The system in this case implies that:
- One developer has committed a few changes to script folder. Let’s say that a new procedure is created, a table has been modified, and a table is dropped
- Other developers need to have a tool that is capable to compare their local databases with a shared script folder and recognize all differences that exist between compared data sources
- After reviewing differences, developers should have an option to select all/specific objects that need to be synchronized to a developer’s local database
In addition, a described system should be also capable to run unattended, when a synchronization could be processed without previous review of detected differences, on a schedule or on a click. When running unattended synchronization, it would be helpful to have date/time stamped comparison reports and/or summary files that will contain all required information about any performed changes.
Solution
As a third-party solution tool, ApexSQL Diff was used for this article, because it can pull changes from a shared script folder, and to compare and synchronize it with a database. It also offers automatization with its CLI, which can be scheduled and run unattended at specific date/time.
In the following example, a scheduled comparison will be run every 20 minutes and if any differences are detected between a local developer database and a shared script folder, the synchronization process will be performed to apply changes to local databases of all developers. In order to apply changes to all developer’s databases, the created script for automating the process will iterate a text file, that will be created as well, and it will contain names of all servers and databases.
For each conducted synchronization, ApexSQL Diff will create date/time stamped HTML comparison reports and detailed output summary files.
The installation topography will be the same one used in article on How to automatically compare and synchronize SQL Server database objects with a shared script folder.
Prerequisites for system setup
Before moving on with setting up the system in this article, make sure that:
- A shared script folder is created. If it’s not set up, check out the article on how to export SQL data sources, so that a database with latest changes is exported to a script folder
- A system to update a shared script folder with latest changes is set up. If not, check out the article on How to automatically compare and synchronize SQL Server database objects with a shared script folder
Setting up the system
Once all perquisites are set up, let’s set up the whole system from the ApexSQL Diff’s GUI:
- Start ApexSQL Diff
-
Under the Data sources tab in the New project window, select the Script folder as a source (provide path to a shared script folder) and set a local developer database as destination:
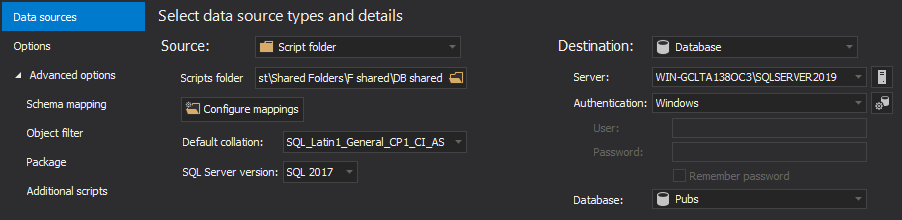

Quick tip:
In order to avoid any unnecessary differences between a compared script folder and a database, set the same SQL Server version for script folder, as a compared database. By default, if any of two mentioned perquisites was done, SQL Server version for script folder will be automatically loaded
-
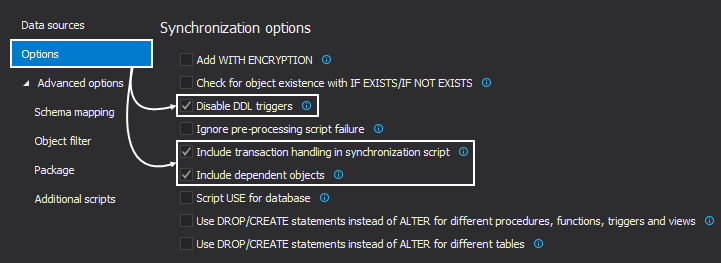
In order to ensure that synchronization process will be error-free, click the Options tab, and check the following options under the Synchronization options section:
- After data sources are set, along with the desired options, in the bottom-right corner of the New project window, click the Compare button
-
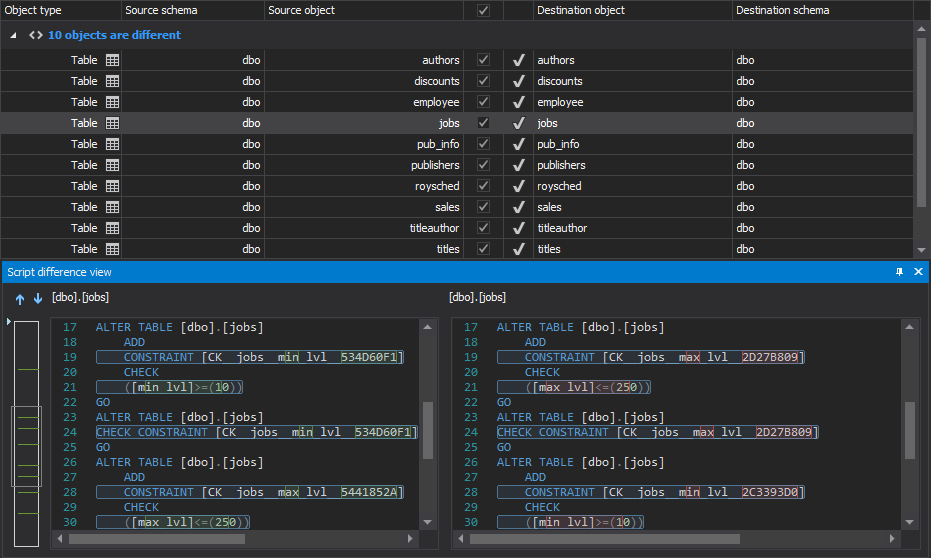
Upon the finished comparison process, compared object with their differences will be shown in the Results grid:
-
Check all/specific objects in the Results grid and click the Save button, under the Home tab of the main application window, so that all project options are saved to a project file:

Once saved, a project file can be used in the automation of the process and it can be send to other developers, as all of them will use the same settings, apart from different name of the destination database, but that database name can be easily changed in the mentioned text file.
-
After the project file was saved, from the Home tab of the main application window, click the Synchronize button to initiate the Synchronization wizard:

-
After reviewing the synchronization direction in the first step and which data source will be synchronized, in the Dependencies step, all objects will be analyzed for potential dependent objects and all of them will be shown here:

-
In the following step, choose the Synchronize now action, to perform direct synchronization to a local database:

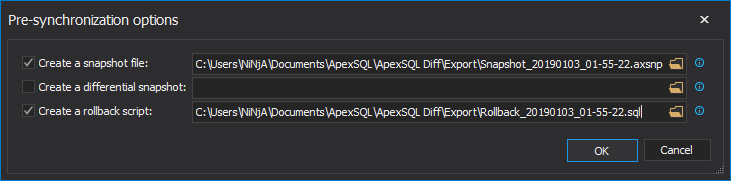
Additionally, a destination database backup can be created and if clicked on the More pre-sync options, the below window will be shown and it will allow to:
- Create a snapshot file – it will create a snapshot of the destination database schema
- Create a rollback script – create a rollback script that will undo all changes that were made on a destination database
-
The last step of the Synchronization wizard, the Summary and warnings step, will provide information about actions that will be performed and it will show any potential warnings:

- Once all actions and warnings are reviewed, in the bottom-right corner of the Synchronization wizard, click the Synchronize button to initiate the synchronization process
-
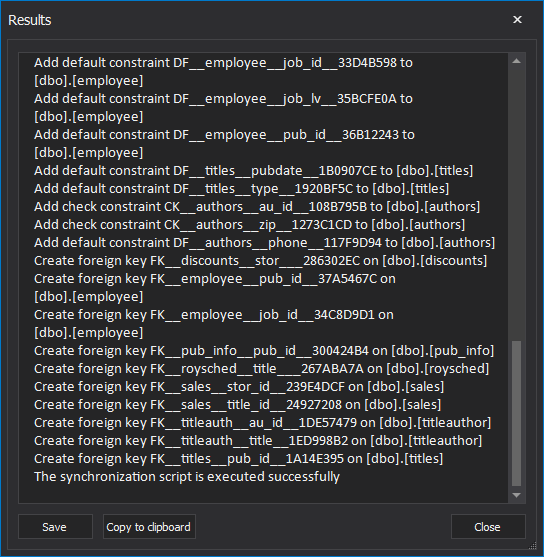
Upon finished synchronization process, the Results window will be shown with detailed information:
System automation
To automate this system, a PowerShell script will be created that will process ApexSQL Diff’s CLI switches, along with the saved project file and all options and settings from it. Also, a PowerShell script will go through all server/databases specified in a text file and initiate the comparison and synchronization.
Windows authentication was used in provided example to connect to each local database. However, if there is a need to use SQL Server authentication, the saved project file will encrypt login password. If a login name and password should be provided on start of each process via a prompt window, read an article about ways of handling database/login credentials, that contains information how to do it, along with other ways to handle login credentials.
In the follow part of the article, only the most important parts of the PowerShell script will be shown and explained, and the complete script can be downloaded at the end of the article and it can be customized for your usage. Also, in Appendix A, learn more about how to create folders and locations for outputs automatically, along with defining the root folder.
The first important thing is to define ApexSQL Diff’s installation location and location of the text file that contains of database and server names that will iterated through:
#define paths of ApexSQL Diff and text file with database and server names
$diffPath = " ApexSQLDiff"
$dbsServersPath = " databases_servers.txt"
The next step is to provide all required ApexSQL Diff’s CLI switches and variables for time/date stamp and return code:
#define ApexSQL Diff CLI switches and variables for time/date stamp and return code
$timeDateStamp = (Get-Date -Format "MMddyyyy_HHMMss")
$diffSwitches = "/s2:""$server"" /d2:""$database"" /pr:""SFtoDBSync.axds"" /ots:d m /ot:html /hro:s d is t /on:""$repPath\SchemaRep_$timeDateStamp.html"" /out:""$outPath\SumOut_$timeDateStamp.txt"" /sync /v /f"
$returnCode = $LASTEXITCODE
Any potential outcome can be defined, along with how to process each action for an outcome. Check out the article on how to define any potential outcome and how to utilize the “no differences detected” return code.
Scheduling the system
As now everything is automated using the created PowerShell script, the whole system can be scheduled to run unattended. To learn more about how to schedule it, check the article about the ways of scheduling ApexSQL tools.
E-mail notification system
To further improve the automated process and get notification of any changes or errors, an e-mail system can be set. With this system, after each comparison, a developer will get an e-mail that will contain a file with details if any change or error occurred. For example, if a couple of objects are added/different, a developer will get information about the names of those newly added objects or the exact difference between existing ones. Learn more in the following article on How to setup an e-mail alert system for ApexSQL tools.
Checking outputs
Now that system was running for a while, any of outputs can be accessed from its defined path (check Appendix A) anytime, and each created output can be viewed anytime:
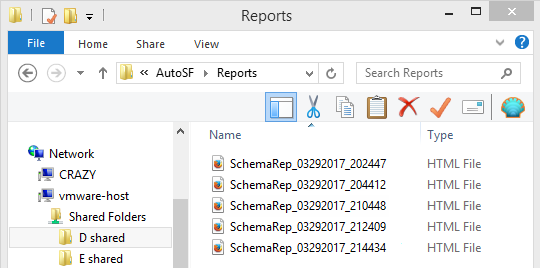
For example, if a developer is particularly interested for a specific comparison and wants to review what has been changed, he can identify a desired HTML report, because each HTML report is time/date stamped, and open it for reviewing:

Additionally, if the e-mail notification system is set, two types of e-mails can be received:
- E-mail with the subject “ApexSQL Diff sync results”, if differences were detected, the synchronization process was successful and the corresponding HTML report is attached for reviewing
- E-mail with the subject “ApexSQL Diff error occurred”, if an error occurred during the synchronization or in any part of the whole process and the latest summary output is attached for reviewing
Let’s say that an error occurred and the corresponding summary output is opened:
An error occurred during the application execution at: 06292017_232739.
Return error code: 2
Error description: Switch ‘pf’ is not recognized
By taking a quick glance of the article about General usage and the common Command Line Interface (CLI) switches for ApexSQL tools, and checking the common return code section for the shown return error code 2, it can be determined that the /pf switch is incorrect switch alias.
The next step is to review the used CLI switch, what was it used for, and found the correct switch in the article about ApexSQL Diff Command Line Interface (CLI) switches. After reviewing and comparing the used switch, it can be determined that the /pf switch should be replaced with the /pr switch.
Downloads
Please download the script(s) associated with this article on our GitHub repository.
Please contact us for any problems or questions with the scripts.
Appendix A
As mentioned above, this appendix will explain and show how to use a PowerShell function to check for folder existence and create the needed output folders:
#check existence and create output folders
function FolderCheckAndCreate
{
    param
    (
        [string] $rootPath,
        [switch] $reps,
        [switch] $outs
    )

    $path = $rootPath

    #the path is set based on the used switch
    if ($reps -eq $true)
    {
        $path += "\Reps"
    }
    if ($outs -eq $true)
    {
        $path += "\Outs"
    }
    #if folder doesn't exist, create it and return its path
    if (-not (Test-Path $path))
    {
        mkdir $path -Force:$true -Confirm:$false | Out-Null
    }
    return $path
}
Now, let’s define root folder path and paths for the folder outputs:
#path of the root folder
$rootPath = "\\host-machine\SharedFolder\AutoDBtoSF\Dev1"
|
Quick tip: The path of the root folder could be set to a shared network location, if there is a system administrator who monitors the whole system, and for each developer there is a separate folder. Or, it can be a local path on developer’s machine, if each developer sets its own system for pulling schema changes from a shared script folder |
#path for HTML reports
$repPath = FolderCheckAndCreate $rootPath -Reps
#path for schema output summaries
$outPath = FolderCheckAndCreate $rootPath -Outs
July 4, 2017


