


One of the many tasks of the DBA in charge on a development project is to make sure the team stays consistent in their code. Routine checks for SQL best practices such as naming conventions, right data types usage, problematic things like cursors, potentially fatal things like Deletes without Where clauses can cause a lot of headaches.
ApexSQL Enforce makes best practices reviewing easy. With its more than 100 pre-installed rules, it can detect and fix issues, lets you write your own or customize existing rules and even setup automated reviewing.
This article is covering the process of setting up an automated reviewing process.
Preparing the rulebase
The process of setting an automated best practices review starts by choosing the rules that will be run against a database and configuring the software. The easiest way to do this is by loading a rulebase in ApexSQL Enforce GUI.
|
Quick tip: Rulebases, as the name implies, are files where rules are stored in ApexSQL Enforce. Beside rules, rule selection and rulebase threshold values are stored along with some other useful information like: rulebase description, categories, version number and author information |
Loading rules in ApexSQL Enforce can be done in few ways:
- In the Home ribbon menu select the Open button and navigate to the desired rulebase
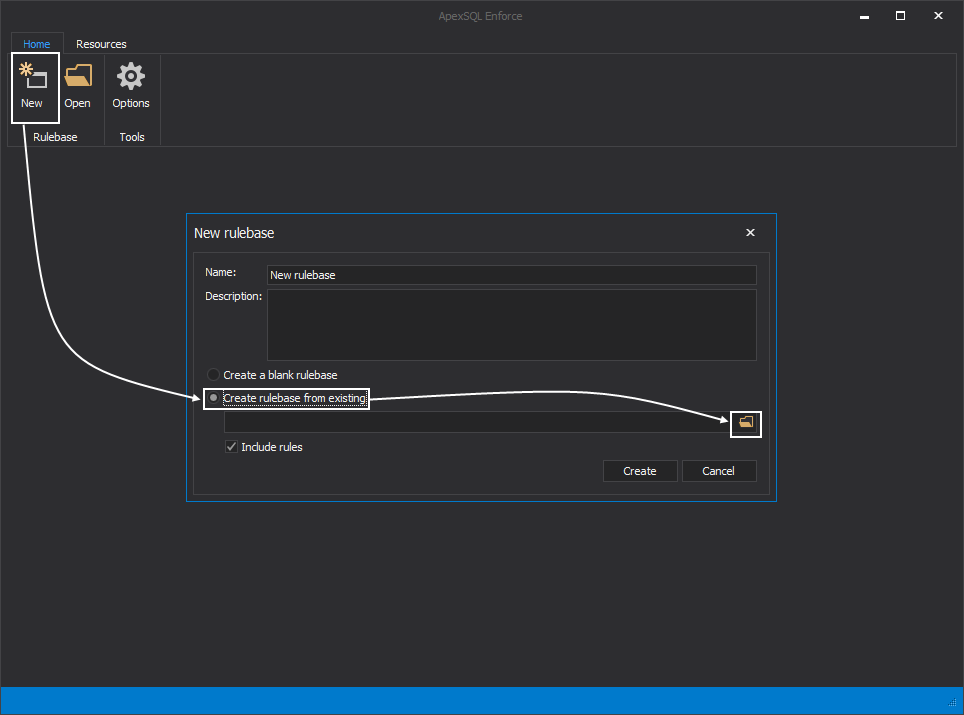
- Opening a new rulebase and importing rules
- Select New from the Home ribbon menu, in the New rulebase dialog choose Create rulebase form existing, make sure that including rules is checked and navigate to the desired rulebase.
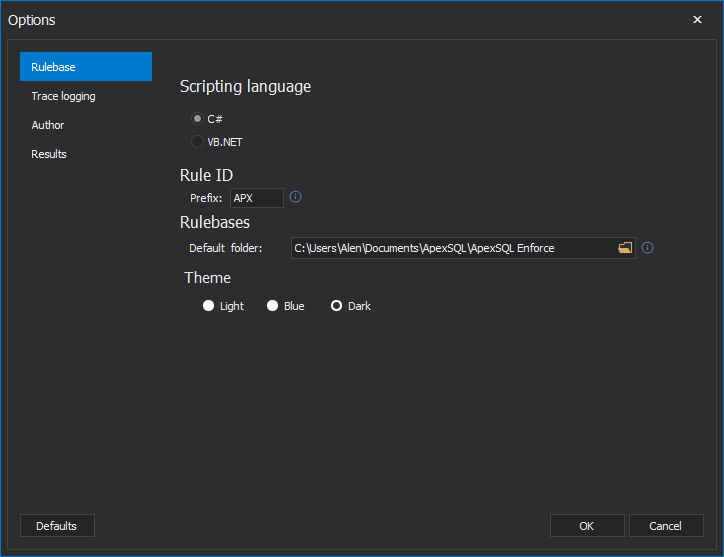
The pre-installed rulebases can be found in the default ApexSQL Enforce folder:
Documents\ApexSQL\ApexSQL Enforce\ApexSQL Enforce rulebases
The default rulebase location can be changed in the Options window.
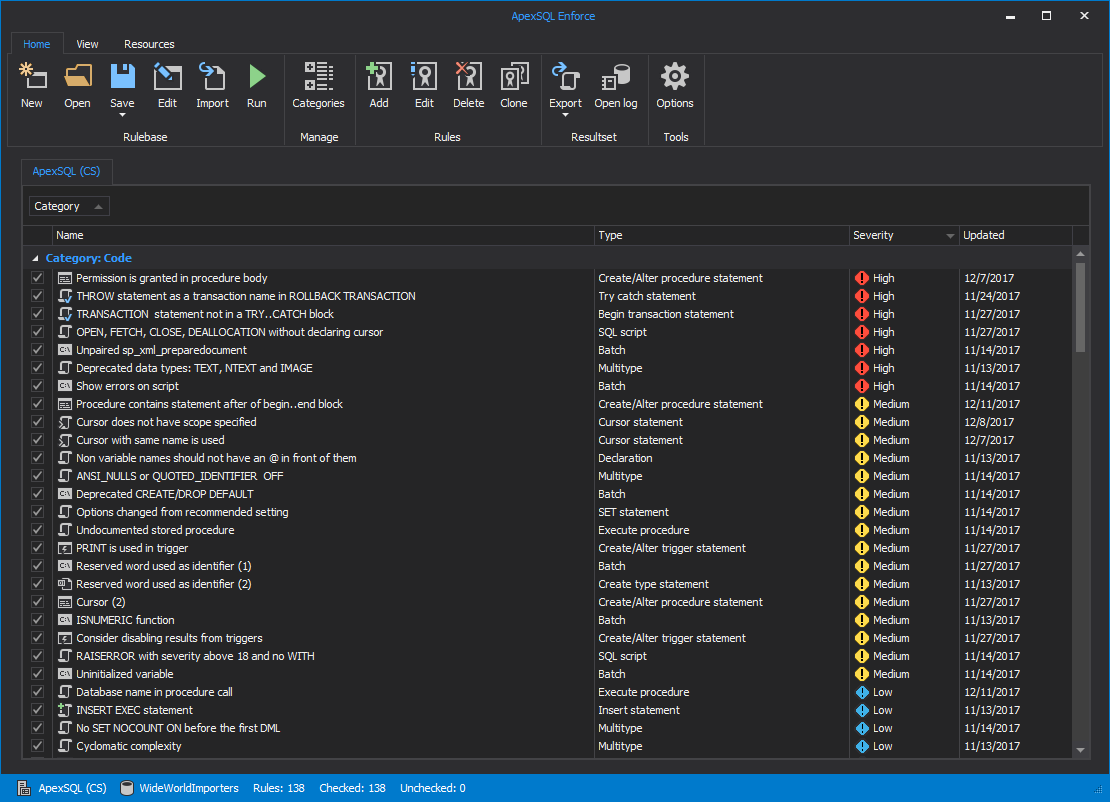
For demonstration purposes, “ApexSQL (CS)” rulebase.
Rule selection and management
Once the rulebase is loaded, a list of rules will populate the main window. By simply clicking the check boxes in the rules list, the rule selection is made to include this rule, the next time the rulebase is executed. This selection will be saved in the rulebase. Additional rules can be imported from the Import rules window
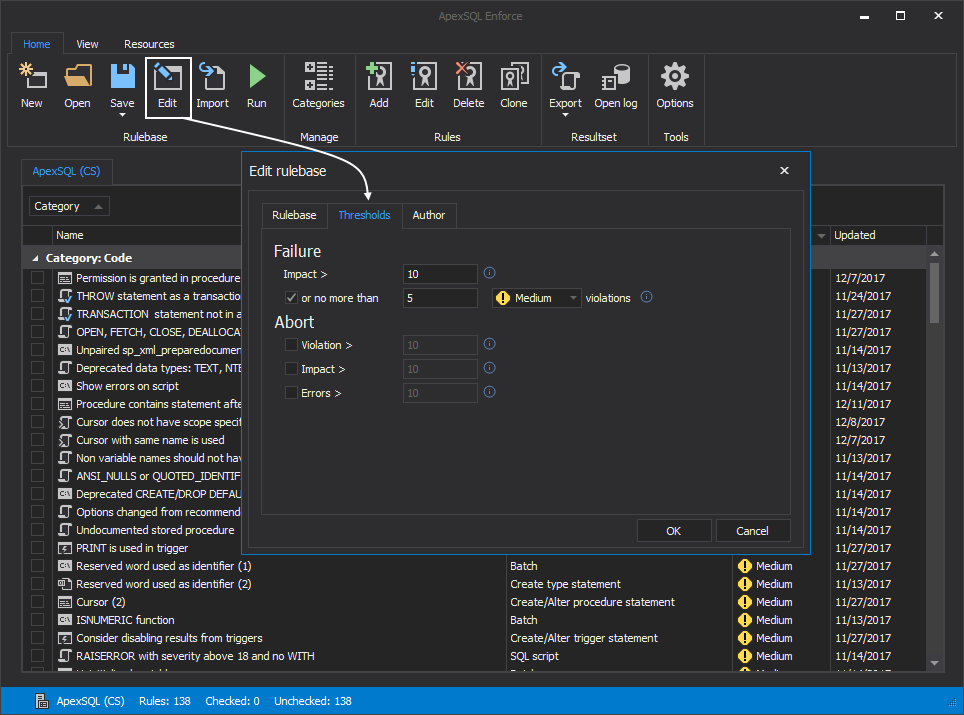
Set the rulebase threshold values which can be found in the Edit rulebase window, under the Threshold. To learn more about the importance of threshold values, please read this article
Now, that the rulebase is set, it can be saved as a new rulebase file.
Writing automation scripts using the ApexSQL Enforce CLI
As with most ApexSQL tools, ApexSQL Enforce includes a CLI interface/console application. To demonstrate how to setup CLI switches it is always the easiest to show on an example:
|
Quick tip: The shown examples assume that the current working directory is the application folder |
|
‘ApexSQLEnforce’ /s:P3TAR\MSSQLSERVER2017 /d:AdventureWorks2014 /rb:$rulebase /ot:f /on:$fixsqlOutput.sql’ /f /v $LASTEXITCODE |
The first step is to define ApexSQL Enforce.com which is the console application. This is a mandatory step for the script to work.
Next, connections switches are specified:
/s:P3TAR\MSSQLSERVER2017 – defines the SQL Server connection.
/d:AdventureWorks2014 – selects a database on the specified server
Using the /rb switch, specify the rulebase that will be used in the reviewing process.
The previously prepared rulebase is specified using the $rulebase variable.
These are the three main switches in ApexSQL Enforce CLI, by adding a /v or /verbose switch the script can be run as it is ant it will give a valid result of the reviewing process.
|
Quick tip: Rulebases can be also run against SQL scripts, in addition to databases. To process SQL scripts via the CLI the /sc switch must be placed between /d and /rb switches |
By adding an /ot switch the CLI will create output of the resultset in one of the following formats:
c – console output (this exports the messages from during the process provided via /verbose switch to a txt file) advised to be used along with /out switch
x – creates an xml export file of the resultset at the end of the process
f– Spool out Fix SQL scripts form the result set into a single SQL script
h – Wraps the resultset into a detailed HTML report file.
The /on switch defines the output file path, name and extension. The /on switch can also specify just the output file name in which case the working directory will be used as output location.
Finally at the end of the script the /v (verbose) and /f (force) switches are specified. Both of these switches are common in ApexSQL tools with the only difference being that /v switch is mandatory in ApexSQL Enforce.
The $LASTEXITCODE in the new row serves to display the return codes.
This CLI script is just an example of common switch usage, to see a fully explained list of ApexSQL Enforce CLI switches with usage examples, please read ApexSQL Enforce Command Line Interface CLI switches
Script execution and results
ApexSQL Enforce CLI scripts can be executed as PowerShell scripts. The result of a successfully finished execution will output a result summary screen similar to the one in GUI:
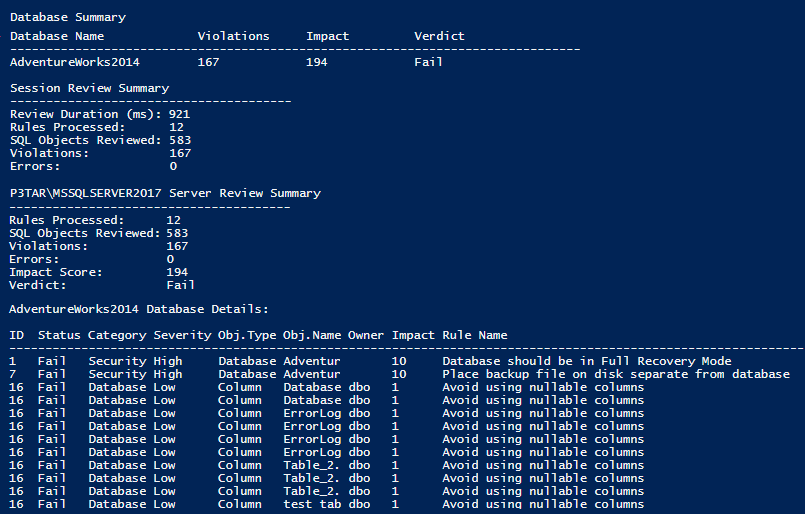
In addition to with a full detail summary, ApexSQL Enforce produces a return code, which is helpful in the CICD process and can be passed to calling scripts.
When the review is finished succeesfully ApexSQL Enforce will return
- 0 for Pass, meaning that the application successfully process, without errors and that the rulebase was also processed with a cumulative result of “Pass”
- 1 means an application error was experienced
- 102 indicates there was no application error but the rulebase generated a result of “Fail”
Additionally, using /os switch, displayed results can be filtered. The arguments for the switch are:
- p – to include passed Pass results
- f – to include fail results
- e – to include error results
If the /os switch is not specified, fail and error results will be displayed, by default which makes this switch optional.
For more information about return codes in ApexSQL tools read General usage and the common Command Line Interface (CLI) switches for ApexSQL tools

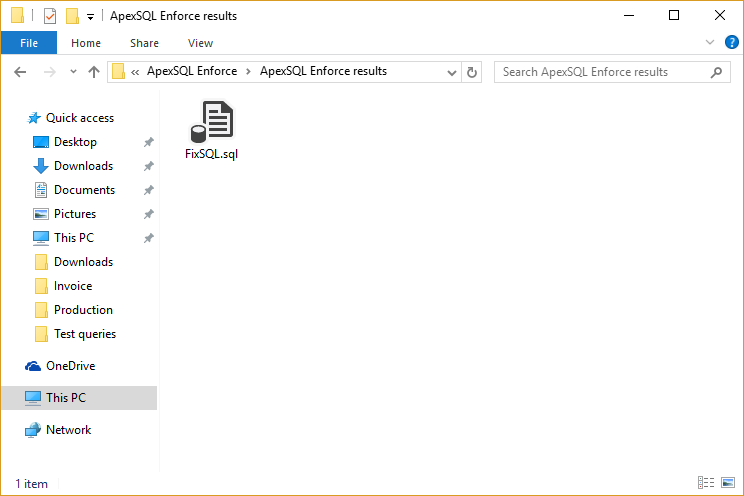
At the output destination, the Fix SQL script is generated:
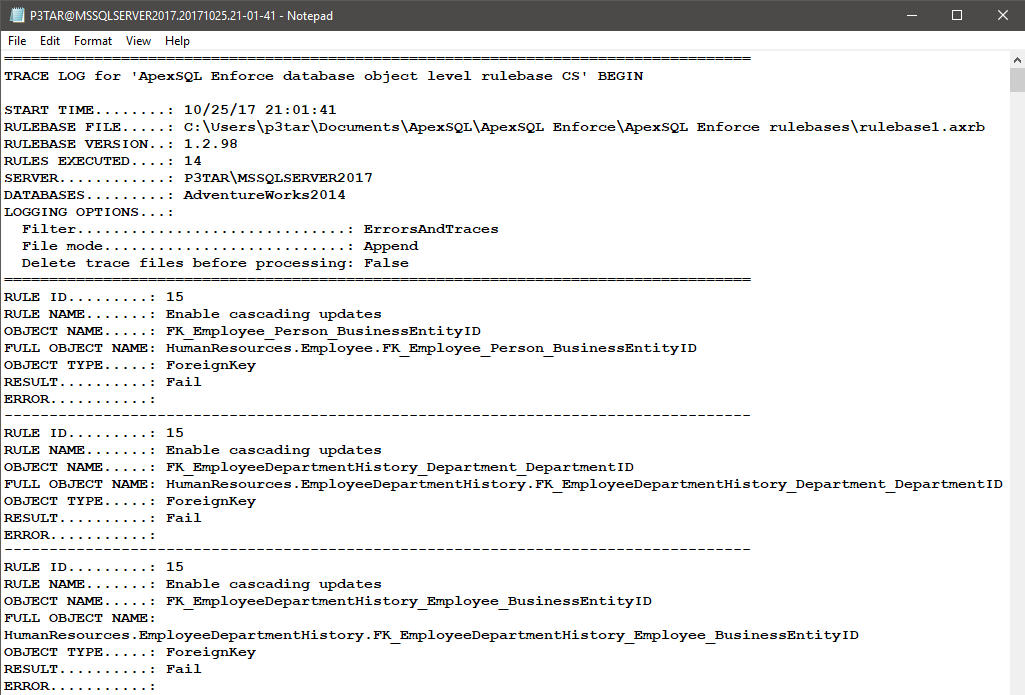
It isn’t always necessary to specify output switches to save results because by default ApexSQL Enforce generates detailed trace logs of each run both in from CLI scripts and from GUI:
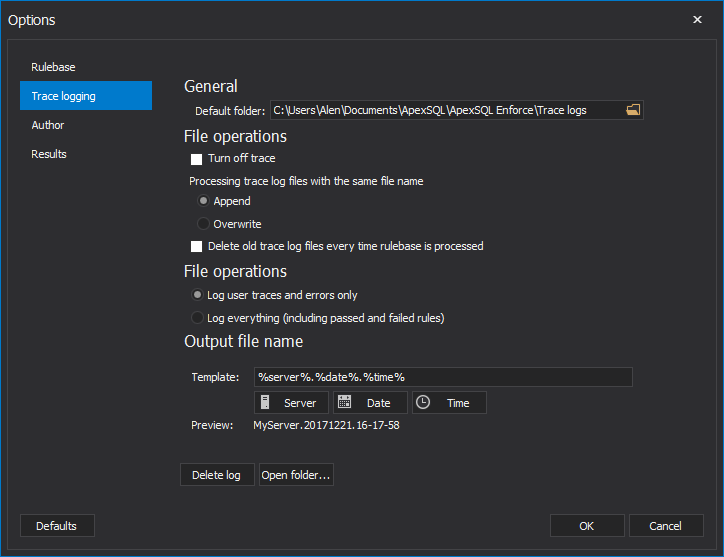
Trace logs details can be customized from the Trace logging tab in the Options menu:
Once the CLI combination is set, the PowerShell script can be sheduled in one of the Four ways of scheduling ApexSQL tools
Useful links
- ApexSQL Enforce Command Line Interface CLI switches
- How to fail at running rulebases
- How to import new rules into an existing rulebase
November 10, 2017


