


In case of database development, in the same way as for the application development, there are always tasks such as developing a new feature, fixing bugs from the current release, experimenting with code in order to improve performance, usability in any way and so on. Because of all of this, it is essential that any changes that have to be committed, but not immediately, are segregated to an isolated environment, that does not affect the rest of the team or the main code. For instance, when developing a new feature, it may require a lot of changes to be committed, before the feature, or even a functional part of the feature becomes useful, so the rest of the team can apply it on their local copies of a database. Without having the isolation while developing, the team will lack the freedom to code, without having to worry about breaking the existing code base.
Branching is a solution that allows developers to work with changes from the repository in isolation, without having to worry about affecting the main code base. When changes are verified, they can later be merged in an organized way
What is branching?
Branching means to diverge from the main path of development and work in isolation, without affecting the larger code base or affecting other developers. Branches are also known as trees, streams or code lines. The idea of branching is to develop in parallel. Large projects often require involvement of many roles such as developers, build managers, QA engineers, etc. Having the ability to work in specific micro-environments that do not affect the rest of the team is essential.
Later, when changes are verified and approved, branches can be merged, which means that changes from a newly created branch will be integrated into another branch, which is typically the main code base.
Why use branches?
The reason for using branches is a need to work in an isolation. Some of the most common use cases are, when developing a new feature, fixing bugs from the previous release, or when experimenting with database changes. Any change made in such cases can broke a database if it is partially finished, and as such used by other developers. In other words, no matter if a developer is working on some new functionality (new feature or experimenting), or modifying the existing one (bug fixes), it is essential that the rest of the team is not affected with changes, unless they are good enough to be used. Branching allows a developer to work in an isolation (using a separate branch), until changes are “good enough” to be used by the rest of the team. At this point changes made in a separate branch can be merged (integrated into mainline).
For the purpose of this article, a new local branch will be used for the next version of a database (MyDatabase2.0).
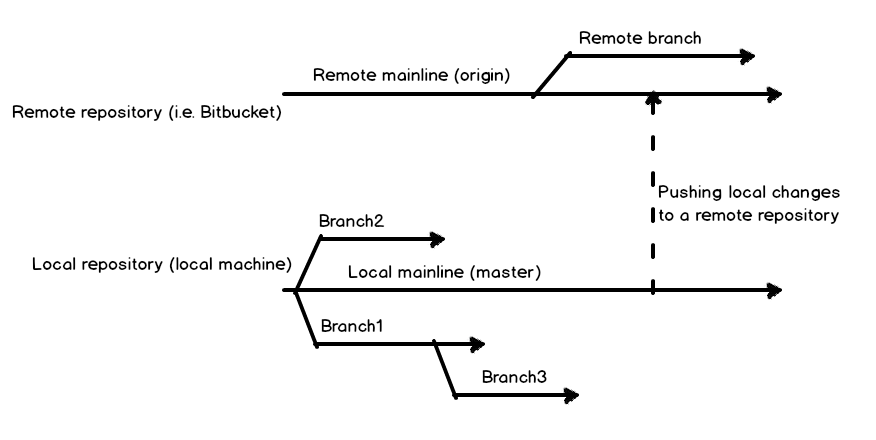
Local and remote branches
As the name says, the local branches are available only on a local machine and visible to a local user only. Remote branches are on the remote repository, available for the entire team or anyone else that has the access to the repository.
Use case
To show to how to maintain database changes using multiple branches, let’s establish a use case and some basics.
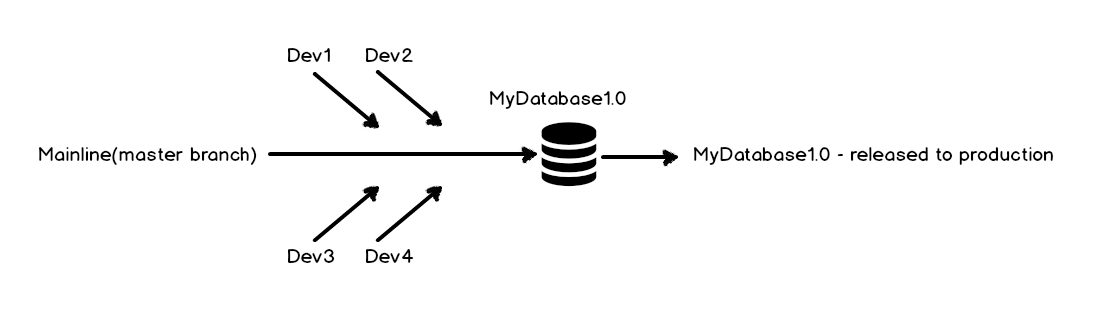
A database used in this case called MyDatabase is being scripted, and all scripts are saved in a local folder initialized as a Git repository. All changes made during the development are committed to a local mainline and pushed to a master branch on a remote repository, using the Git Bash client. Initial database version is released to production as MyDatabase1.0.
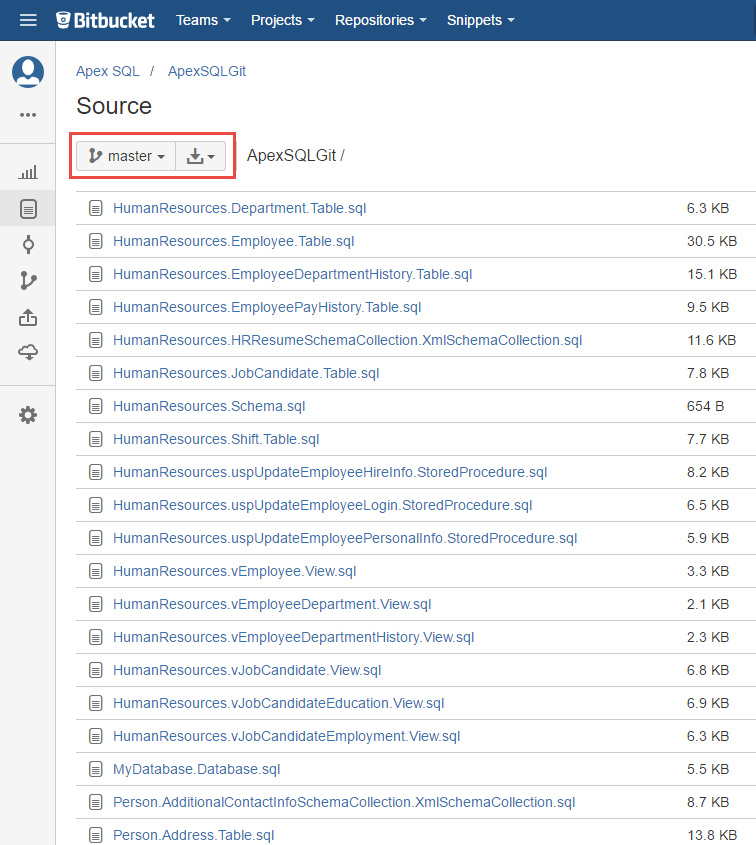
By looking at the remote repository where changes have been pushed, the following result shows that all changes are in the master branch (mainline):
For the next database release, there are a plenty of new features that have to be developed. Other than that, any bug found in the MyDatabase1.0 version after it is released, has to be fixed from within the MyDatabase1.0 code line, which is in this case a master branch. This is the point where Git branching comes into play.
Creating a new branch
To create a new branch, the following command is executed:
$ git branch MyDatabase2.0
To verify that the MyDatabase2.0 branch is created, run the following command, that should give a list of all local branches:
$ git branch
As a result, the following appears:
MyDatabase2.0
* master
This means that the MyDatabase branch is only created, but the master branch is still the current one (used for committing changes).
Switch between branches
To switch to another branch, in this case, the MyDatabase2.0 branch, the following command is used:
$ git checkout MyDatabase2.0
The output confirms that the current branch is the MyDatabase2.0 branch, from now on:
Switched to branch ‘MyDatabase2.0’
When the branch is checked out, any change committed will not affect the master branch in any way. To show this, a simple change on one object is made:
ALTER TABLE dbo.Users
ADD AddressLine2 NVARCHAR(50);
and the SQL script is saved in the local repository folder. After running the following command:
$ git status
The result shows that the SQL table has been modified:
On branch MyDatabase2.0
Changes not staged for commit:
(use “git add <file>…” to update what will be committed)
(use “git checkout — <file>…” to discard changes in working directory)
modified: dbo.Users.Table.sql
no changes added to commit (use “git add” and/or “git commit -a”)
By running the git commit command, the above change (a new column added to the dbo.Users table) will be committed to the MyDatabase2.0 branch.
To verify that the master branch is not affected, there should be some differences when comparing the master branch with the MyDatabase2.0 branch. Specifically, the difference should be a single change recently made on an object, that is committed to the MyDatabase2.0 branch.
To compare between branches, the following command is used:
$ git difftool master MyDatabase2.0
As a result, the following is shown:
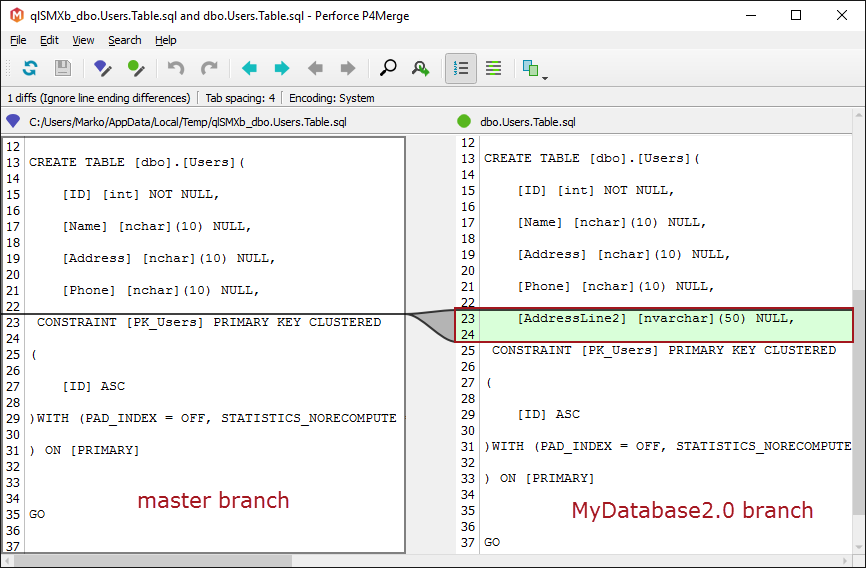
The above image represents the comparison result between the master branch (on the left side) and the MyDatabase2.0 branch (on the right side). Since the above mentioned change (newly added column AddressLine2) is committed to the MyDatabase2.0 branch it will not exist in the master branch.
Furthermore, anything committed to the current branch (in this case MyDatabase2.0 branch) will not affect any other branch. Therefore, a developer can work on a new version of a database, without affecting the local mainline or the current version of a database (MyDatabase1.0).
Working with remote branches does not differ, in any way, when compared to working with local ones. The remote repository, along with the remote branches are available for the entire team, so any change in branching structure should be a team decision. Since the concept of committing changes to a specific branch is similar when working with local and remote branches, the following will be an explanation of committing changes to a remote branch, directly from SQL Server Management Studio, using ApexSQL Source Control.
ApexSQL Source Control branching feature
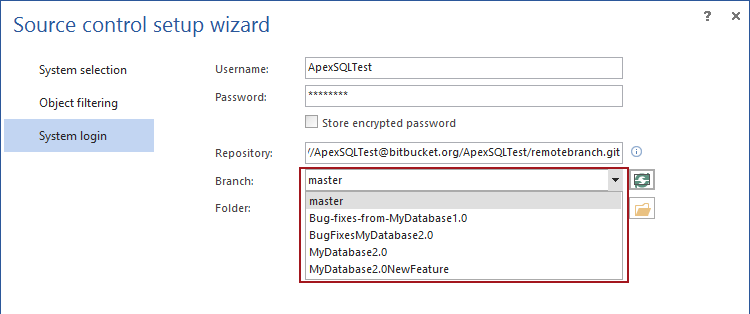
ApexSQL Source Control is an add-in that integrates directly into SQL Server Management Studio (SSMS), and allows version control of SQL database objects. In the process of linking a database, the user will be offered to choose a branch to link a database to:
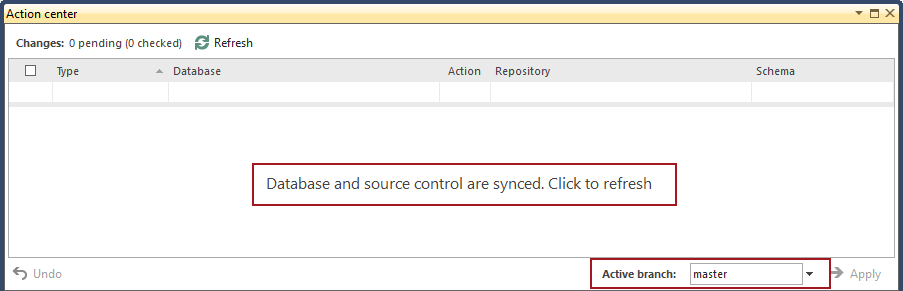
The selected branch can be verified/changed later, in the Action center tab, after it is initialized, as the same drop-down list will be available, showing the active branch (the branch where selected changes will be committed):

To compare the current state in a database with any available branch, a branch needs to be selected from the drop down list. The add-in will perform the comparison, and will present results in the Action center tab.
Let’s commit changes to a separate branch and confirm that such changes do not affect the master branch, using ApexSQL Source Control.
As a starting point, all database changes have been synchronized with the master branch, so the Action center tab will not display any differences:
After executing the following script against the database:
ALTER TABLE dbo.Users
ADD AddressLine2 NVARCHAR(50);
and refreshing the Action center tab and switching to the MyDatabase2.0 branch, the following will be shown:
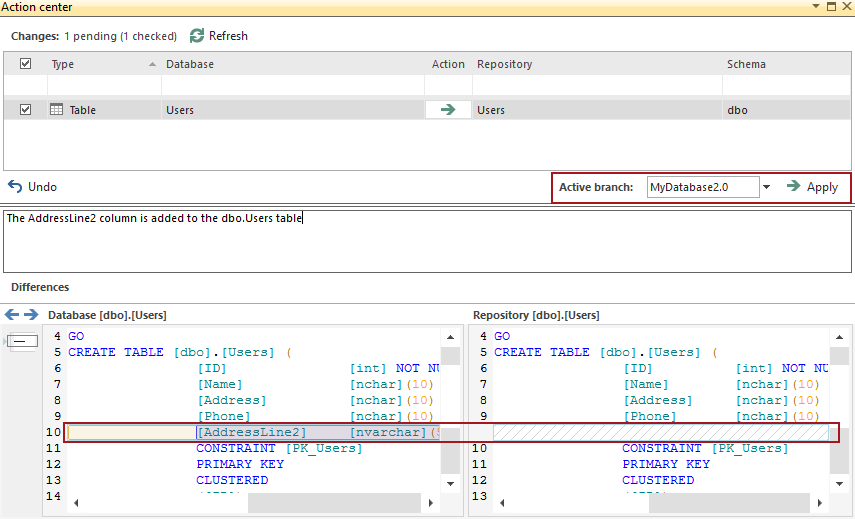
This shows that the database and the master branch are now different, in that the database reflects the change, but since it hasn’t been committed to the Master branch, the master branch doesn’t show the change
For this change, we don’t want it in the master branch though, but instead, the Active branch drop down list is changed to MyDatabase2.0.
After committing to MyDatabase2.0, the Action center tab shows the following:

The previously shown change is committed to the MyDatabase 2.0 branch, and the Action center tab shows that there is no difference between the database and the MyDatabase2.0 branch.
To verify that changes from the MyDatabase2.0 branch are not made to the master branch, when working with ApexSQL Source Control, we will simply pick the master branch from the Active branch drop down list. The Active branch drop-down list is an equivalent to the git checkout command, which is used to set any branch to be the current one, where changes will be committed.
When switching back from the MyDatabase2.0 branch to the master branch (after the change is committed to the MyDatabase2.0 branch), the result in the Action center tab is as follows:
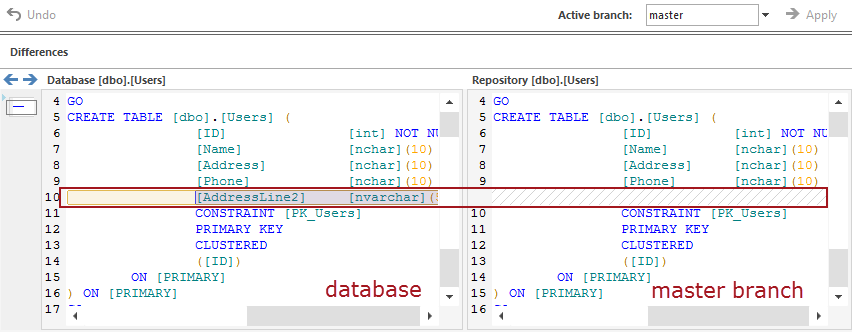
The image above shows the comparison result between the master branch (on the right side) and the database (on the left side). The result shows that the column added to the database (AddressLine2), and committed previously to the MyDatabase2.0 branch, does not exist in the master branch, as shown on the right side.
This confirms that the change committed to the MyDatabase2.0 branch did not affect the master branch in any way. Furthermore, all changes that are committed to the MyDatabase2.0 branch will not be committed to (will not affect) any other branch (including the master branch). So a developer can work on a separate branch until changes are good enough to be used by the rest of the team.
Useful links:
May 25, 2016


