


The SQL Server Database Administrator job is not a boring or relaxing job, as you will face new challenges every day. Although you may be required to drink multiple cups of coffee during your working hours, you still have the chance to sleep your nights without nightmares and enjoy your holidays without carrying your laptop everywhere as your baby … but only if you can master your tasks and responsibilities to be able to perform them efficiently.
In addition to the tasks that you will be requested to perform during the working hours, there still be a number of tasks that should be performed outside the working and peak hours, for multiple reasons. For example, the Full backup operation or the purging jobs should be performed at the middle night, so that it will not affect or be affected by the systems load. But who will be awake and execute these tasks during the night?
The answer depends on the budget of the company. If they have the luxury to hire more members in the database administration team to cover the night shift and work only in executing these tasks manually it will be great. But the proactive database administrator can suggest to his manager to take advantages from the virtual database administrator who can work 24 hours per day, seven days per week without salary!
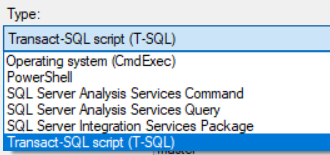
The Knight in shining armor who covers our absence during the day and at night is the SQL Server Agent. It is a Windows service, installed with the SQL Server Engine and available for all SQL Server editions except for SQL Server Express edition, that is commonly used by all database administrators and developers to automate the execution of variant types of critical business and administrative tasks, based on a predefined schedule. SQL Server Agent allows us to schedule a Transact-SQL script, Operating System commands, PowerShell command, SQL Server Analysis Services queries and commands and the SQL Server Integration Services Packages, as shown below:
SQL Server Agent automates the different types of tasks in the shape of Jobs, in which the business logic or the administrative task will be defined as a group of Step that is organized in the correct order and executed based on a predefined Schedule. A schedule specifies when a job runs, with the ability to execute the SQL Agent job based on multiple schedules or execute multiple jobs based on the same schedule.
In this article, we will see how we could create and manage the different Agent Job schedules using ApexSQL Job. Before start diving in the process of creating and managing the schedules, let us have a small visit to the location where the schedules information is stored in the SQL Server instance.
Schedule Information in MSDB
The SQL Server database that is used by the SQL Server Agent service to store the SQL Agent jobs information is the MSDB system database. If you browse the MSDB database tables, you will see information about the Agent jobs schedules, steps, alerts and execution history. The information that is stored in these tables is very important to keep the SQL Server Agent jobs running properly as you define it. Because of that, DO NOT try to modify or delete the data stored in these tables manually. Instead, it is more secure to perform the change properly from the related configuration wizard or using the documented system stored procedure to modify or delete the data.
Schedules Tables
The MSDB tables that contain information about the SQL Agent jobs schedules are:
-
dbo.sysjobschedules: Stores schedule information for the Agent jobs that will be executed by SQL Server Agent. This information includes the ID for the job associated with that schedule and the next execution date and time for that job, stored as INT data type in YYYYMMDD format for the execution date and in HHMMSS format for the execution time, as shown below:

-
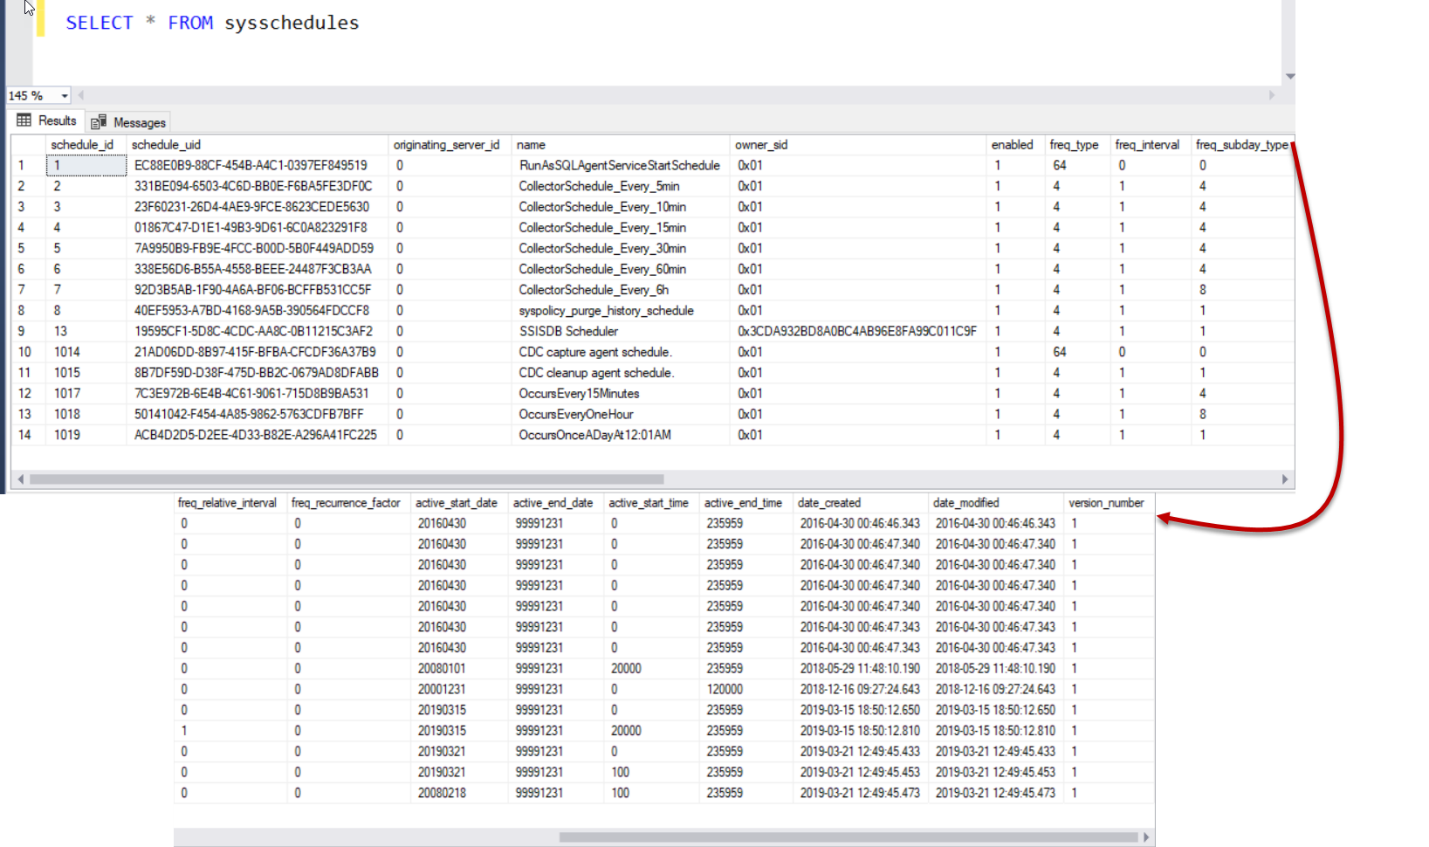
dbo.sysschedules: Stores information about all SQL Server Agent job schedules, regardless if it is associated or not to a SQL Agent job. This information includes the name of the schedule, if it is enabled or not and detailed information that describes the schedule frequency, with the dates and times also stored as INT data type in YYYYMMDD format for the execution date and in HHMMSS format for the execution time, as shown below:
sp_help_jobschedule
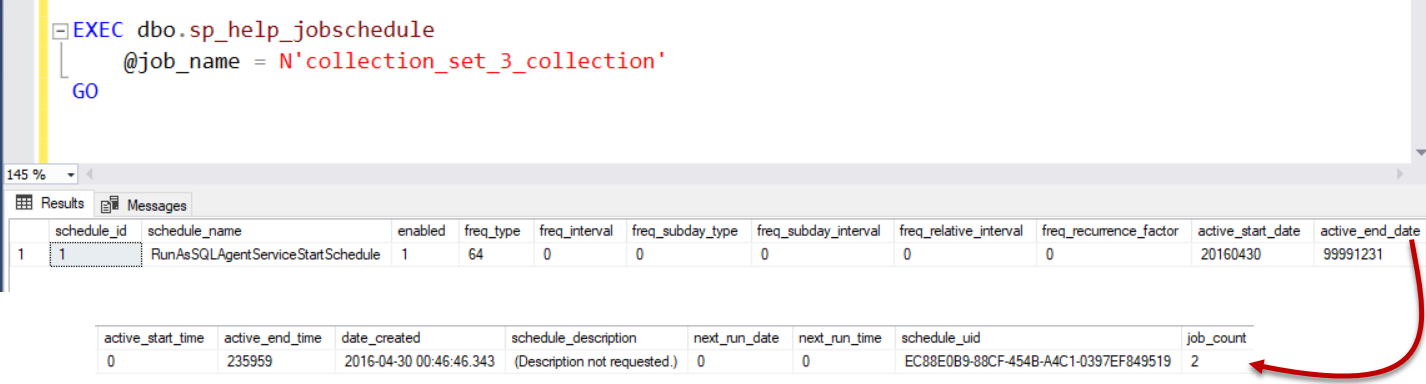
Rather than querying the system table directly, which is not recommended by Microsoft, you can easily use the sp_help_jobschedule system stored procedure, by passing the name or the ID for the SQL Agent job and schedule that you are interested in checking. The information that is retrieved from this system stored procedure summaries the data retrieved from the sysjobs, sysschedules and sysjobschedules tables for the selected job, as shown below:
sp_help_schedule
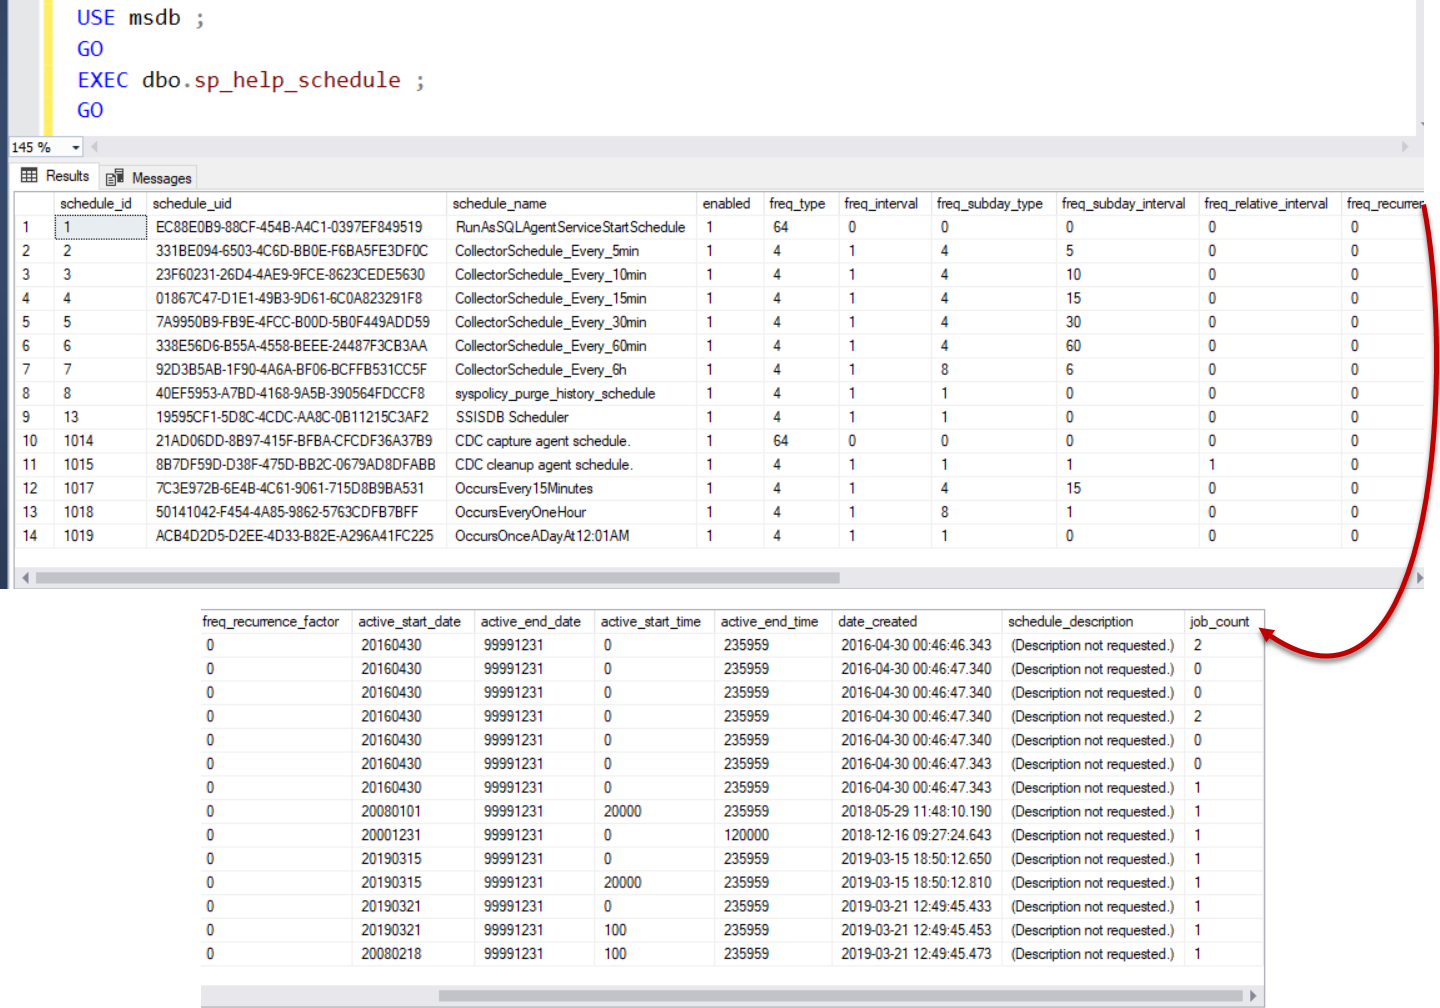
The sp_help_schedule system stored procedure is used also to provide detailed information about the SQL Server Agent jobs scheduled, by optionally passing the name or the ID of the schedule, or pass nothing to retrieve information about all SQL Agent jobs schedules, as shown below:
From the previous results, it is clear that getting information about the jobs and its schedules by reading directly from the MSDB system database is a bit challenging as it requires joining multiple system tables together in order to generate a meaningful report for the schedules and the associated SQL Agent jobs. The task becomes easier when using the discussed system stored procedures but it still not displaying the information in a user-friendly format. Let us see if it is easier and more user-friendly when using the GUI.
SQL Agent Job Activity Monitor
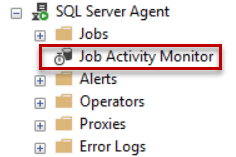
The Agent job schedule information can be also retrieved using the SQL Agent job Activity monitor, under the SQL Server Agent node, as shown below:
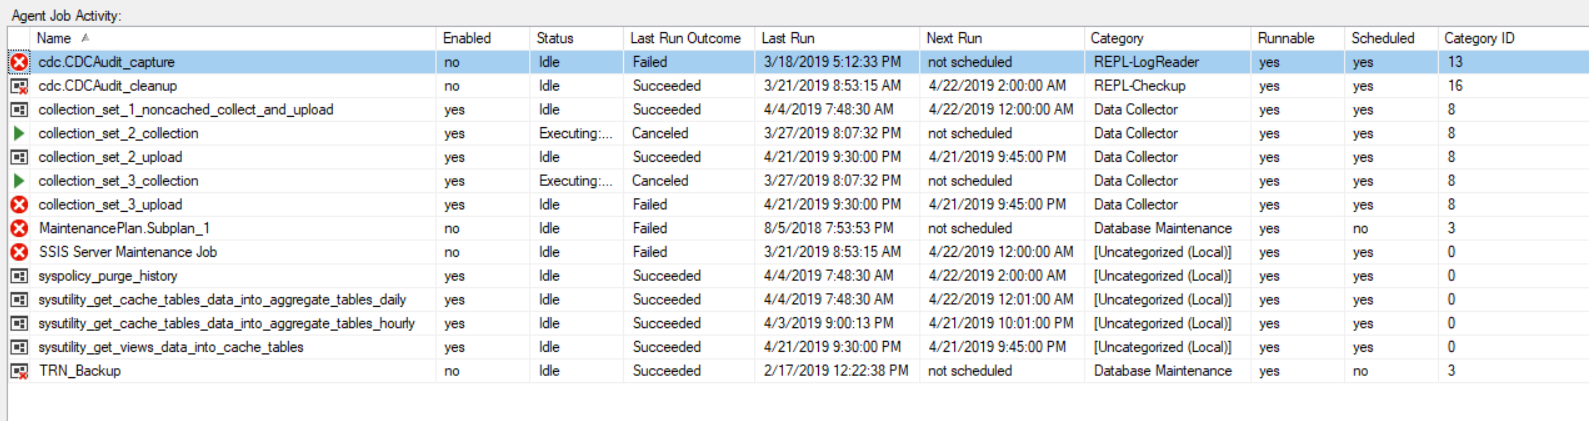
To get a general view about all the running SQL Agent jobs and the defined schedule of each job, including the last execution, the next execution and if the job is linked with a schedule, just open the Agent job Activity Monitor, and the result will be similar to:
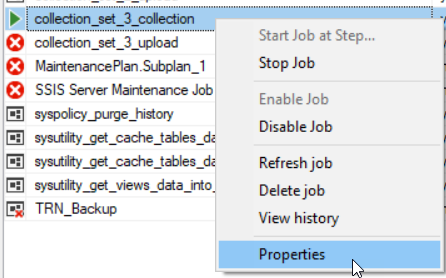
To view detailed information about the schedule of a specific SQL Agent job using the Agent Job Activity Monitor, right-click on that job and choose the Properties option, as follows:
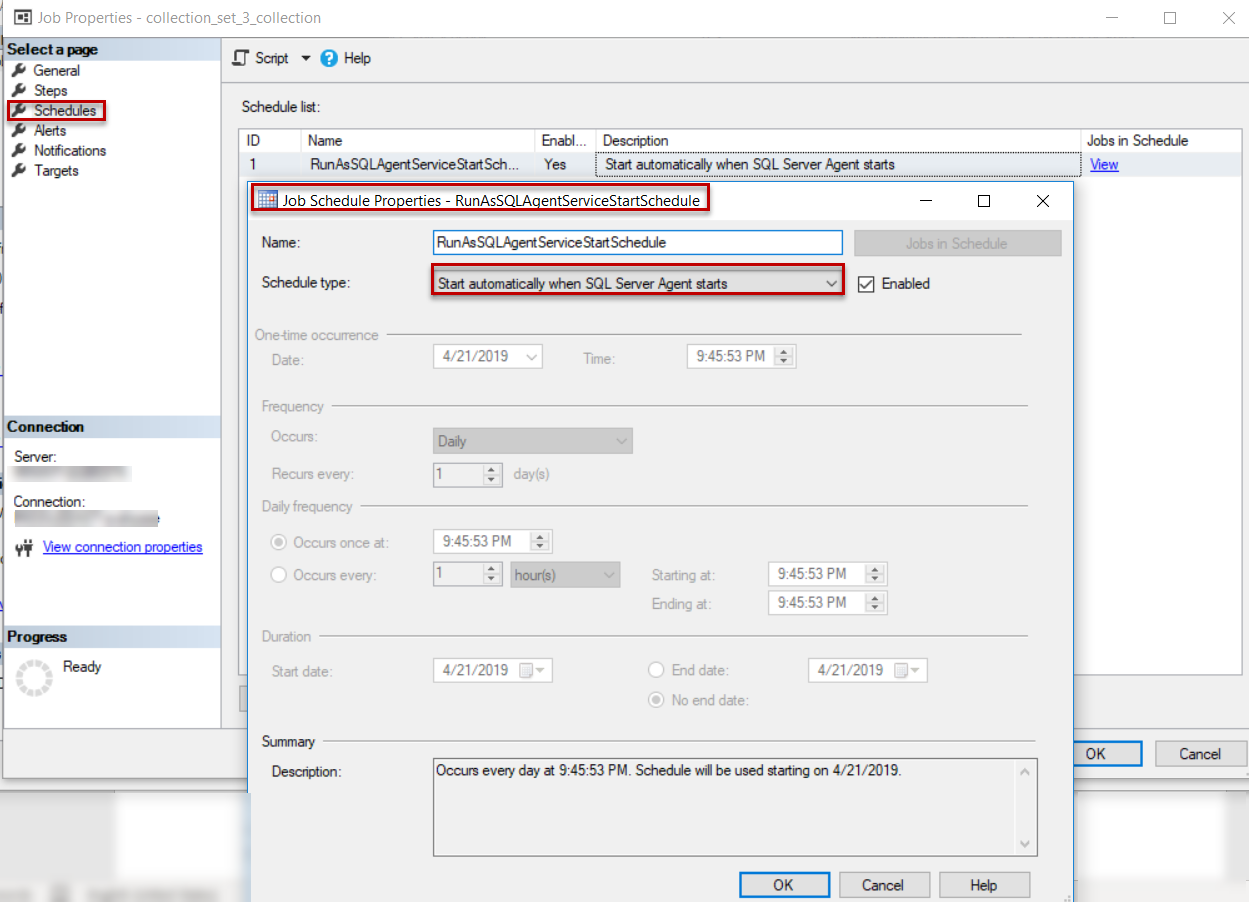
From the Schedules page of the SQL Agent job Properties window, double-click on the provided schedule to open the schedule editor window, in which you will be able to view the graphical information about the schedule frequency, with the ability to change the current schedule, create a new schedule or pick an existing schedule to link it with that Agent job, as shown below:
The SQL Agent job Activity Monitor helps to view, creating and editing any number of schedules to the opened Agent job. Over time, and with an increasing number of jobs and schedules increase on a given SQL Server, it will become challenging to fully understand when and how often the SQL Agent jobs run during a given slot of time.
Being able to quickly generate a list of jobs that will run during a given time frame, what jobs run when and how often is very helpful when planning for a maintenance window, in which we need to make sure that nothing will be affected during the scheduled maintenance.
Hence, the need for a 3rd part tool to provide such a consolidated view and management workplace, such as ApexSQL Job that we will discuss in the next section, is apparent.
ApexSQL Job
SQL Server Agent job is a powerful component to the feature ecosystem of SQL Server, but value-added solutions exist to expand on the capabilities of this technology by consolidating the view and the management tasks of the Agent jobs from one place and displaying the jobs, alerts, schedules and jobs history in a more user-friendly way. One is ApexSQL Job, a 3rd party database automation tool from ApexSQL.
To be able to install ApexSQL Job to your machine, you need first to get the installation file from the ApexSQL download center. It is a small installation file with less than 40MB size, that can be used to install ApexSQL Job using a straight-forward installation wizard, on which you will be asked only to specify the installation path for ApexSQL Job and whether to create a desktop shortcut for ApexSQL Job to reach it faster:
Getting started
Now you have ApexSQL Job installed to the server. To distinguish ApexSQL Job from the rest of applications that are installed to your server, search for the black “job organization bag” icon and click on it to run ApexSQL Job:
![]()
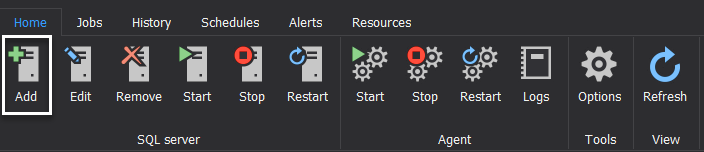
The first step in using ApexSQL Job is connecting to your SQL Server instance(s). To achieve that, click on the Add button, from the SQL Server tasks category, under the Home tab, as below:
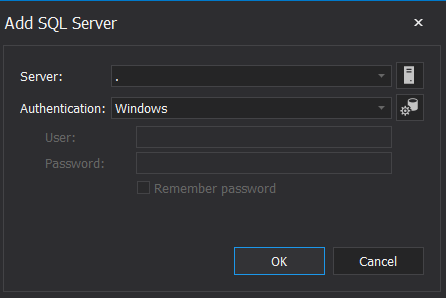
From the Add SQL Server page, and similar to the information required when trying to connect using the SQL Server Management Studio tool, enter the name of the SQL Server instance that contains the SQL Agent jobs Schedules to be viewed and managed and the authentication mode with credentials for the authorized user who will manage the Agent jobs schedules, as follows:
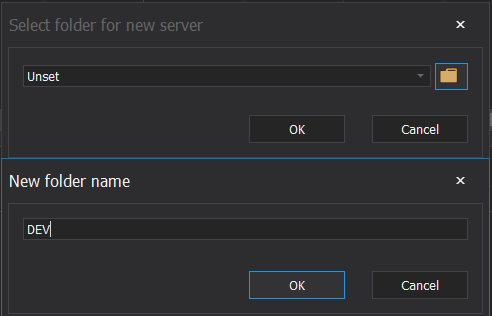
ApexSQL Job provides you with the ability to organize your SQL Server instances within categories under customized folders. This is due to the fact that ApexSQL Job is a centralized administration tool that allows you to manage multiple SQL Server instances from the same place. So that, when you add a new SQL Server instance, you will be asked to add the server under the default “Unset” folder or create your own folder to include that SQL Server instance under it, as shown below:
To be able to manage the SQL Agent jobs schedules, the SQL Server Agent service should be running on that instance. To run the SQL Server Agent Service from ApexSQL Job, click on the Start button, from the Agent tasks category, under the Home tab:
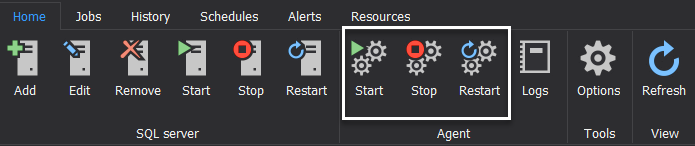
Far from the annoying error messages, ApexSQL Job will start the SQL Server Agent Service if it is stopped and perform nothing if it is already running, notifying you with the proper message, as shown below:

View Existing Schedules
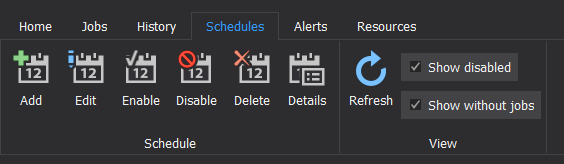
The SQL Agent jobs schedules can be viewed and managed from the Schedules tab, with all available functions categorized into two main categories:
- The Schedule category: from where you can manage the schedules individually, by adding, editing, enabling\disabling, deleting and displaying the schedule details and history
-
The View category that controls the schedules view to show or exclude the disabled schedules or the schedules that are not linked with a Agent job, as shown below:
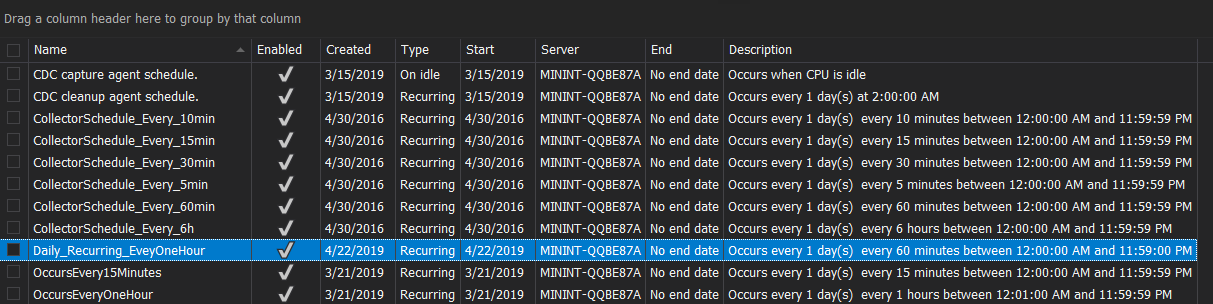
ApexSQL Job provides you with two main consolidated views for the existing schedules. The first view will display detailed information about all existing SQL Agent jobs schedules that are defined on the connected SQL Server instance. It hides the computer generated IDs, GUIDs, and date and time information and converts it to more user-friendly representation that makes it easy to understand if this schedule is enabled, the type of that schedule, meaningful description, and more useful information about all schedules, as shown below:
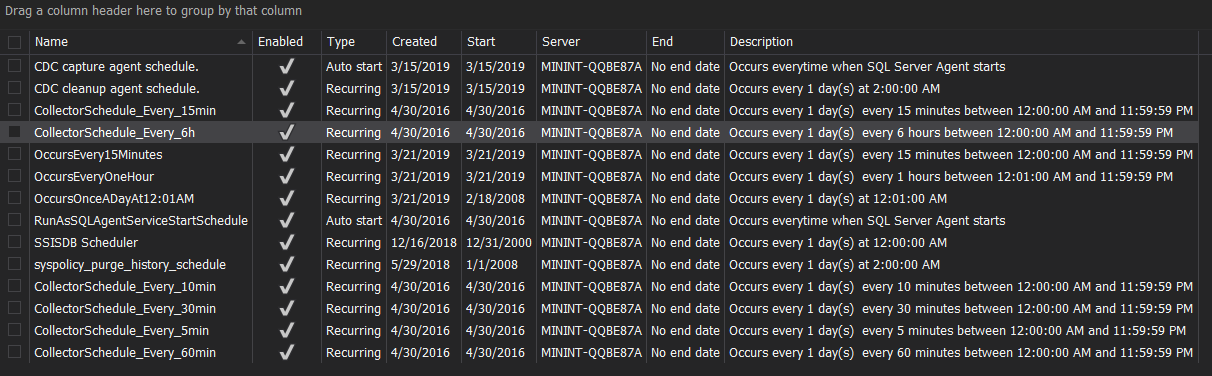
It also provides the ability to sort the view of the schedules based on a specific column, by clicking on that column name and group the schedules view based on specific column values by dragging that column to the top of the window, as shown below:

The checkboxes in the Schedules View category controls if the disabled schedules or the schedules that are not linked with a SQL Agent job will be displayed in that view. For example, if you uncheck the “Show Without Jobs” checkbox, all unattached schedules will disappear from the view, as shown below:

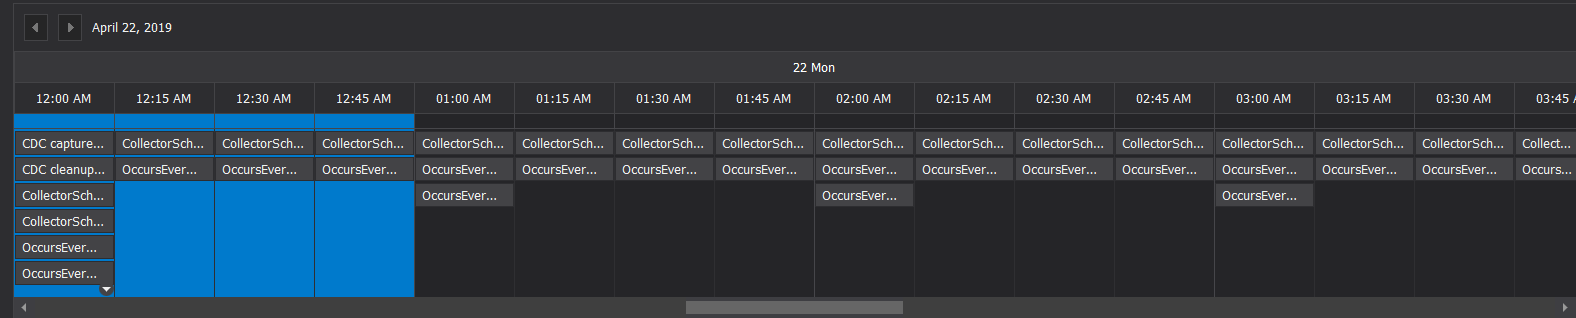
The second schedules view displays the SQL Agent jobs schedules distribution during the selected date in the form of timeslots, with each slot contains all the Agent jobs schedules that will be executed during that timeslot. Such a view is very helpful when planning for a maintenance window or troubleshoots what is running in that specific timeslot, as shown below:
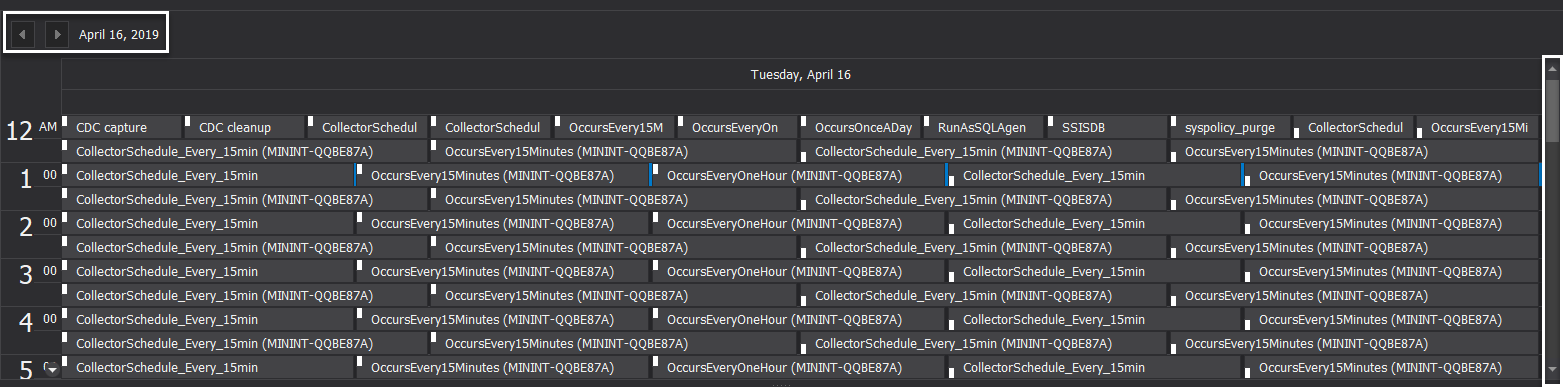
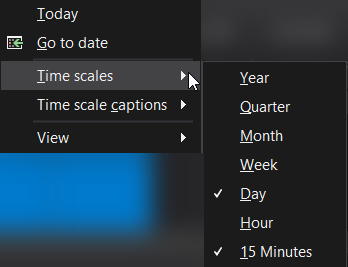
ApexSQL Job provides the ability to navigate between the dates and timeslots using the scrolls or simply right-clicking on the top of the view and choose to list Today schedules, go directly to a specific date and the timeslots scale, as shown below:
With the ability to switch between the vertical and the horizontal view of the timeslots as shown below:
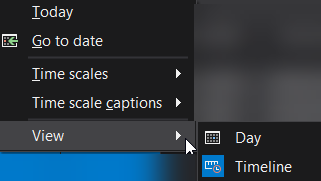
Switching to the Timeline view, the timeslots will be shown as below:
Manage Schedules
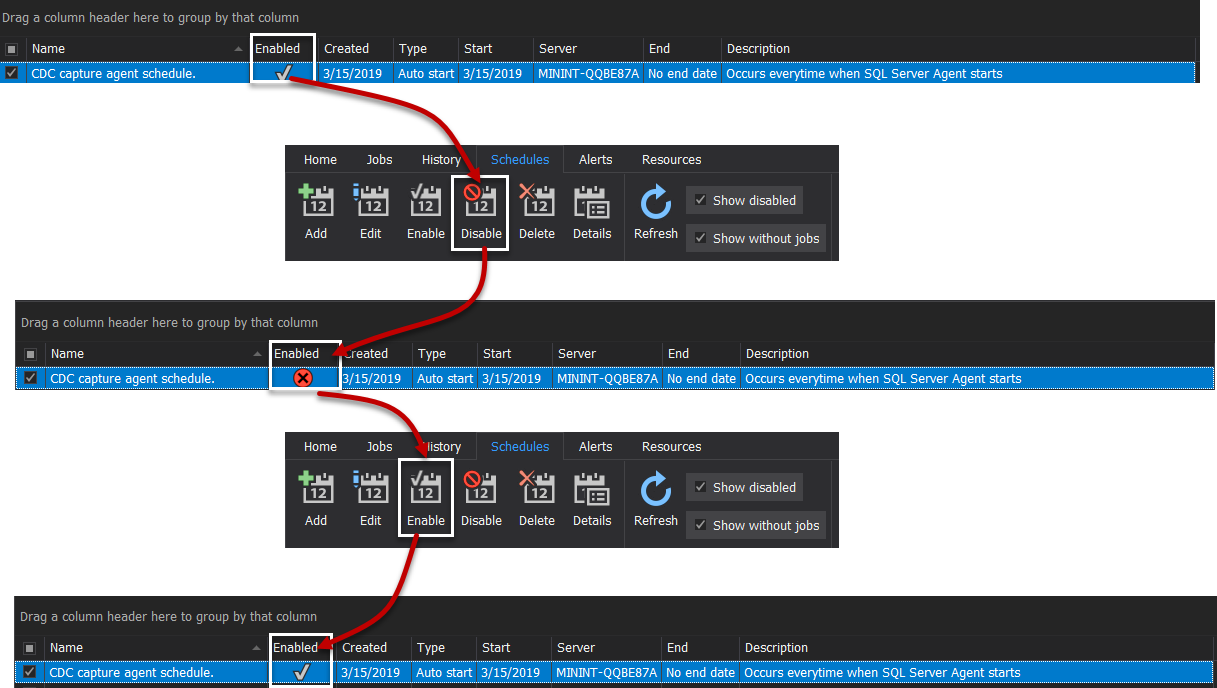
Enable\Disable Schedules
To Disable and enable SQL Agent job schedule, check the box beside the schedule in the schedules view then click on the Disable button under the schedules tab. You can enable it back by selecting that schedule again and click on the Enable button under the schedules tab, as shown below:
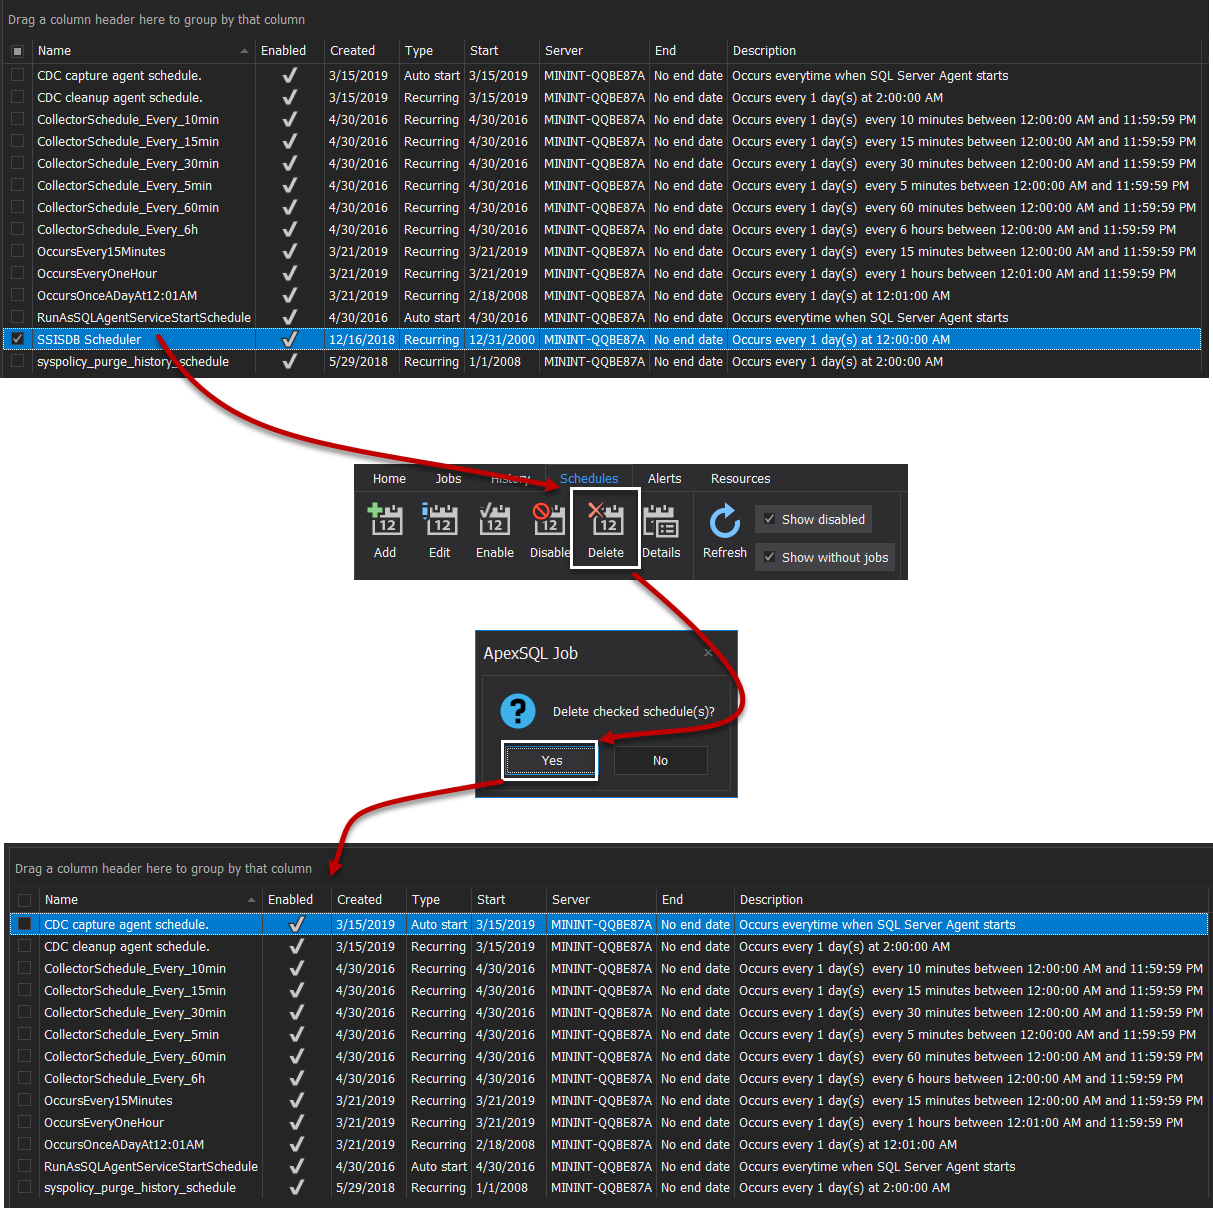
Delete Schedule
To delete an existing schedule, select that schedule then click on the Delete button under the Schedules tab. ApexSQL Job will notify you to confirm the deletion of the schedule and the schedule will be dropped completely, as shown below:
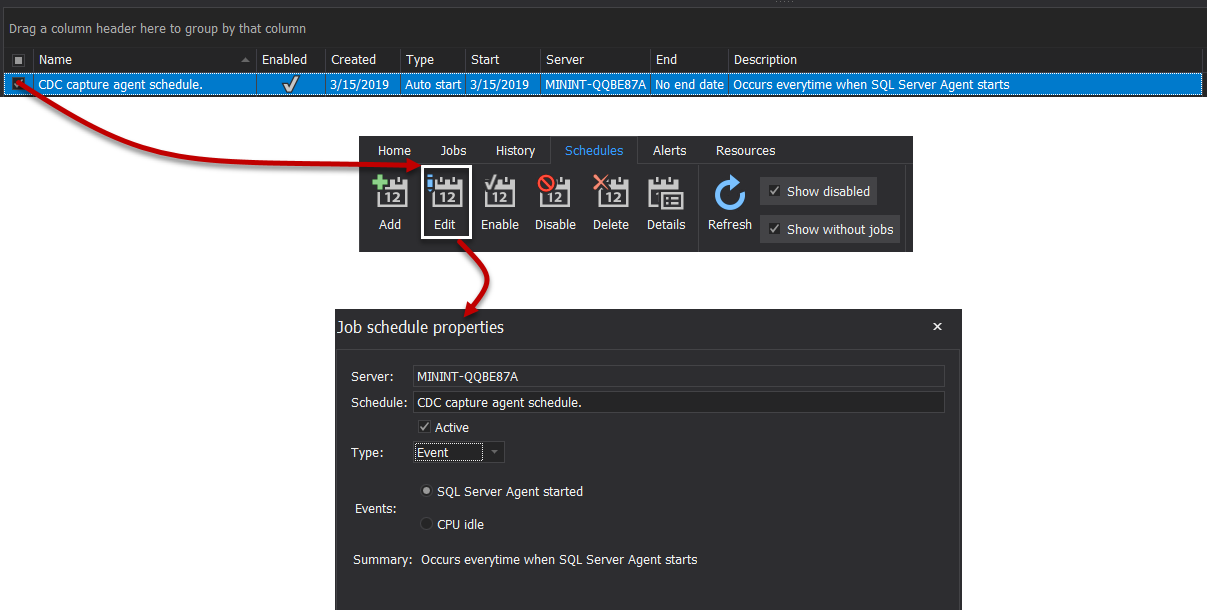
Edit Schedule
To check the current configurations of an existing schedule or perform changes on the schedule name, type, date, time or frequency, select the schedule then click on the Edit button under the Schedules tab and perform the required change, as shown below:
Schedule Details
ApexSQL Job provides you also with the ability to get general details about the SQL Agent job schedule and historical information about the changes performed on that on that schedule, with the ability to undo the latest changes and clear the schedule changes history. To achieve that, select the schedule you are interested in and click on the Details button under the Schedules tab, as shown below:

Add Schedule
In order to add a new SQL Agent job schedule using ApexSQL Job:
-
Click on the Add button under the Schedules tab, as below:

- From the New Job Schedule window, write a meaningful name for the new schedule that describes the type and the frequency of the schedule.
- After that, check the box beside the Active flag, to make sure that the schedule will be active and ready to be attached to a job once created.
-
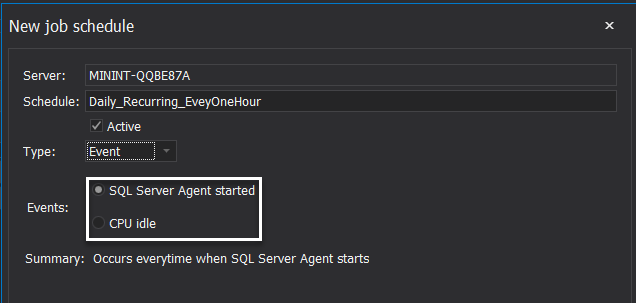
From the Schedule Type drop-down list, specify if the job schedule will be triggered based on an Event, such as starting the SQL Server Agent service, or when the CPU meets the idle condition, as below:
Or choose the Time schedule type to trigger the schedule based on a predefined date and time.
-
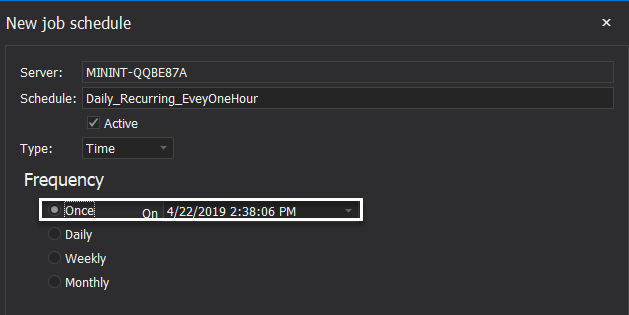
Specify the Frequency of the new schedule. There are four options for the schedule frequency:
-
Choose the Once option if the SQL Agent jobs that will use this schedule will be executed only one time based on the specified date and time:
-
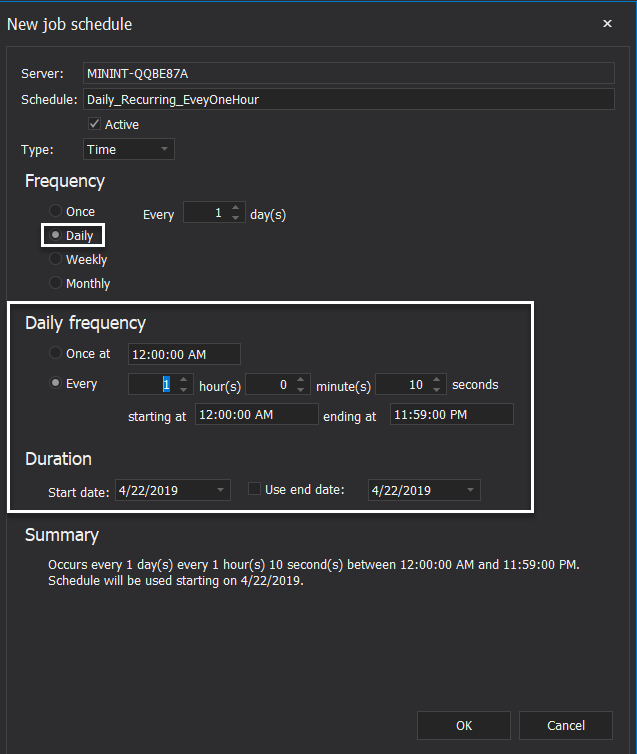
Choose the Daily option if the SQL Agent jobs that will use this schedule will be executed every day, or every multiple days, based on the daily frequency and duration criteria specified in that schedule. The summary section will help you to review the specified criteria in words:
-
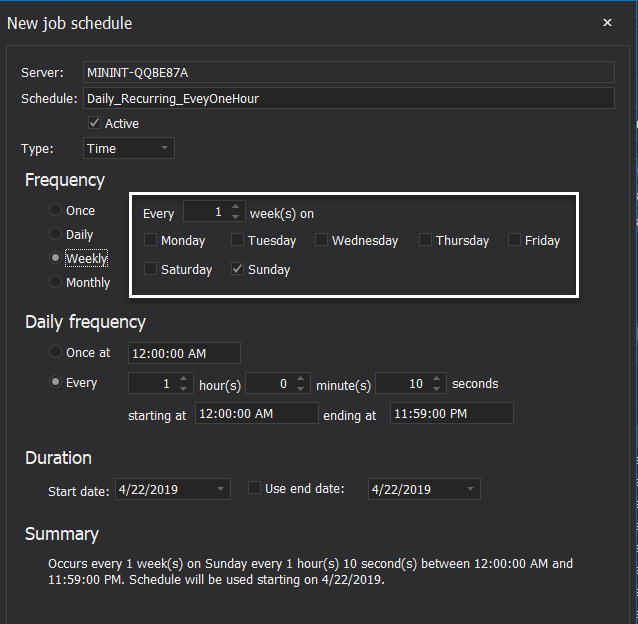
Choose the Weekly option if the SQL Agent jobs that will use this schedule will be executed during specific days of the week, or multiple weeks, based on the daily frequency and duration criteria specified in that schedule for each selected day. The summary section will help you to review the specified criteria in words:
-
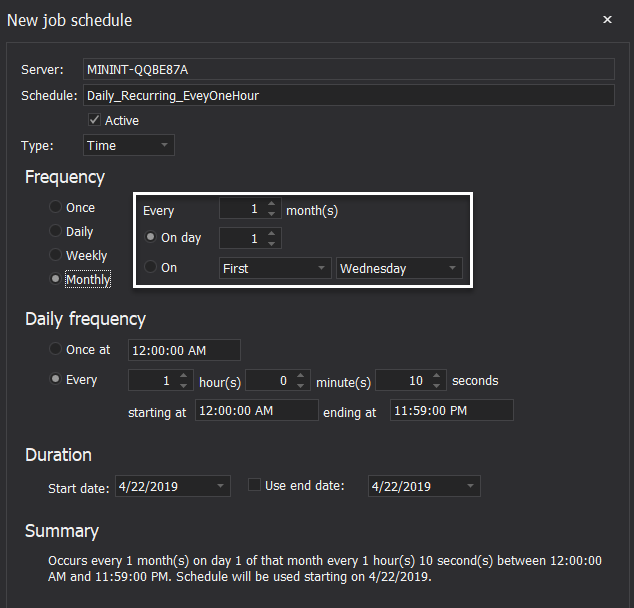
Choose the Monthly option if the SQL Agent jobs that will use this schedule will be executed every month, or multiple months, based on the day rank on the moth or the week and daily frequency and duration criteria specified in that schedule for each selected day. The summary section will help you to review the specified criteria in words:
-
-
After specifying the frequency of the schedule, click OK to create it and you will see the new schedule in the schedule view, and it will be available for attaching it to an existing job or any new job, as shown below:
-
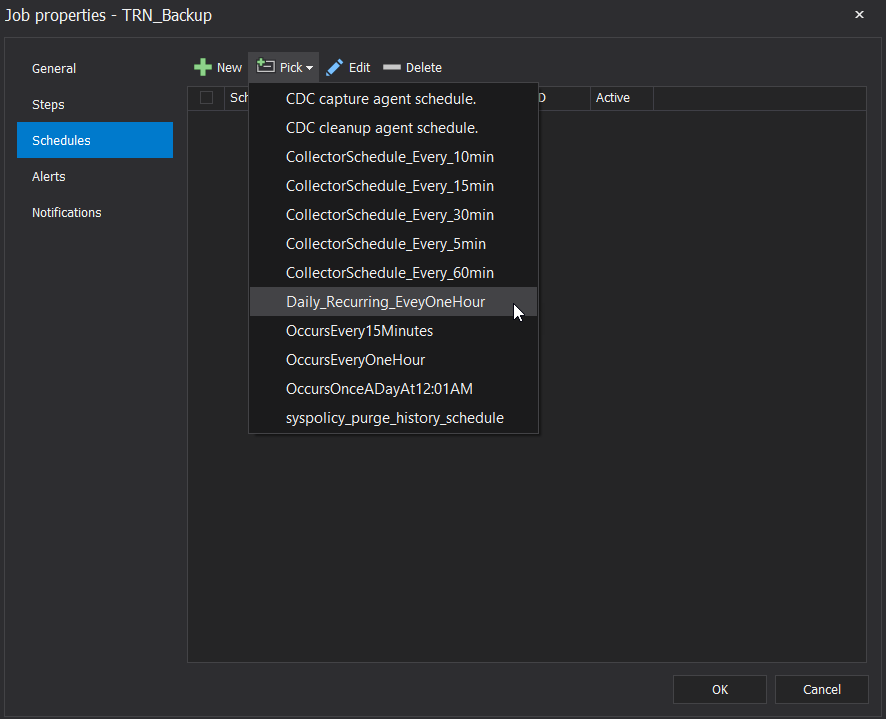
Click on the Jobs tab from ApexSQL Job, select the job that you need to attach the schedule then click on the Edit button. From the Job Properties window, browse to the Schedules page and click on the Pick option to choose the proper schedule, as shown below:
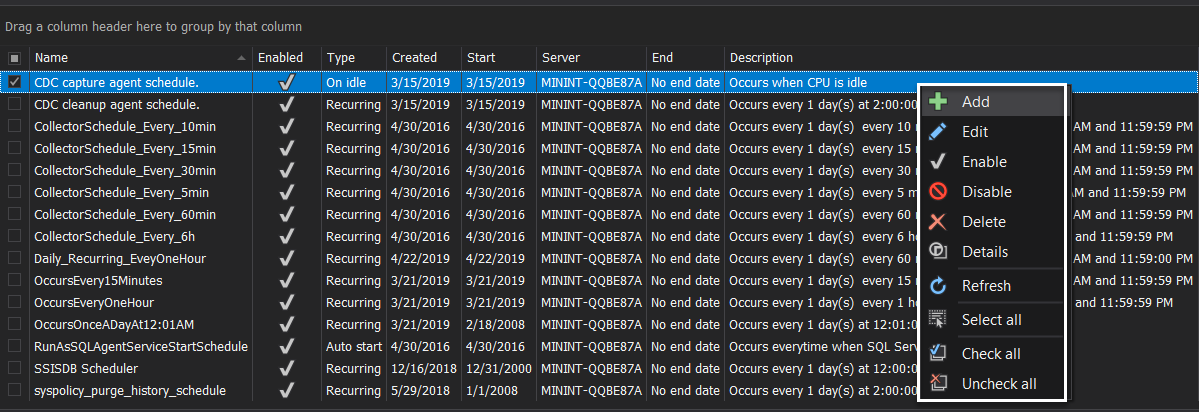
Take into consideration also that, you can easily select the schedule that you are interested in from the schedule view then right-click anywhere on that view and all the discussed tasks can be employed from here, as shown below:
April 25, 2019


