


This article will cover SQL Server Agent capabilities and features as well as tools to extend and enhance these core capabilities.
SQL Server provides us with the ability to schedule the different types of administrative tasks, in order to execute it automatically with customizable configurations. These tasks can be simple queries, database maintenance tasks, such as database backup, integrity check, re-indexing or statistics update, command prompt application, Microsoft ActiveX script, Analysis Services command or complex SQL Server Integration Service Packages. The Windows service that is responsible for scheduling and executing these tasks is called the SQL Agent Service.
A group of administrative scheduled tasks that are executed sequentially by the SQL Server Agent is called a SQL Agent Job. The tasks are organized within the SQL Agent Jobs as Steps, with each step will have its own connection and executing task. Each job runs on a Schedule, that specifies the date, time and frequency of the job execution, with the ability to use the same schedule to run multiple jobs. On the other hand, a single job can be run using more than one schedule. The execution of the SQL Server Agent job can be triggered also as a response to specific events, such as starting the SQL Agent service or when the CPU is considered as idle, with a predefined idle threshold. SQL Agent jobs can be also run on demand with no defined schedule, or as a result of the failure of another job.
The SQL Agent Job can be scheduled to run on a local or remote SQL Server. The Job can be also scheduled to run on multiple SQL Servers by defining a master server and one or more target servers. You can run the SQL Agent Job using a specific security context, such as using SQL Agent Service Account, or using a predefined proxy account that helps accessing the external system resources.
The SQL Server Agent can be also used to trigger alerts or send notifications automatically, in response to the Job execution result, which makes the process of monitoring and administrating these SQL Agent Jobs easier. To be able to create a SQL Agent Job, the user must be a member of SYSADMIN fixed server role, or minimum a member of the SQL Agent fixed database roles.
All the SQL Server Agent Jobs steps, schedules and execution information are stored in the MSDB system database. This information can be retrieved by joining the different views and tables within the MSDB system database in order to get meaningful information.
The default graphical user interface tool that can be used to create, configure, monitor and execute the different types of SQL Agent Jobs is the SQL Server Management Studio. But performing all these tasks on the SQL Agent Jobs using the SQL Server Management Studio is not piece of cake and requires big effort and good knowledge in these tasks, as they cannot be performed from one place. From this point, ApexSQL Job can help. ApexSQL Job is a tool used to create, configure, execute and monitor the different types of SQL Server Agent Jobs.
ApexSQL Job can be downloaded from the ApexSQL tools download site. The installation file is a small one, its size less than 40MB, but it performs large number of tasks as you will see later in this article:

Installation
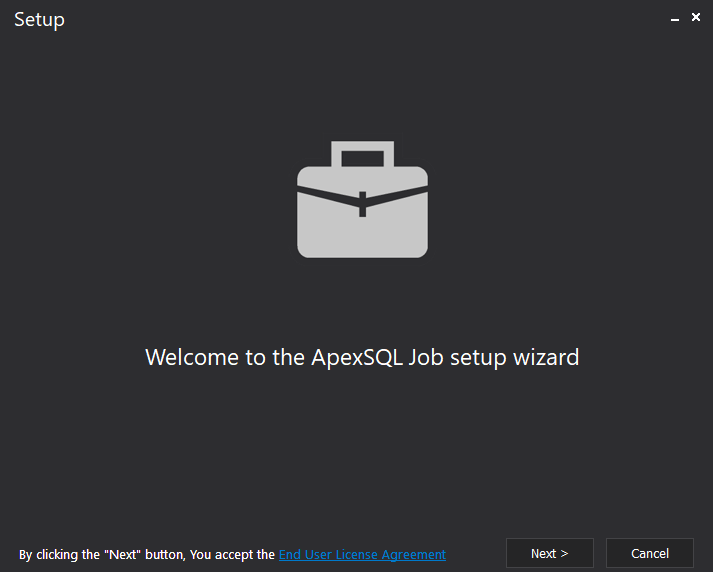
The installation wizard of ApexSQL Job is straight-forward. It will ask you first about the installation path of the tool and if you need to have a shortcut icon on your desktop, then it proceeds with the installation quickly:
ApexSQL Job is installed on your machine now and ready for use. SQL Server Agent job tool can be identified by its unique icon, in the shape of a business bag that organized your jobs

Getting started
When you run the ApexSQL Job tool, it looks like:
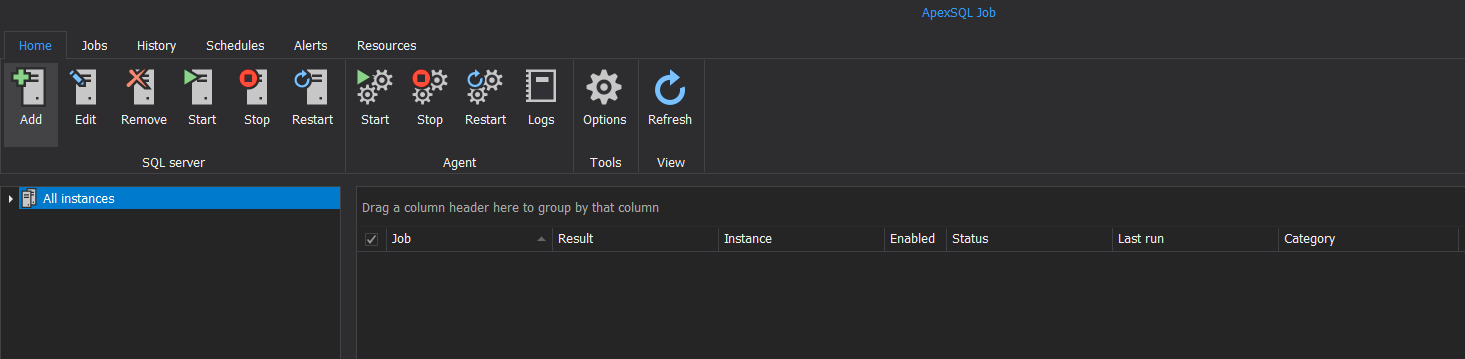
What makes ApexSQL Job intuitive, is that it describes itself. Just look at it and you will know that, you need to add a SQL Server instance or multiple instances, check that the SQL Agent Service is running then start creating new SQL Server Agent jobs and administrate the existing ones.
Main functions
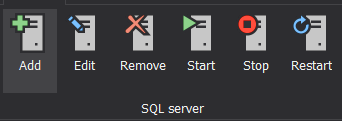
The functions of ApexSQL Job are divided into six main tabs. Each tab is responsible for specific tasks. For example, the Home tab includes the tasks that manages the SQL Server instances, such as adding a new SQL Server instance, editing an existing instance, removing an instance from the selected folder, starting the SQL Server service, stopping the SQL Service and finally restarting the SQL Server service, as shown below:
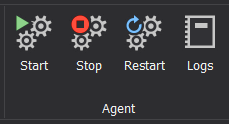
The second part of the Home tab is used to control the SQL Server Agent service, by starting, stopping or restarting the SQL Agent Service, in addition to checking logs of the agent service, as follows:
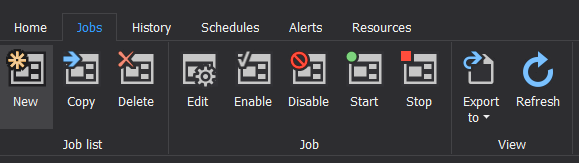
As the name indicates, the Jobs tab is used to perform the tasks related to the SQL agent jobs. This includes organizing the jobs list by creating a new job, copying a job from one server to another and deleting the selected job. Under the same tab, you are able to control the SQL agent jobs settings and execution, by editing the selected job settings, enabling or disabling the selected job, starting or stopping the SQL Server Agent jobs or exporting the jobs list to four different formats, as shown below:
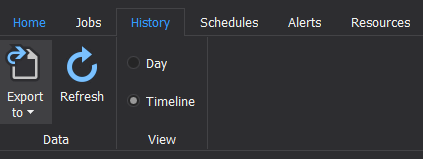
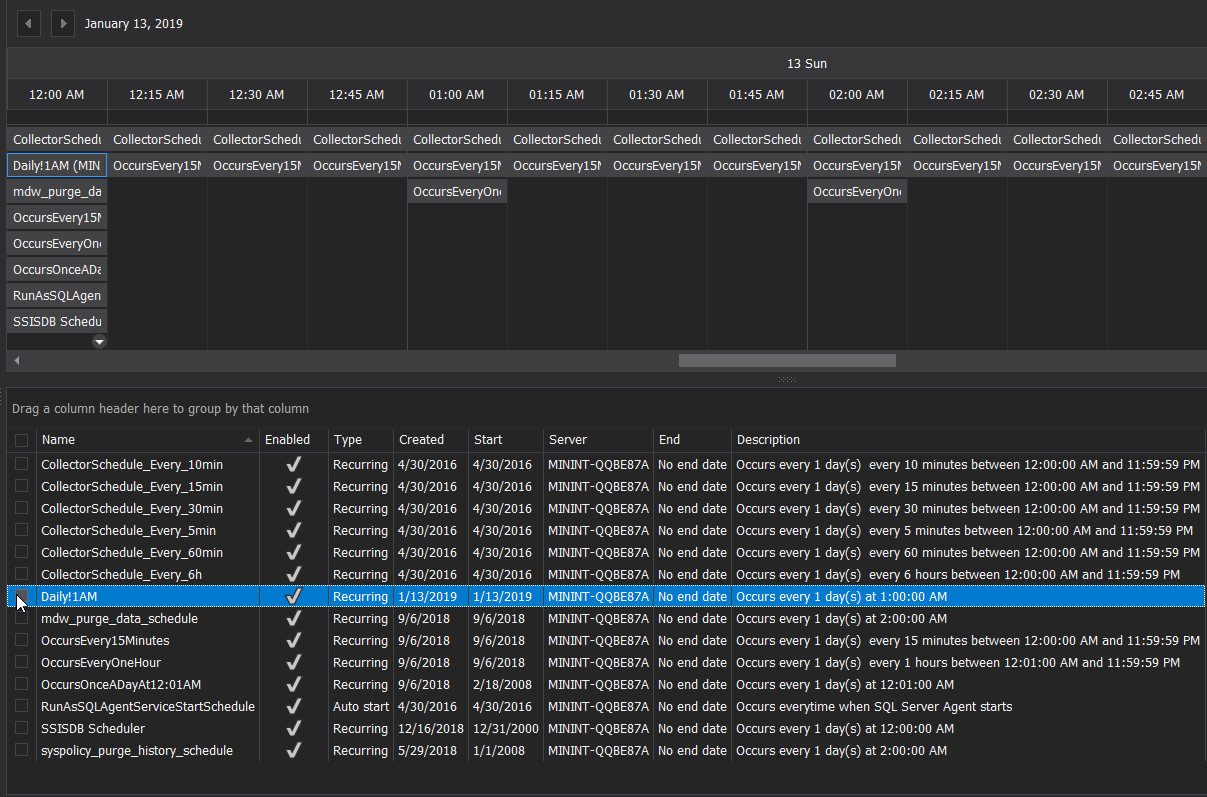
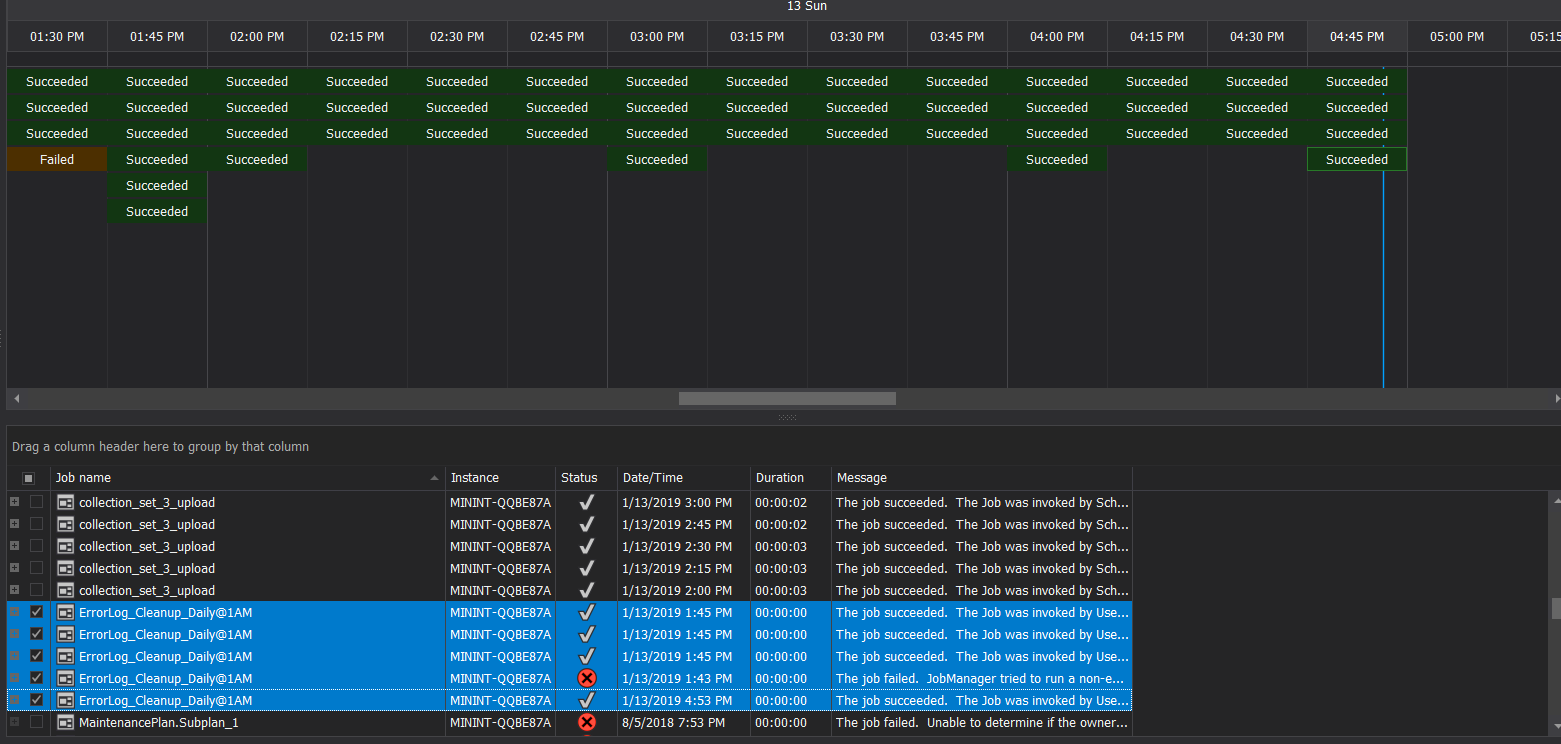
The History tab will display the execution history of the SQL Agent jobs, viewed in horizontal or vertical time slots, with the ability to export the selected jobs history to different formats, as shown below:
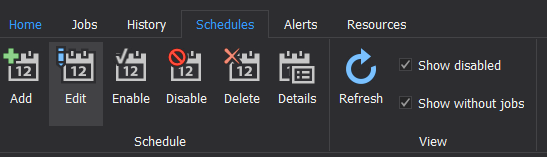
The Schedules tab contains the tasks that are used to control the SQL agents job schedules. This includes adding a new schedule, editing an existing schedule, enabling, disabling or deleting the schedules and checking the selected schedule details with the actions performed on that schedule, as shown below:
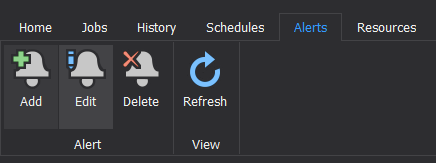
The SQL Server Agent jobs alerts are configured and managed using the tasks located under the Alerts tab. It allows you to add a new job alert and edit or delete an existing one, as follows:
Job configuration
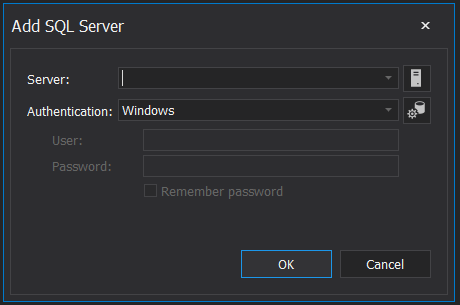
Until this point, we are familiar with ApexSQL Job components. Let us start using it to configure the SQL Agent jobs. The first step that should be performed is adding the SQL server instance that we will configure its SQL Server Agents’ jobs. To add a new SQL Server instance, click on the Add button under the Home tab, and specify the name of the SQL Server instance that you will work with, SQL Authentication or Windows Authentication mode, and the credentials that will be used to access that SQL instance, as shown below:
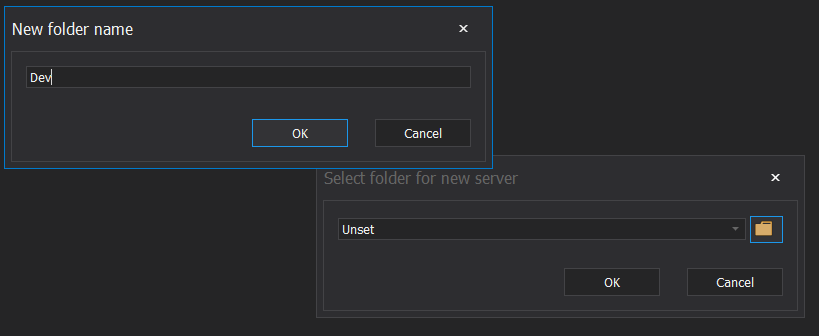
As ApexSQL Job can be used to configure the agent jobs on multiple instances at the same time, it organizes the servers within folders. So, when you add a server, it will ask you if you plan to add it under an existing folder, or create a new folder, as below:
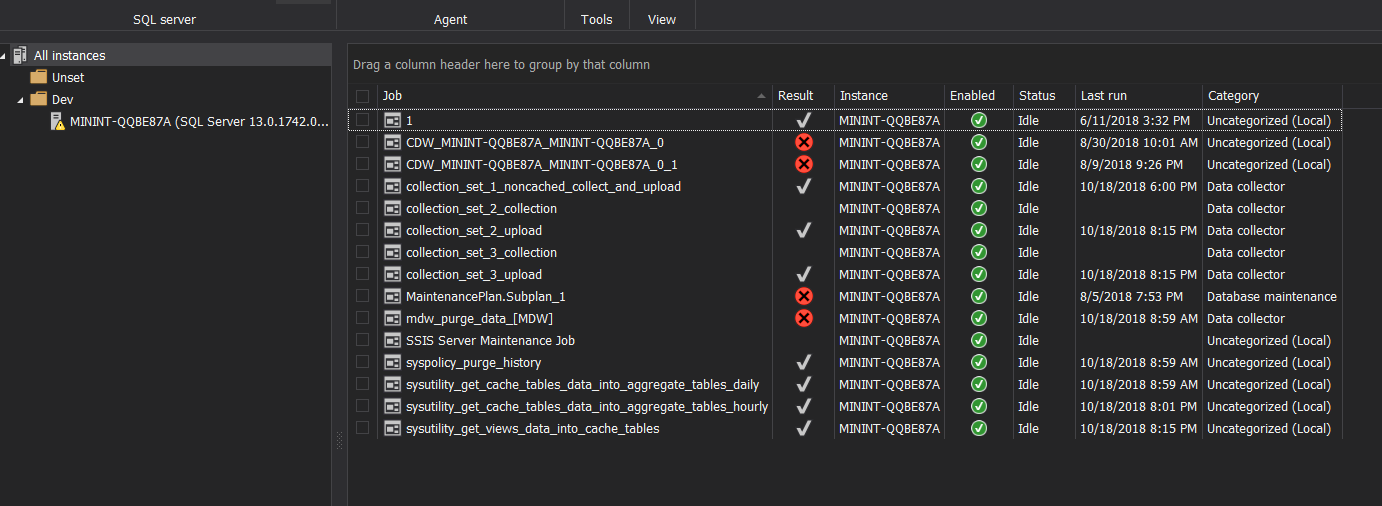
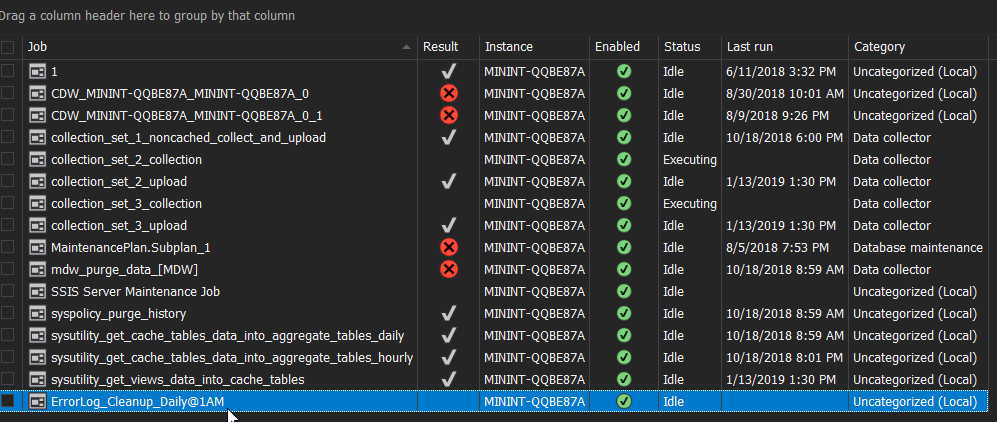
When you add a SQL Server instance, SQL Server Agent job software will add it under the specified folder and list all the existing agent jobs in a detailed view, as shown below:
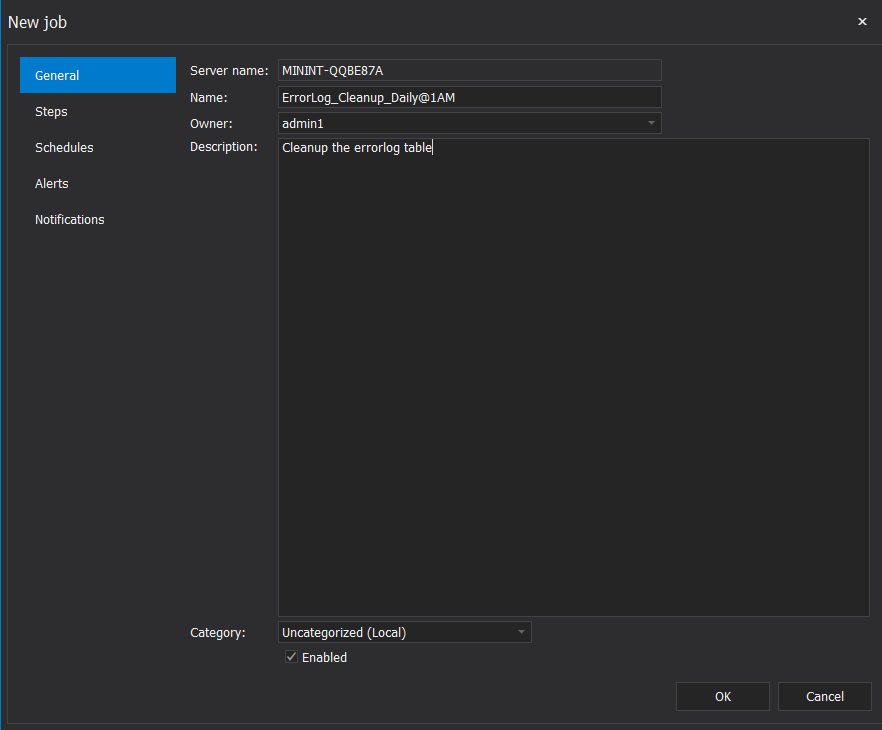
To create a new job on the connected SQL Server instance, click on the  button under the Jobs tab. In General page of the displayed New Job window, provide an indicative name of the SQL agent job, that shows the functionality and the execution frequency of this job. In the same page, you can specify the owner of the job and a meaningful description of its functionality, as shown below:
Under the Steps page of the New Job window, you can add a new step in the SQL Server Agent job, edit or delete the selected step and finally specify the execution order of these steps within the job. To add a new step, click on the New option, specify an indicative name of the step that describes what will be performed inside it and the type of operation that it will execute, as shown below:
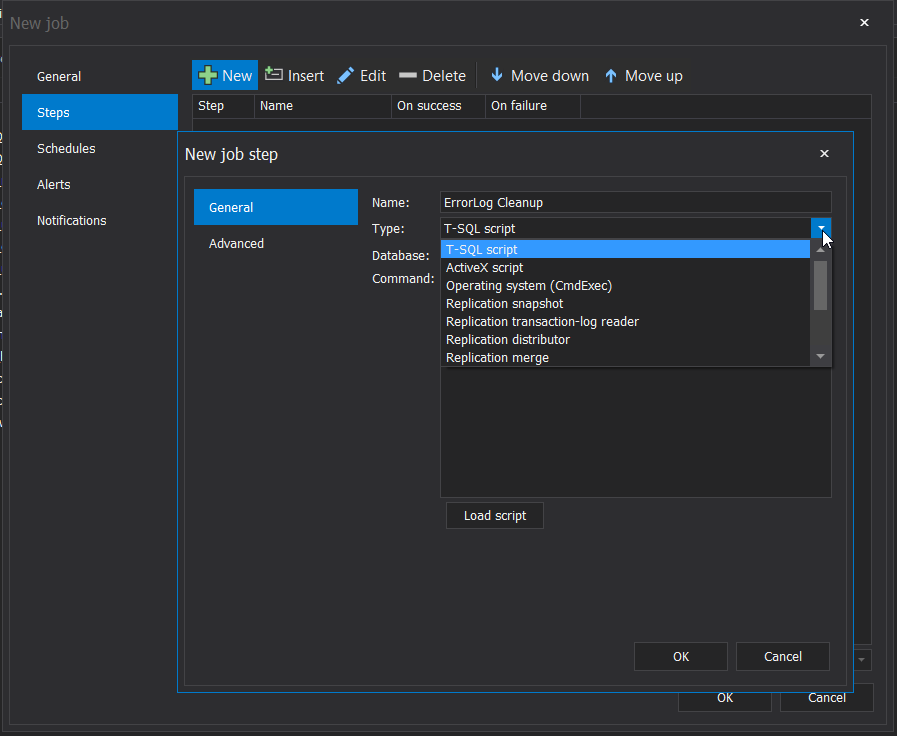
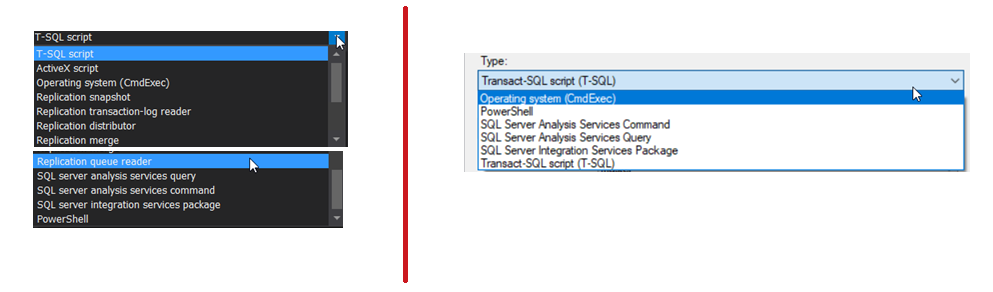
It is clear from the types drop down list, that ApexSQL Job allows you to add steps that executes twelve types of tasks, compared with the SQL Server Management Studio that provides you with six options only, as shown below:
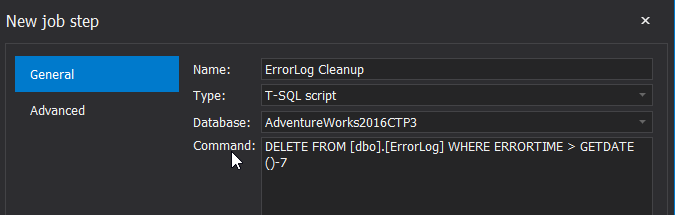
After specifying the task operation type, you can write the command directly in the Command space:
Or load a previously prepared script directly, using the Load Script option, as shown below:

Once you specify what will be done in the created step, you can control the action that will be performed when the step completed successfully or failed, the number of retries in the case of the step failure, if you prefer to retry the step execution after a specific time and where to write the output of the step execution, as shown below:

The step is created successfully as follows:

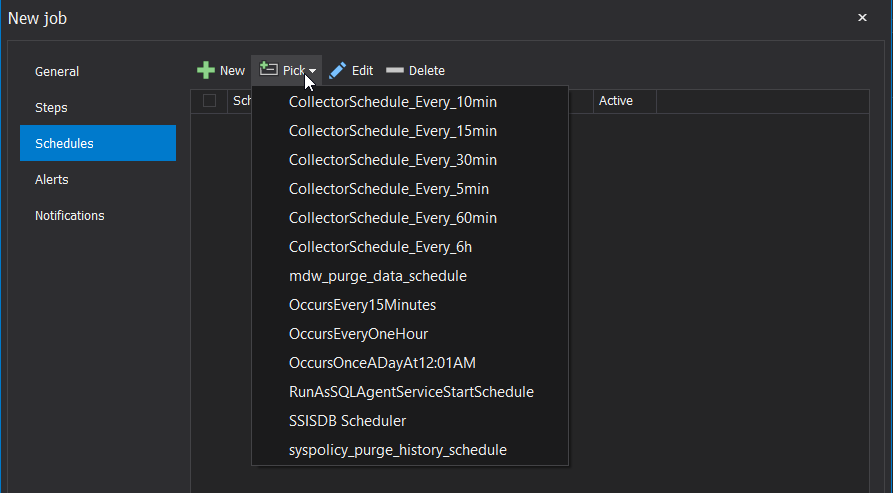
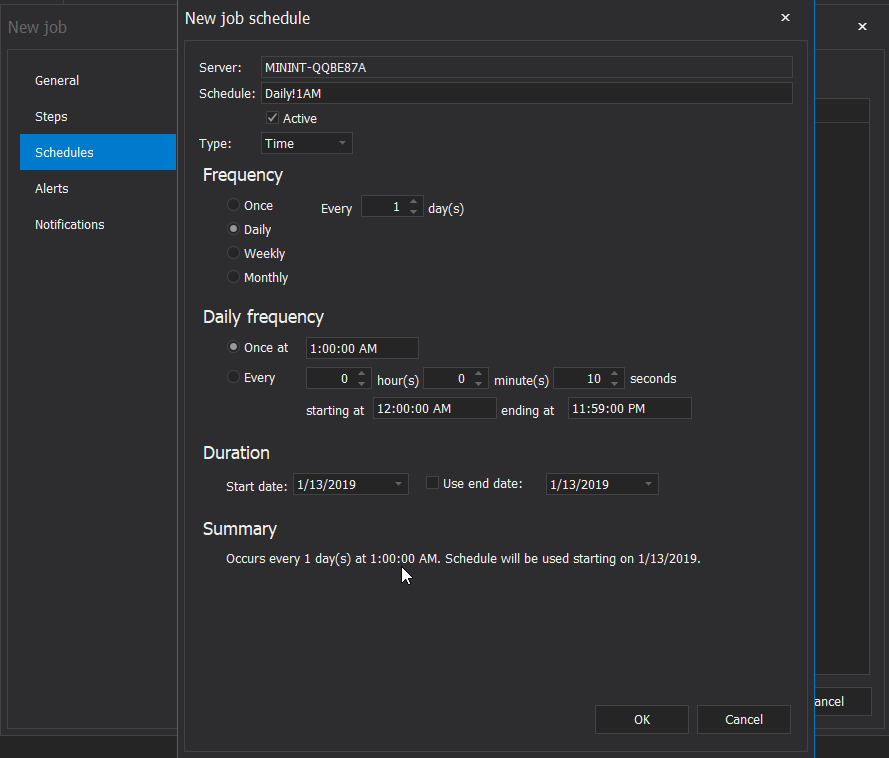
For now, we have configured what will this package do. The next step is to specify when and how frequent this SQL Server Agent job will be executed. In addition to creating and organizing the SQL agent jobs schedule from the Schedules tab, ApexSQL Job tool allows us to create a new schedule for a specific job from the Schedules page of the New Job windows, pick a previously created schedule, edit or delete an existing one, with the ability to create more than one schedule for same agent job, as shown below:
The New Job Schedule window provides you with various options to specify when and how frequent the job will be executed, with a clear summary for the selected options, as below:
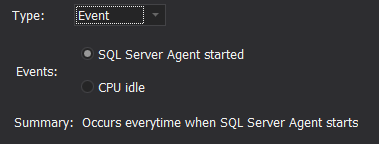
The schedule can be also created as a response to a specific event. For example, the SQL Server Agent job will start directly when the SQL Server Agent service starts or when the CPU is considered as idle, as shown below:
And the schedule is created successfully as follows:
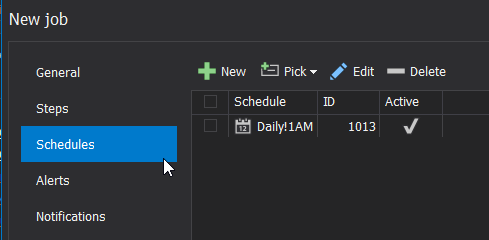
The created schedule can be also checked or configured under the Schedules tab, as below:
Rather than monitoring the SQL Agent jobs manually, ApexSQL Job tool allows you to create a new Alert for your job, in which you specify the action that will be performed if the job fails, as shown below:
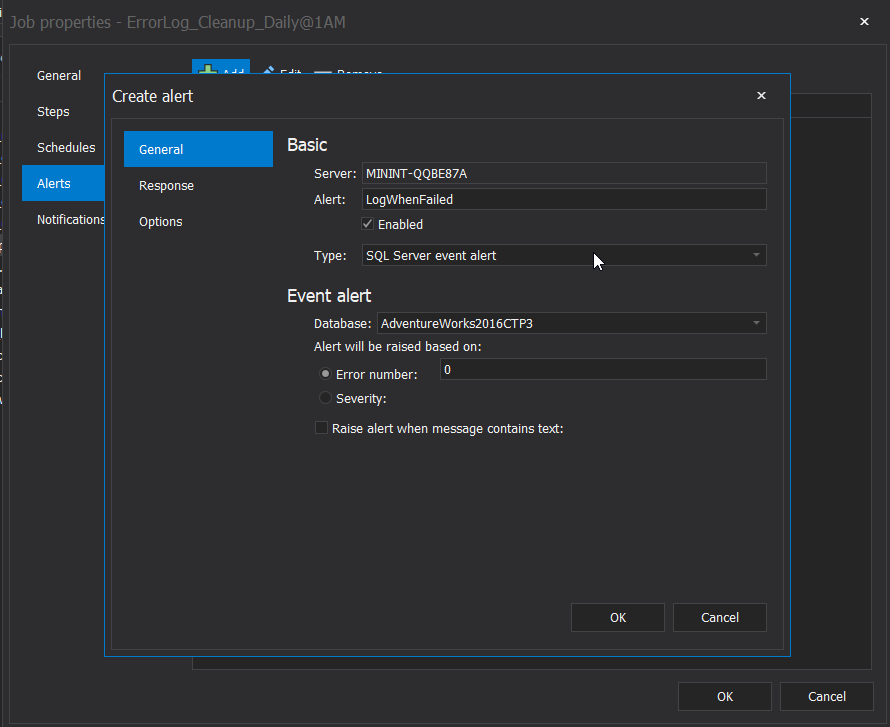
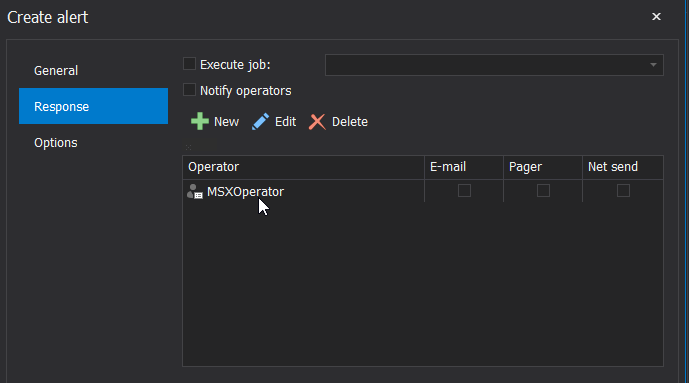
This includes executing another SQL Server Agent job when the specified job fails, or notify a defined operator, using the different available notification methods, as follows:
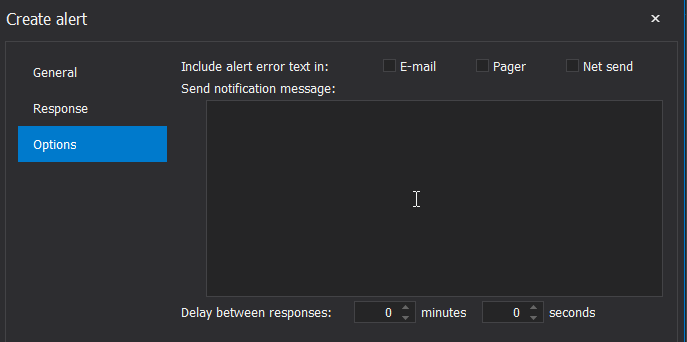
You can also define the message that will be received by the operator and the time delay between the notifications as shown below:
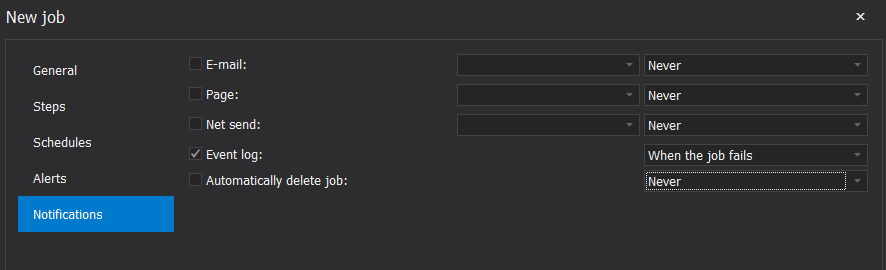
And finally, in the Notifications page, you can specify how to response to the successful and failed execution of the job, by notifying a specific operator, writing a record in the event logs or delete the SQL Agent job, as shown below:
The SQL Server Agent job is created successfully now as you can see from the SQL agent jobs list below:
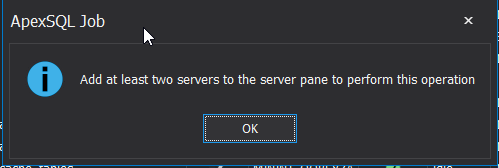
ApexSQL Job allows you to perform multiple number of operations on the created task. For example, you can use the Copy option from the Jobs tab to copy the SQL Agent job to another server. If you do not specify a destination server for the copy operation, you will receive the notification message below:
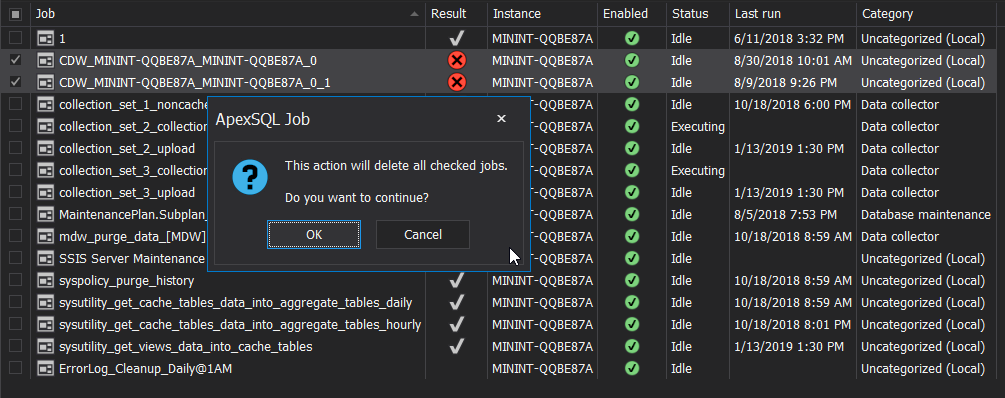
From the same Jobs tab, the Delete option is used to delete the selected SQL Agent job(s), as shown below:
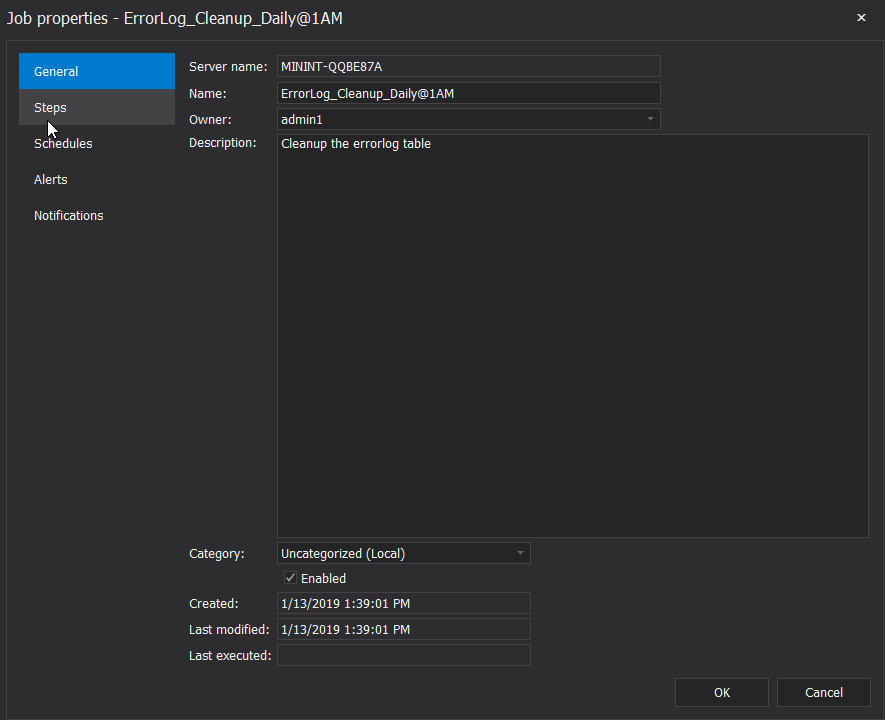
To reconfigure the SQL Server Agent job settings, select the job and click on the Edit option, that will open the job properties windows, allowing you to change any of the previously configured setting, as below:
To allow the SQL agent job to run automatically using the defined job schedule, click on the Enable option. On the other hand, clicking on the Disable option will disable that job and limit its execution with the manual execution option of the job. In the snapshot below, the first job is enabled, with green checked circle, and the second job is disabled with black circle:

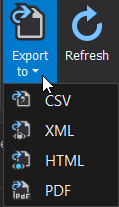
Exports
SQL Server Agent job tool provides you also with an option to export the selected jobs list to four different formats, as shown below:
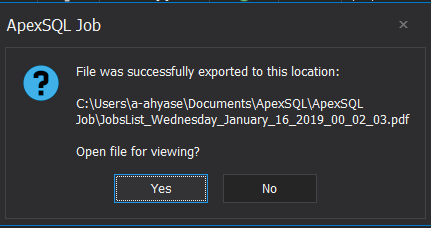
And no need to search where is the exported list stored. As the tool will ask you to open the generated file directly as follows:
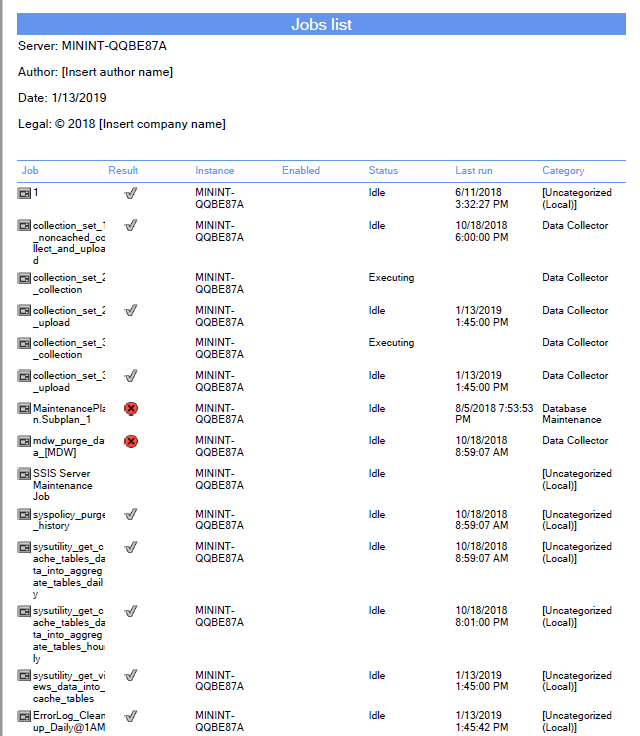
And the detailed exported list will be like:
Once created and configured, the SQL Agent job will be executed automatically based on the configured schedule. It can be also executed manually from the same place, by choosing the Start option under the Jobs tab, and stopped manually using the Stop option.
Navigation
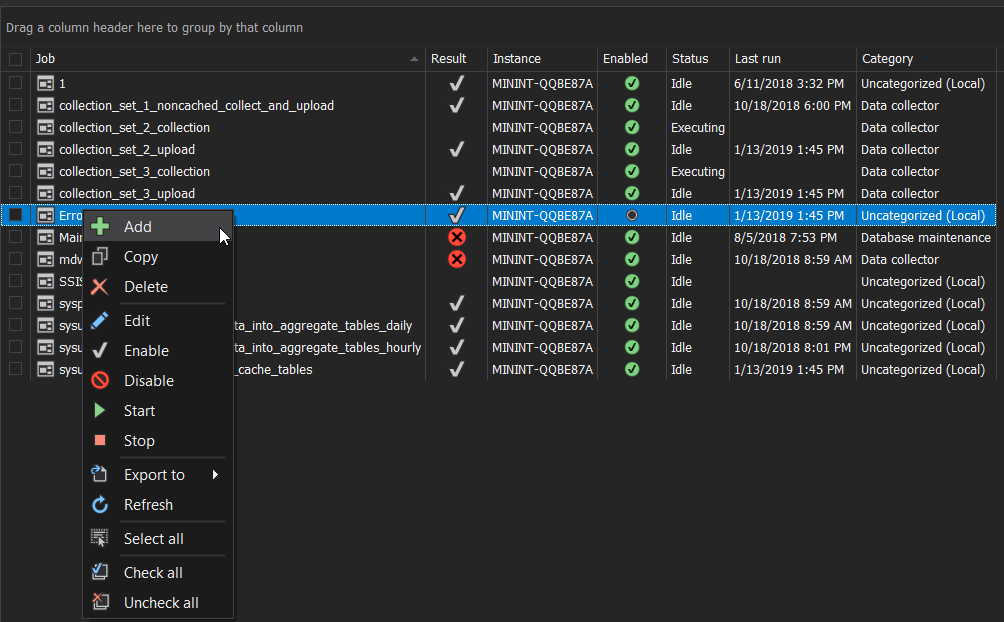
If travelling between the different tabs and options isn’t for you, ApexSQL Job tool allows you to perform all listed tasks on the SQL Server Agent job directly from the jobs list window, by right-clicking on the jobs list and choose the option of creating a new job, configuring or administrating the selected jobs, as shown clearly below:
Monitoring
ApexSQL Job can be used also to monitor the execution history of the different SQL Agent jobs. Click on the History tab, filter the job (s) that you need to check, and the execution results history of the selected jobs will be displayed in the shape of horizontal or vertical time slots, as in the results shown below:
January 17, 2019


