


In our case, someone has inadvertently dropped a foreign key from the specific table using the following SQL script which has left our database “broken” and it causing problems with client operations:
USE [AdventureWorks2014]
GO
ALTER TABLE [Sales].[Customer] DROP CONSTRAINT [FK_Customer_Person_PersonID]
GO
The challenge will be to solve this “crime” by confirming the suspected transaction, isolating when the change was made, who made it, and then, hopefully even quickly repairing the damage
In this series of articles, we’ll present various solutions for solving this “crime” by detecting the DDL change that broke a SQL Server database and even fixing the broken SQL Server database. The goal is to detect a bad change as quickly as possible (since there will be a lot of other changes) and to find a way to fix it.
For the purpose of this series we’ll show various solutions including
- Reverting to a previous version of an object from version control, specifically using the version control history. Skip to section
- Forensically investigating database changes and rolling back changes that have negatively impacted the database by reading the information inside the database transaction log files. Skip to section
- Auditing specific SQL Server events, investigate and analyze them and even set precautionary alerts to quickly notify DBAs on potentially hazard events using SQL Server extended events and/or SQL profiling. Skip to section
Version control
The first solution assumes that a database is already under version control. We’ll use ApexSQL Source Control as a 3rd party solution in this case.
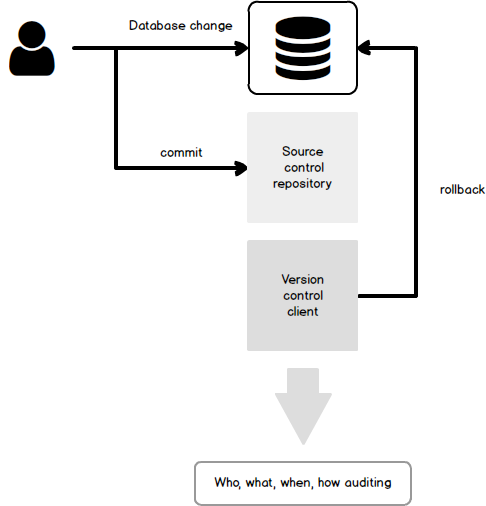
ApexSQL Source Control is a SQL Server Management Studio add-in that allows versioning a database from SSMS in just a few clicks, without the need for any additional software installed. Assuming that a number of other changes are committed to version control besides the one that broke a database, we’ll need to be able to quickly browse through committed changes in order to find the one that broke a database. In order to browse the history of committed changes on a database level, we’ll right click a linked database in the Object Explorer pane and choose the Project history option from the context menu:
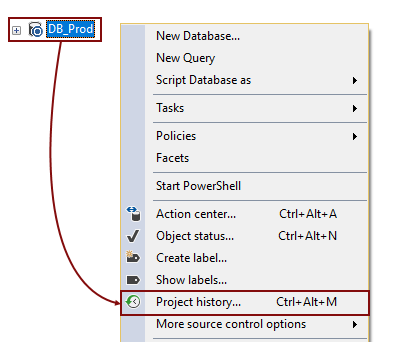
This initiates the Project history dialog where all changes made against a database from the moment of linking to version control will be shown:
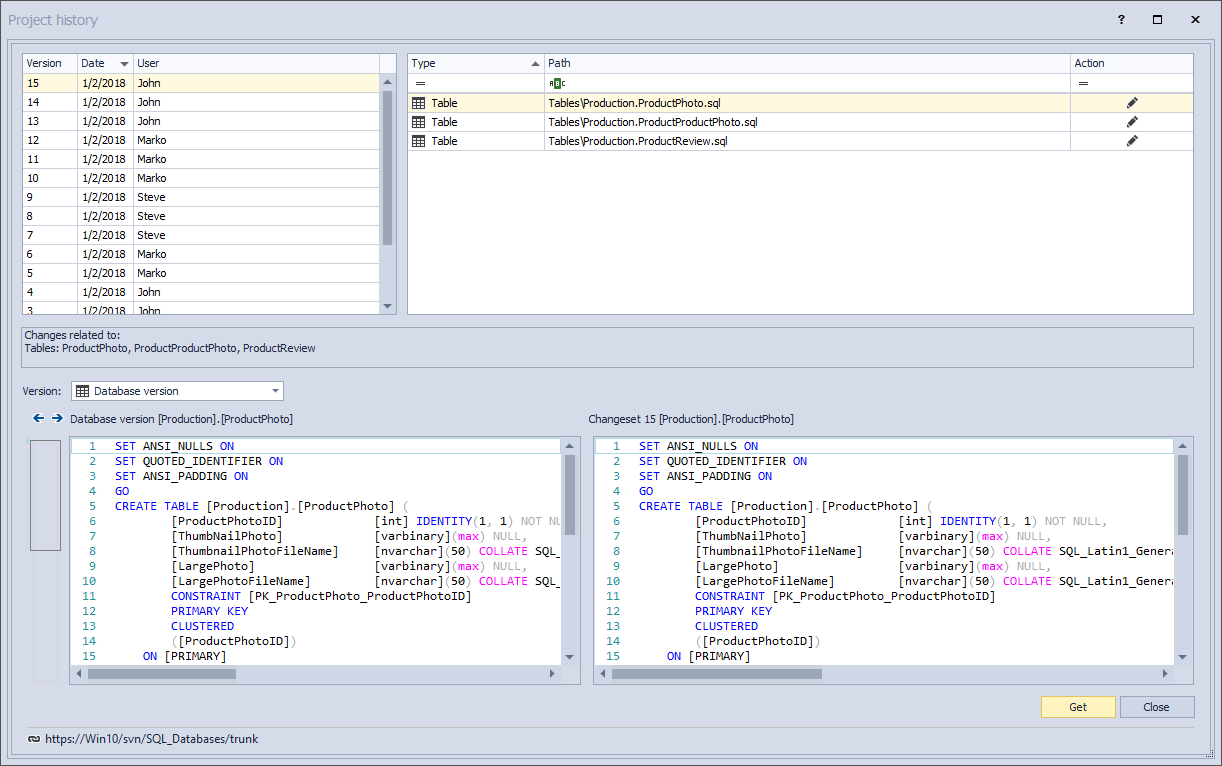
The upper left part shows a list of committed changesets along with the unique ID generated by the version control system itself and the date stamp for each changeset, as well as the user who performed a commit. This gives a general overview of who performed commits, without any other details:
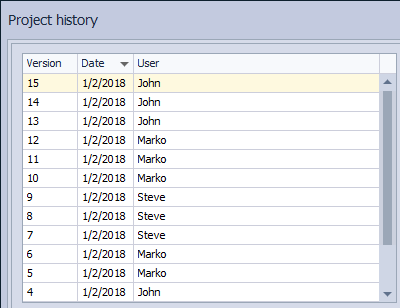
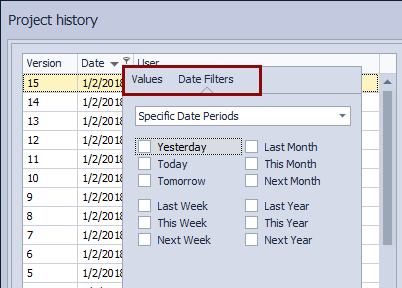
This will help us to quickly review a list of committed changes and if needed to filter out changesets committed at a specific period of time, by the specific user, or even to search through commit messages for the specific keyword. By filtering the list, we could reduce the number of committed changesets and easily find the changeset we want. For example, we could filter out changesets committed in the last 24 hours, or within any other specific time range using the filtering option:
Highlighting any of the changesets from the given list loads an object or a group of objects in the upper right section of the Project history dialog. Also, for each highlighted changeset, a corresponding commit message will be shown in the Comment area:

This allows reviewing committed objects from the selected changeset and to have more information about the exact change being made, through the commit message.
Let’s assume a DDL change that broke a database was committed a day before we investigated this. In order to bring all the committed changes from the previous day, we can simply filter out all the changesets committed “yesterday”, using the filtering options:

Since we are looking for the specific change where the foreign key is dropped from the Customer table, we can search for the Customer keyword in the commit messages, assuming that a table name is mentioned in a commit message when a change is committed:
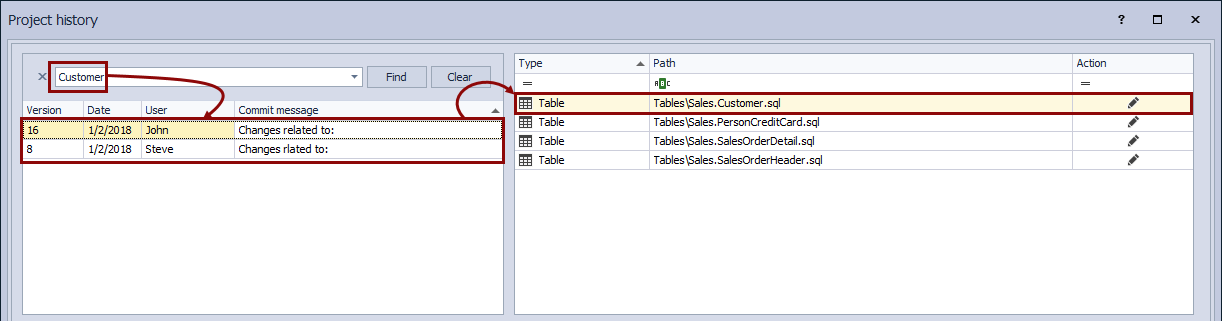
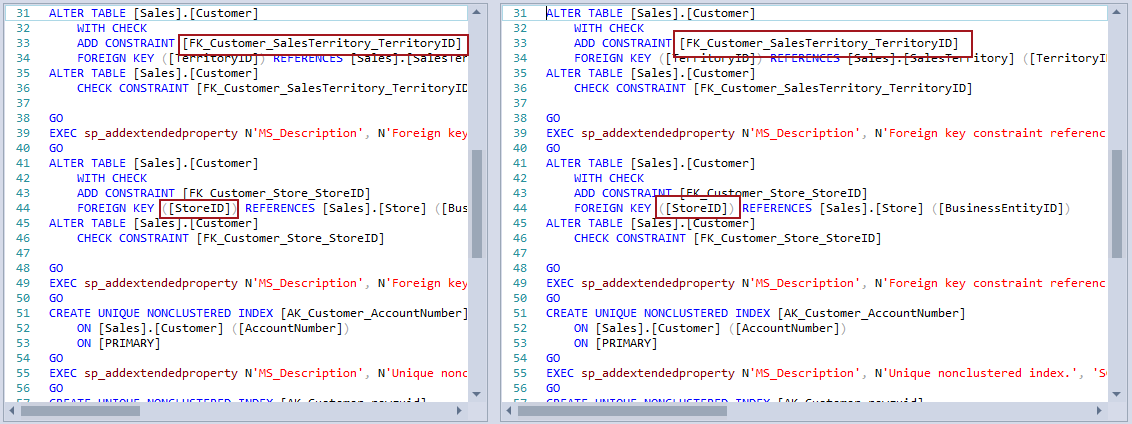
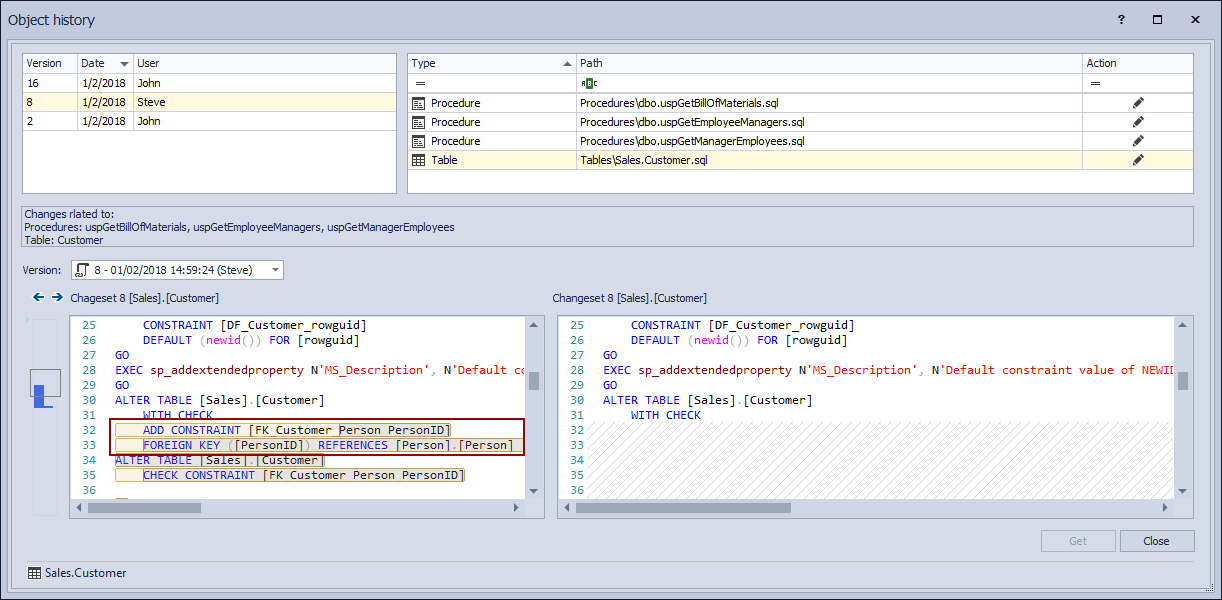
This will narrow down the list of committed changesets to a single one that contains a change related to the Customer table (In case of more than one changeset contains changes related to the Customer table, we’ll get more search results, but even then we could easily find a changeset with the foreign key change). By reviewing the exact SQL script, we can easily determine that in this changeset, a foreign key (FK_Customer_Person_PersonID) was deleted, since it does not exist in the version that was committed a changeset (shown on the right side) as well as in a database (shown on the left side):
How that we have found a changeset, we should revert to the previous version of the Customer table where the dropped foreign key existed.
Since we know the exact object that we need to revert, instead of working on a database level, we can switch to the history of the Customer table only. In order to do so, we will right click the Customer table in the Object Explorer pane, and choose the Object history option from the context menu:
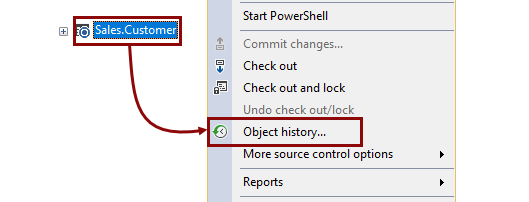
Similar to the Project history dialog, the Object history dialog shows the list of committed changesets but only those changesets that contain changes related to the Customer table:
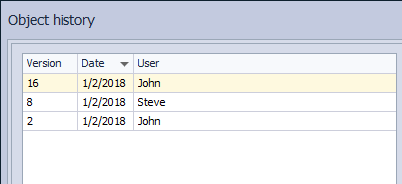
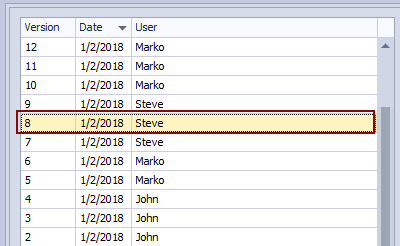
The most recent changeset is the same one we have found in the Project history dialog. However, if we highlight the previous changeset from the Version drop-down list, we’ll get the latest version of the Customer table where the dropped foreign key existed:
By getting this specific version of the Customer table and applying it to a database, we will fix the original issue. In order to apply this version, we need to highlight it in the list of changesets in the upper left section of the Object history dialog:
This will bring up the previous version of the Customer table, showing its script on the right side of the differences section, while the current version from a database will be shown on the left side. Differences related to the foreign key will appear so we can confirm what will be applied to a database:
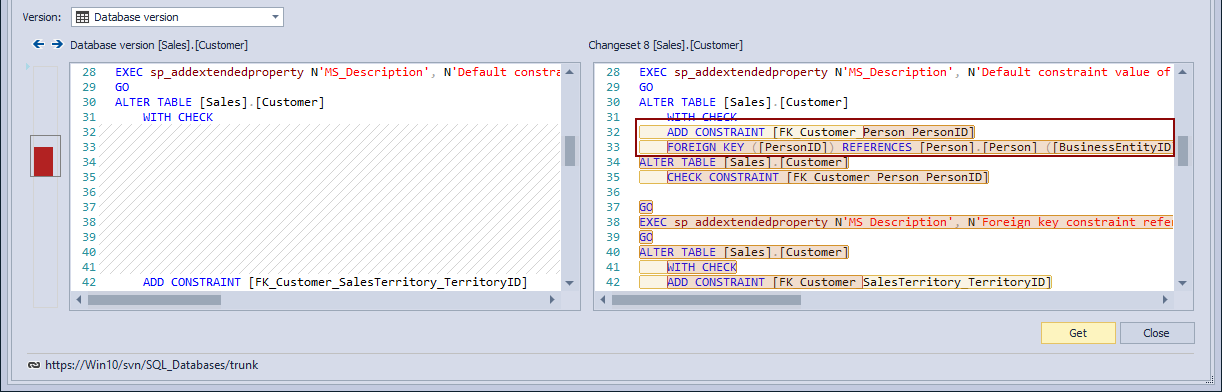
By clicking the Get button, ApexSQL Source Control will generate a synchronization script that will apply all the differences from the selected version against a database. This includes creating foreign key that was initially dropped as well as any other changes that need to be performed in order to keep a referential integrity of a database:
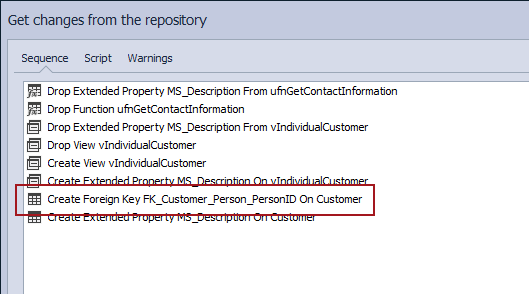
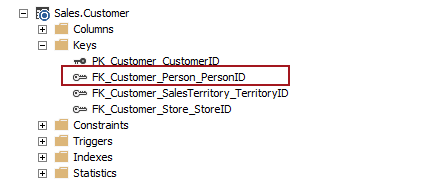
After applying a script, we can confirm that a dropped foreign key is successfully created:
Let’s review the results our investigation
-
Who made the change?
- In this case it was Steve as shown in the changeset details
-
When was it made?
- It was made on Jan 2nd, 2017
-
What was the specific transaction/operation?
-
A foreign key was dropped using the following SQL script:
ALTER TABLE [Sales].[Customer] DROP CONSTRAINT [FK_Customer_Person_PersonID]
-
A foreign key was dropped using the following SQL script:
-
On what machine, was the change made?
- There is no such information available
-
By what application?
- There is no such information available
-
Were we able to reverse the mistake?
- Yes, the problem is solved by reverting to a previous version of an object
What are the advantages and disadvantages of the version control approach?
Advantages
- A version controlled database offers a complete audit trail of checked in changes with lots of built in features to see a history of changes and compare versions
Disadvantages
- Version control can’t track changes that weren’t committed to the repository
- Some information like Machine and Application, that might be useful, aren’t tracked
- There is no means for automatically constructing a rollback script for a particular change. That would have to be done manually
- Version control must have been set up and implemented, prior to any inadvertent change, for it to be tracked and analyzed
Transaction log
For our next solution, let’s look at how we can forensically investigate this crime using ApexSQL Log to read the SQL Server transaction log, which contains all the clues we need to solve this crime.
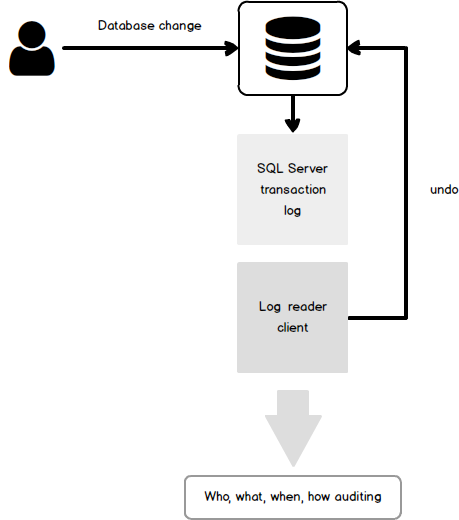
ApexSQL Log is a SQL Server transaction reader which can be used to read online transaction log file, transaction log backups or detached transaction log files (ldf) on demand, or on pre-automated schedule. By unveiling information stored inside transaction log files, ApexSQL Log enables users to look into any previous operations executed against their databases and to investigate information on those operations, including who made structural or data change (DDL or DML), when did the change occur, as well as much more details on executed operation and transaction where it was included. This allows users to perform forensic database auditing in order to investigate all changes on their database and perform forensic analysis in order to find out what changes negatively affected their database.
Furthermore, ApexSQL Log provides powerful rollback mechanisms which will allow users to undo any changes as if they’ve never happened with few simple clicks and allow users to quickly fix the broken SQL Server database. Let’s look into the process of forensic analysis and recovery from the inadvertent ALTER operation which incorrectly removed foreign key from our example table.
-
Start ApexSQL Log – new session will automatically start
-
Select a SQL Server, provide connection details and choose the database where the inadvertent ALTER was executed and click “Next”

-
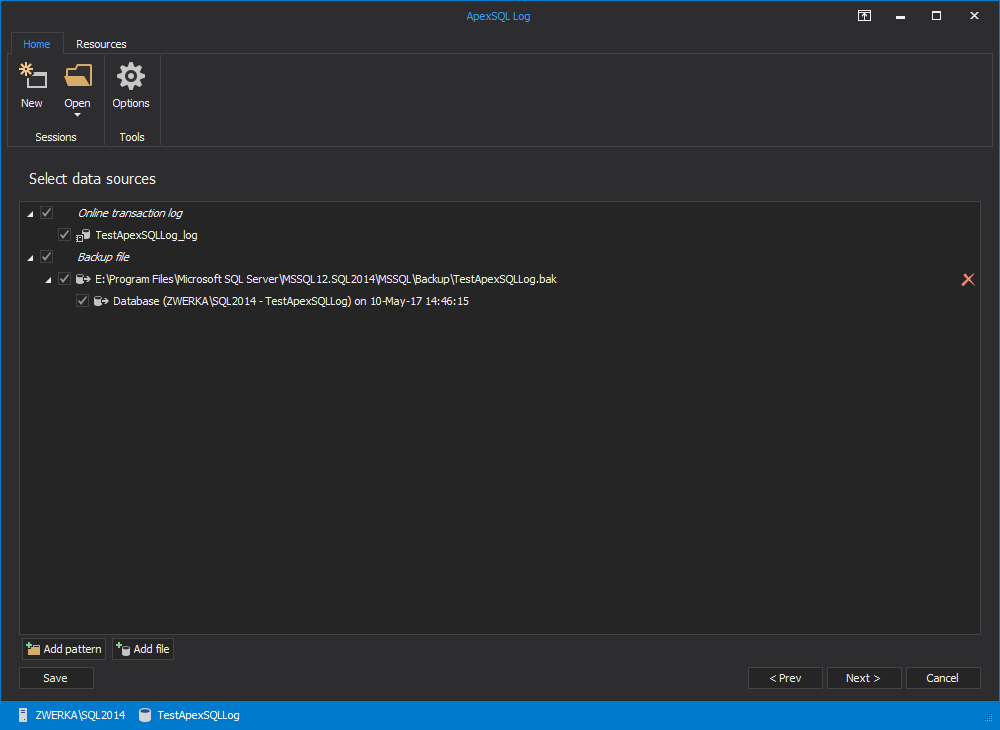
In the “Select data sources” step of the wizard, online transaction log file is automatically selected for auditing. If transaction log backups were created since the operation we are looking for has been executed, add a full chain of transaction log backups including the one which holds the information on the operation we are looking for by clicking on the ‘Add file’ button and adding all relevant files
-
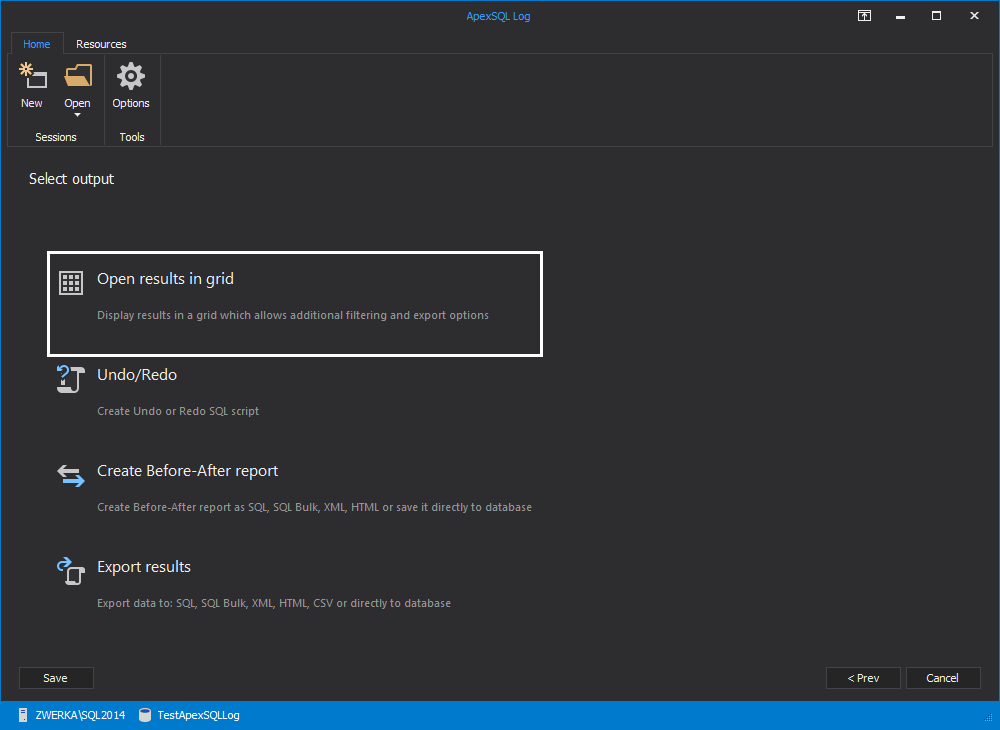
In the next step of the wizard, opt for the “Open results in grid” option so that the auditing results will be displayed in a comprehensive grid suitable for analysis and investigation
-
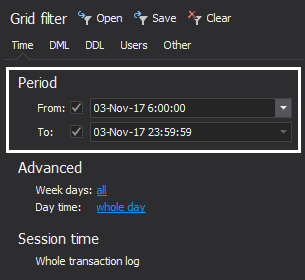
In the “Filter setup” step of the wizard, users can use variety of existing filters, including operation, table, time/date and other filters. It is generally recommended to utilize as many filters and possible in order to minimize the auditing results which will enable easier investigation. So, let’s choose time filter which will include the period when the table/database stopped working correctly, add DDL changes in operations filter and select only the table of interests and exclude others. Users can use more filters to fine-tune the auditing trail, and once this is done, click on the “Finish” button to audit results to the grid
-
Now that the information on executed operations is available to us in a comprehendible format, we can historically explore our transaction log and check all DML and DDL changes on our table of interest. Additional filtering can be imposed by using grid filters, and find option can be used to perform specific explore tasks. The best place to start with in order to isolate the change(s) is to use the information we have, for instance, in our example, we have the confirmed information that the database was broken in the specific time period, so we’ll be able to set date/time filters to narrow down the results
In case we have more information available on the issue, we can add more filters to further narrow down auditing results.
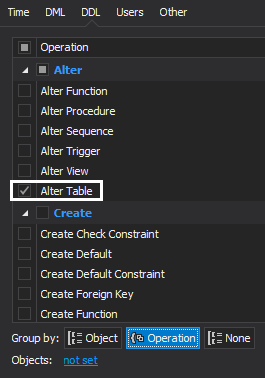
Let’s set DDL filter to exclude everything except for “ALTER Table” and also exclude DML operations
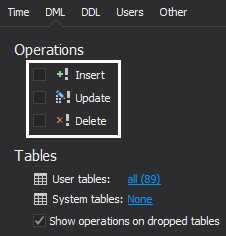
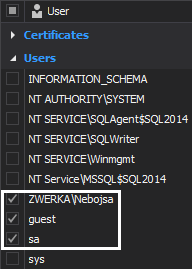
Finally, let’s exclude all users that are of no interest to our auditing tasks and include only those that could have performed the ALTER operation we are trying to recover from
Once all filters are set, we can click on the “Apply” button to have our grid filtered.
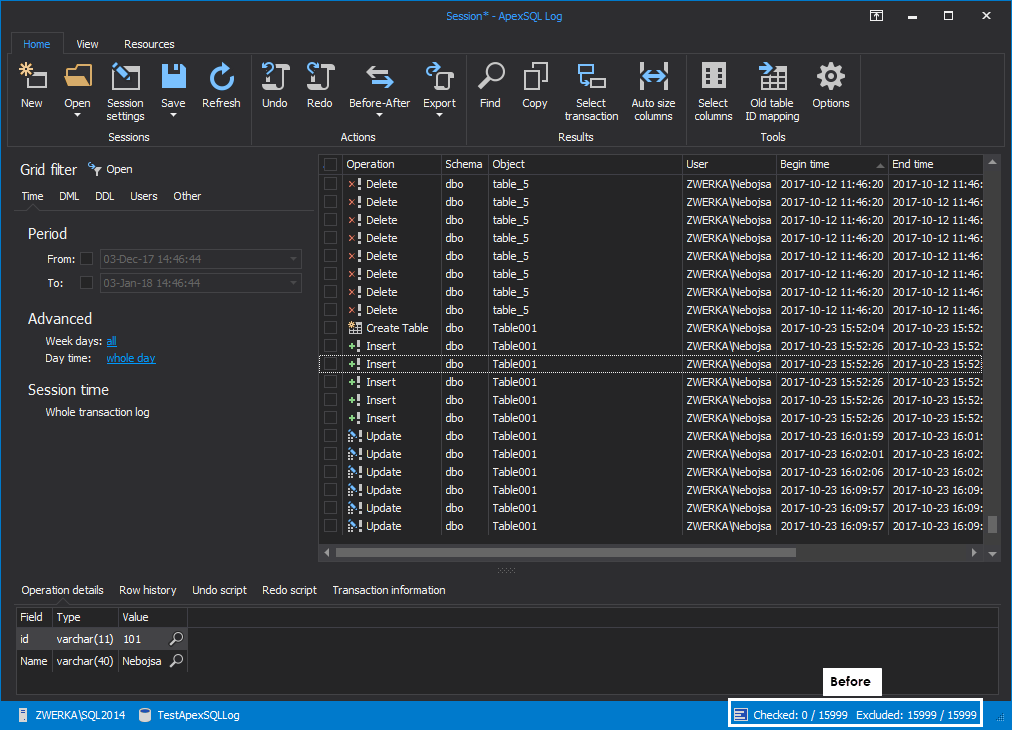
With these in place, we’ve narrowed down our auditing results from 15999 to only 2, and we can check each of them to determine how our database was affected and which one broke it.
Here is our initial audit:
And here is our audit after using available filters to isolate the ALTER operation which broke our database
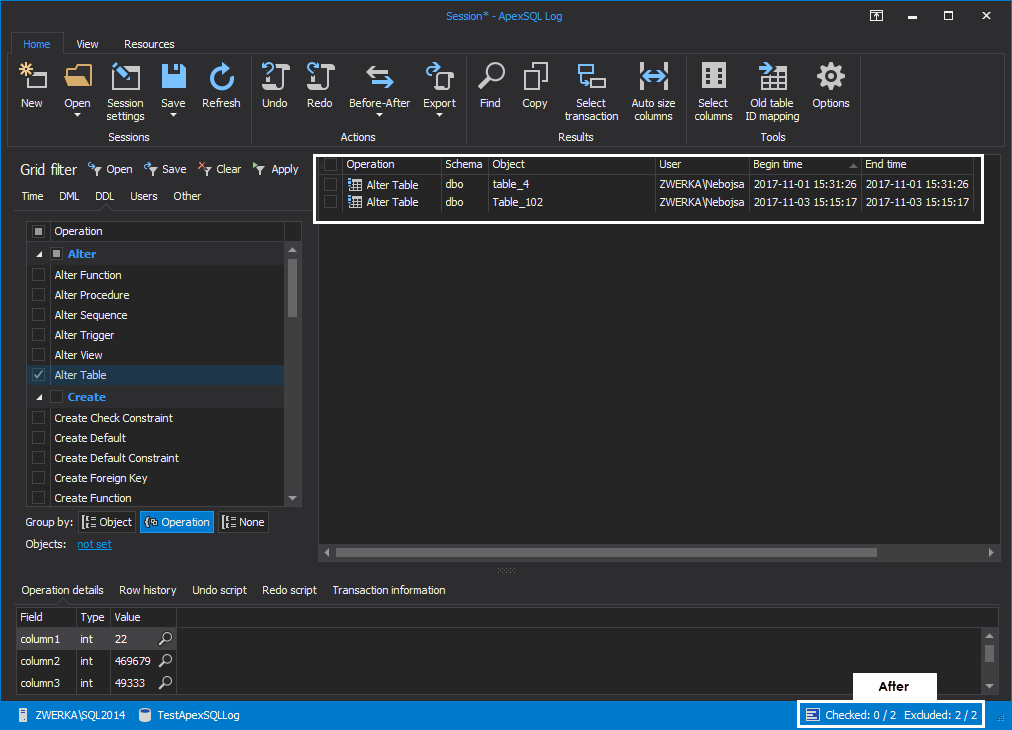
Finally, if we click on the “Redo script” button, we can see the actual script which broke our database

-
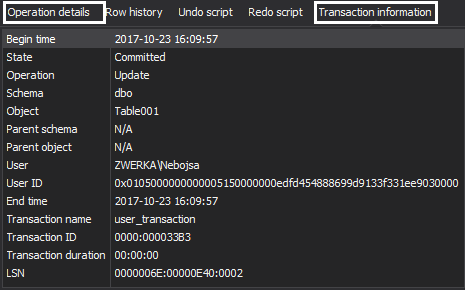
With all these assets at our disposal, it should be fairly easy to isolate any potentially problematic operations and to explore them individually in great details. In our case, once we’ve found our foreign key ALTER which resulted in the key removal, let’s click on it and see which SQL Server login has performed it and when. We can further explore it by clicking on “Operation details” and “Transaction information” tabs for relevant information
Now that we’ve completed our investigation and successfully isolated the issue which caused our table to falter, let’s look move forward and recover the broken SQL Server database. The best thing to do in these cases is to simply put the table back to its original state and rollback those unwanted changes. We are going to accomplish this task with ApexSQL Log by creating and executing an undo for our faulty ALTER.
-
Starting from the grid where we’ve completed our investigation, simply check the checkbox near the ALTER operation we want to rollback

-
Next, click on the “Undo” in the main ribbon. After short processing, ApexSQL Log will create a rollback script which can be opened in integrated editor or any other program such is SQL Server Management Studio

-
Finally, we can inspect the rollback script, and if needed even adjust or edit it if the demands need it. To complete the rollback task, simply click on the “Execute” button in the main ribbon and wait for the confirmation message that the execution was successfully completed
With this, our investigation and recovery processes are completed, and our broken table and SQL Server database have been fixed and are now completely operational, as if the issue was never there to begin with.
Summary
Let’s review the results our investigation
-
Who made the change?
- User “ZWERKA\Nebojsa”
-
When was it made?
- It was made 11/3/2017 15:15:17
-
What was the specific transaction/operation?
- ALTER Table operation was executed
-
On what machine, was the change made?
- This information is not available in ApexSQL Log
-
By what application?
- This information is not available in ApexSQL Log
-
Were we able to reverse the mistake?
- Yes, full recovery was made using rollback script created by ApexSQL Log
What are the advantages and disadvantages of the transaction log analysis approach?
Advantages
- Using the transaction log allows for changes to be investigated even if no software or system for tracking them has been set up. As long as transaction logs exist e.g. backups, online long, they can be read and analyzed to isolate historic transactions/operations
- As this approach simply reads the transaction log, there is no system maintenance or overhead
- ApexSQL Log can track any and all databases on a particular server, quickly and easily
- ApexSQL Log can easily and quickly reverse any transaction found, allowing for any inadvertent or malicious operation to be rolled back
Disadvantages
- Reading the transaction log requires a SQL Server to be set to Full recovery mode
- Transaction logs can’t be read for databases that use TDE
- ApexSQL Log does not provide information on client host and application used to make the changes we are investigating
Extended events, SQL profiler
Now let’s have a look into another method which will allow us to track all database changes and to perform real time auditing as well as real time alerting on such operations and events using extended events and/or SQL profiling.
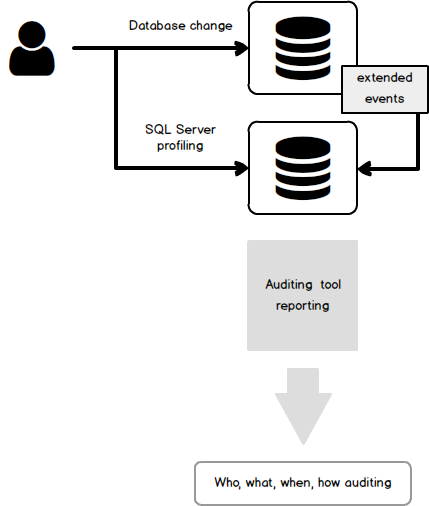
ApexSQL Audit is a SQL Server auditing tool which allows users to audit almost 200 SQL Server events in real time and store auditing results in a safe, tamper-evident repository database. This means that with ApexSQL Audit we can track all database changes, including all DML and DDL changes as well as security events, warnings, errors, backup and restore jobs and more and have auditing results safely stored and available for reporting at any given time.
While already mentioned ApexSQL Log reads the auditing information from transaction log files and backups forensically, ApexSQL Audit comes into play when we have a requirement for bigger auditing scope, or when we need to audit a database that is in a simple recovery model, which is not a valid target for ApexSQL Log due to the fact that in the simple recovery model transaction logs are frequently truncated and overwritten which means that there might not be sufficient information for ApexSQL Log to work with.
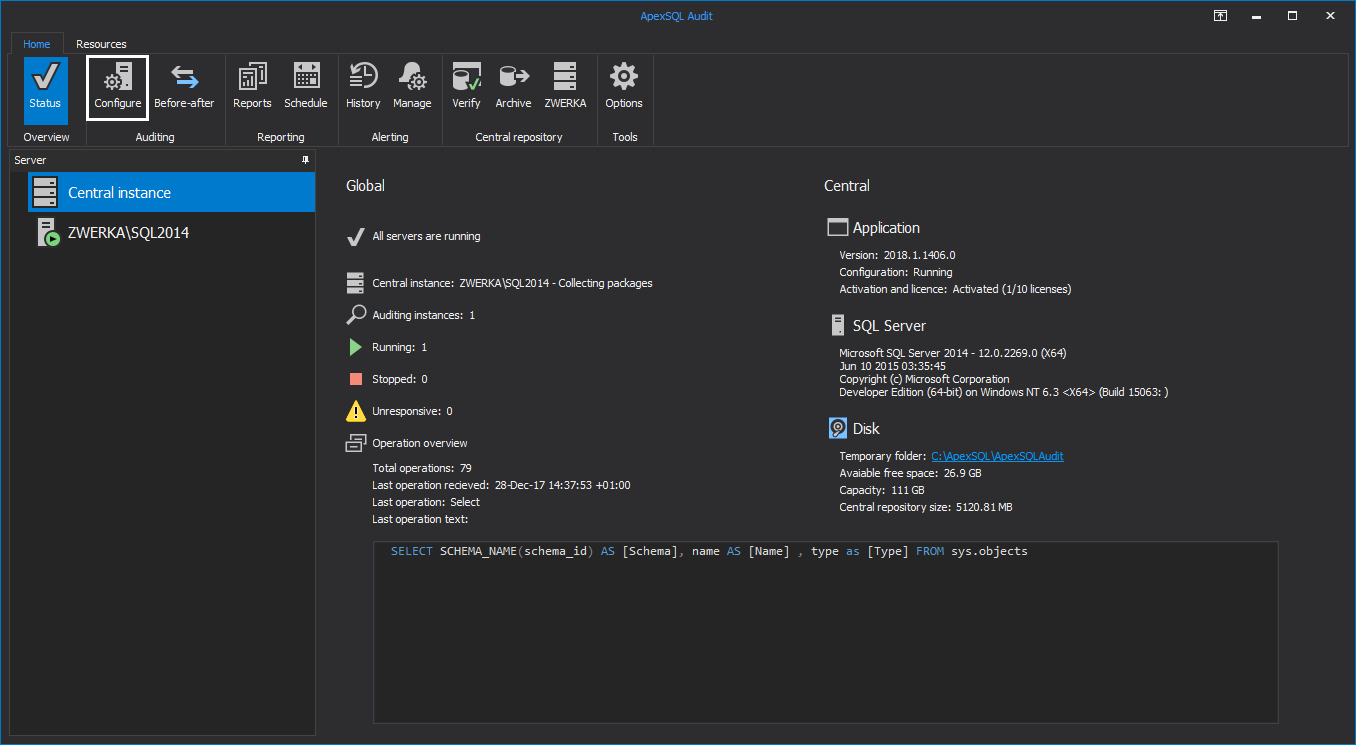
So, to start with the auditing, after the ApexSQL Audit has been installed, we need to first configure auditing by performing the following steps:
-
Start ApexSQL Audit and click on the “Configure” button in the main ribbon
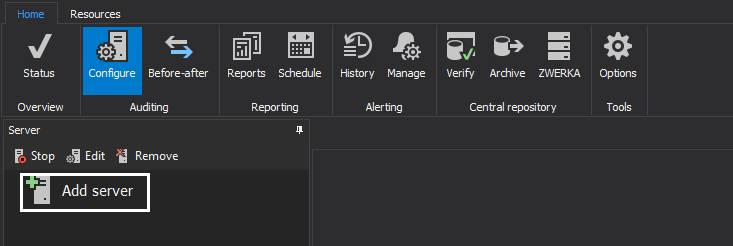
-
Click on the “Add server” button
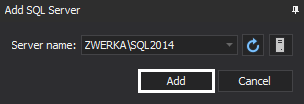
-
Type the SQL Server name or enter it manually and click on the “Add” button
-
Provide valid username and password, choose temporary folder location and click on the “OK” button

-
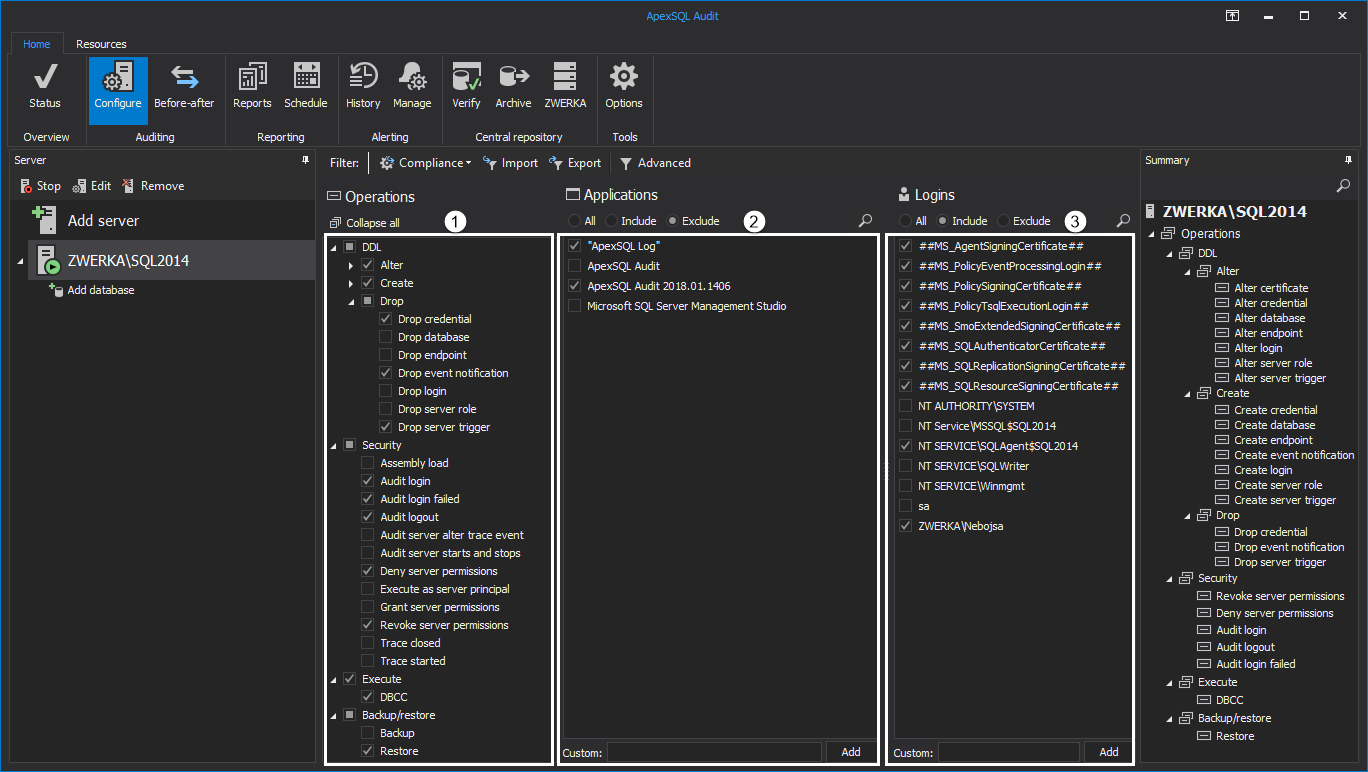
Next, we need to configure auditing on both server and database levels. First, check DDL, security, execute and backup/restore operations that need to be audited on the server level, and choose which applications and logins to include/exclude from the auditing process
-
Next, click on the “Add database” button to add databases for auditing
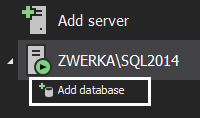
-
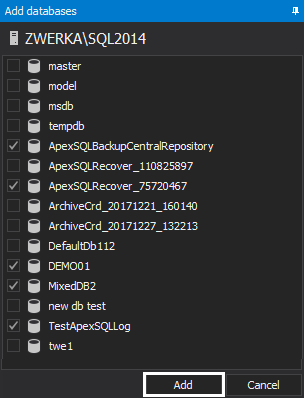
Check database that need to be audited and click on the “Add” button
-
Similar to the configuration for the server level, check the appropriate operations on the database level and choose objects that will be included/excluded from the auditing task. We’ve made sure to include auditing of ALTER TABLE operation so we can follow on our previous example

With this, the auditing configuration task is completed and ApexSQL Audit will now actively audit added SQL Server instance and appropriate databases for all specified operations.
Next, let’s quickly look into how we can quickly investigate the audited data.
ApexSQL Audit has a plethora of already built-in reports available to the users, while still providing users with the ability to generate their own fully customized reports.
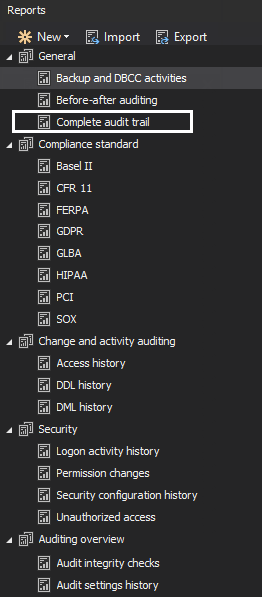
To do so, first click on the “Reports” button in the main menu

Next, click on the “New” button in the reports panel and chose an existing report template as a starting point – we’ll opt for “Complete audit trail” since this report does not have any limiting filters and includes full audited data
Next, let’s choose the operations we want to see in our report (ALTER operations under DDL category), and set out some filters to focus our report results as much as possible. We can add all known variables, like server, database, client host, login, time etc.
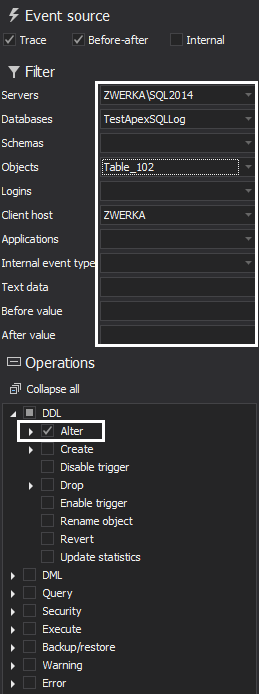
When we are happy with the report configuration, hit the “Preview” button to generate the report preview
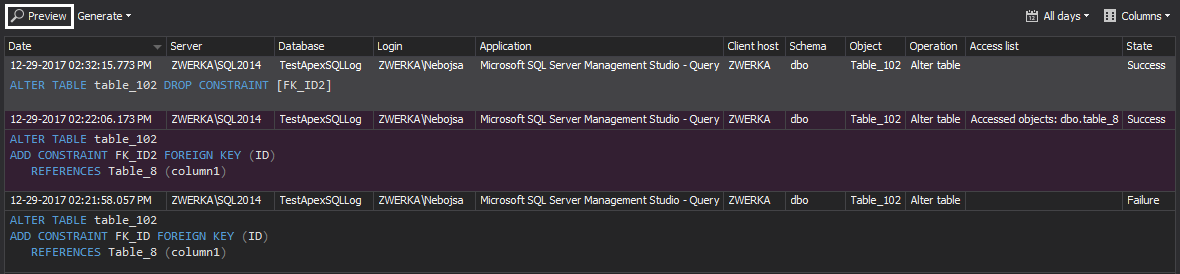
As can be seen in the image above, our preview shows that the constraint at the specific table column has been dropped. We can also see when the operation was executed, from which client host, which application and SQL Logins were used and more. Using this information, we can easily track the source of changes and make any needed actions.
Let’s review the results our investigation
-
Who made the change?
- User “ZWERKA\Nebojsa”
-
When was it made?
- 11/3/2017 15:15:17
-
What was the specific transaction/operation?
- ALTER table
-
From which machine, was the change made?
- It was made from machine (Client host) “ZWERKA”
-
By what application?
- SQL Server Management Studio (Query) was used to perform the change
-
Were we able to reverse the mistake?
- No, ApexSQL Audit does not have recovery mechanisms
Advantages
- ApexSQL Audit offers the most comprehensive details of the audited event including information on which client host and application were used to execute operations we are recovering from
- Audited data can’t be altered or removed without such attempts being made self-evident via the tamper-evident mechanisms in the repository
Disadvantages
- This system must have been set up and configured, prior to the event, for the transaction/operation to be reviewed and analyzed
- There is no built-in rollback of isolated transactions
- Some configuration and setup is required to define the audited events, specify a repository etc
Finally, let’s compare all the solution presented so we can make a best pick on which solution to implement as per our needs and investigation requirements
| ApexSQL Source Control | ApexSQL Log | ApexSQL Audit | |
| Auditing | |||
| Who |
|
|
|
| When |
|
|
|
| What |
|
|
|
| From where (Client host) |
|
|
|
| Application used |
|
|
|
| Recovery |
|
|
|
January 8, 2018


