


The scenarios
The applications used by travelling sales representatives, or other field workers – delivery drivers, visiting nurses, etc., are designed to collect data from remote locations and then send it to a data center. Also, the data from the data center, occasionally need to be sent back to these remote locations, to keep them up to date.
For example, whenever nurses pay a visit to a patient, they enter the information about the visit into the database on mobile devices. At the end of the day, all these entries created during the day are sent to the central database in a hospital. After that, the nurses can synchronize mobile devices with the database in the hospital data center, so they get the new information about their patients, and also, the information about any new visits they need to make the next day.
In the scenario such as this, there’s constantly a need to synchronize the information from a mobile device to a central database.
The solutions
1. Use SQL Server replication. It synchronizes databases by copying and distributing the records from one of the databases to another when these databases are in different locations.
There are some limitations when SQL Server replication cannot be used:
- Only Standard or Enterprise editions of SQL Server can act as a Publisher, so if free SQL Express is used, it will require an upgrade
- A configuration with a SQL 2005 Publisher and SQL 2008 Subscriber is not supported for web replication
- A Distributor version must be greater than or equal to the Publisher version
- A Subscriber version in transactional replication must be within two versions of the Publisher version, e.g. a SQL Server 2000 Publisher cannot have SQL Server 2012 Subscribers
- A Subscriber version in merge replication must be less than or equal to the Publisher version, e.g. SQL Server 2012 Subscribers cannot have a SQL Server 2008 Publisher
2. Use Sync Framework, an API that enables users to build applications and synchronize between databases. It provides a lot of flexibility, but also requires development, which increases the cost and timeframe of implementation.
3. Use ApexSQL Data Diff, a SQL Server data comparison and synchronization tool which detects data differences and resolves them without errors. It can compare and synchronize live databases, native or natively compressed database backups, script folders, source control projects and generate comprehensive reports on the detected differences, create a synchronization file and execute it.
How to do it
In the following example, two databases are used:
- The Central database is the hospital data center
- The Nurse database on a nurse’s mobile device
The hospital adds the records for the visits into the Visits table, and the nurses synchronize their mobile devices every morning to get the latest records, and find out what their route for the day is. The records inserted by the nurses during the day, are stored in the Visits table and should be synchronized back to the data center at the end of the day.
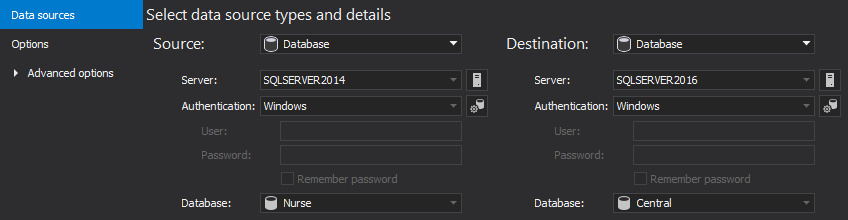
- Start ApexSQL Data Diff
-
In the Data sources tab, select the server where the Central database is located as source and select the server where the Nurse database is located as the destination:

-
Click the Compare button
-
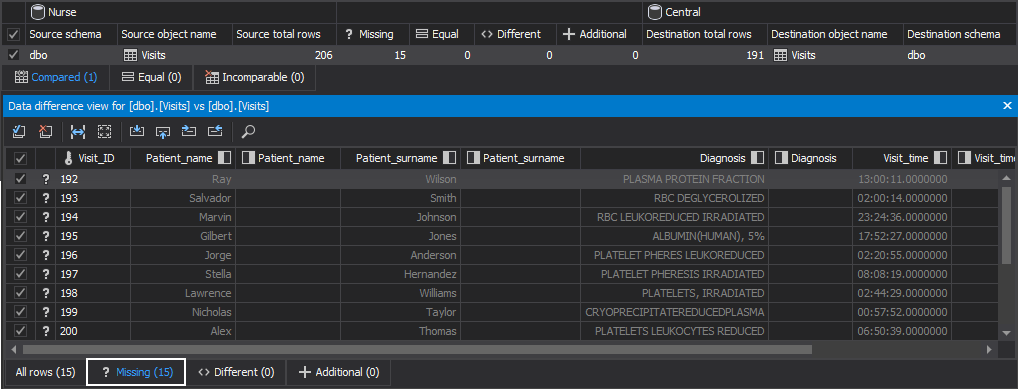
Once the comparison is done, the Visits tables, along with its corresponding data, will be shown:
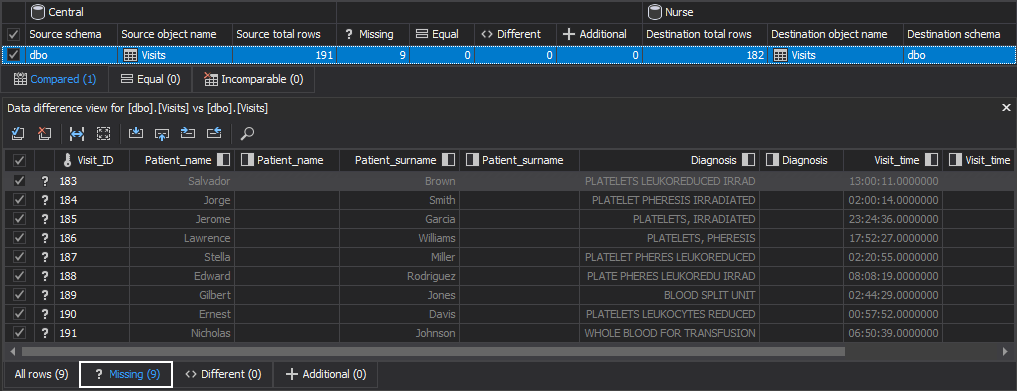
The records inserted into the Visits table, from the Central database, are shown in the Missing tab.
-
Click Save button from the Home tab, to save the current settings into a project and perform comparison and synchronization quickly and easily next time:

-
Click the Synchronize from the Home tab to initiate the Synchronization wizard:

- Click the Next in the Synchronization direction step of the Synchronization wizard
-
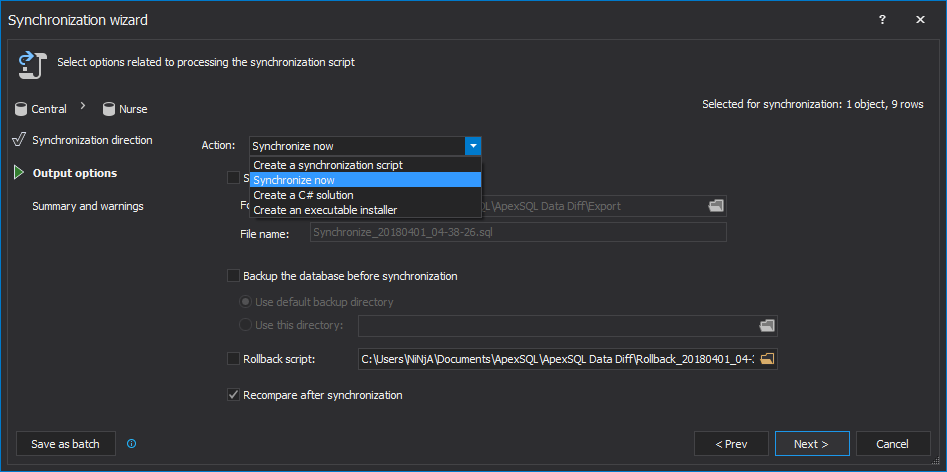
In the Output options step of the Synchronization wizard, select the Synchronize now as an action:
- Click the Next button
-
Check out the summary of actions in the Actions tab that will be performed:
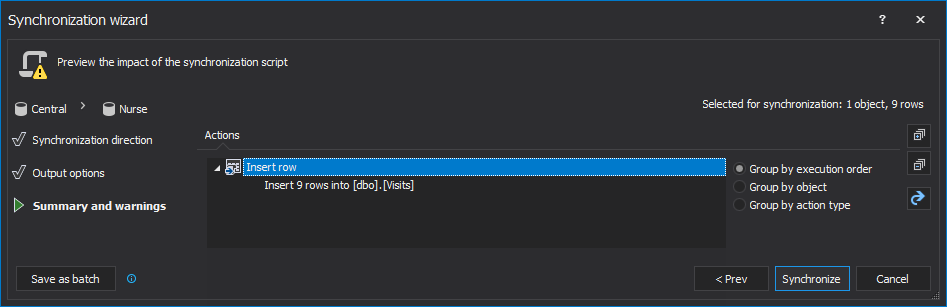
- Click the Synchronize button from the bottom-right corner of the Synchronization wizard
-
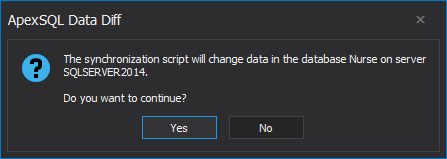
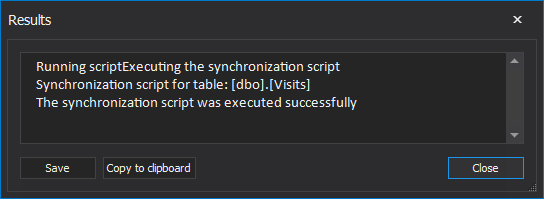
The prompt message will be shown to provide information that synchronization script will be executed on the Nurse database. Click the Yes button to perform synchronization:
-
When the destination database synchronization is complete, the Results window will be shown with the following messages:
If in the evening, the records that the nurses added during the day to their databases need to be synchronized back, in the central database, the steps are similar:
-
In the Data sources tab, set the Nurse database as the source and Central database to be the destination:
- Click the Compare button
-
Select the table into which the records have been added during the day. The records are shown in the Missing tab:
-
Click the Save button from the Home tab, to save the current settings into a project and perform comparison and synchronization quickly and easily next time:
-
Click Synchronize button from the Home tab:
- Repeat the same steps in the Synchronization wizard as above and add the missing records to the Central database
Automating processes
Now that both projects are saved, the synchronization processes can be automated by creating two PowerShell scripts:
-
The first PowerShell script will automate synchronization of records from the Central database to the Nurse database, before the morning shift starts:
#provide tool’s location, define date stamp variable, and tool’s parameters $appLocation = "ApexSQLDataDiff" $dateStamp = (Get-Date -Format "MMddyyyy_HHMMss") $appParameters = "/pr:""CentralToNurse.axdd"" /sync /v /f /rece"
#initiate the comparison of data sources (Invoke-Expression ("& `"" + $appLocation +"`" " +$appParameters)) $dateStamp = $LASTEXITCODE -
The second PowerShell script will automate synchronization of records from the Nurse database back to the Central database, after the shift is over:
#provide tool’s location, define date stamp variable, and tool’s parameters
$appLocation   = "ApexSQLDataDiff"
$dateStamp = (Get-Date -Format "MMddyyyy_HHMMss")
$appParameters = "/pr:""NurseToCentral"" /sync /v /f /rece"

#initiate the comparison of data sources
(Invoke-Expression ("& `"" + $appLocation +"`" " +$appParameters))
$dateStamp = $LASTEXITCODE
Scheduling
After both PowerShell scripts are created and the whole process is automated, it can be scheduled in different ways. Find out more about different ways of scheduling ApexSQL tools.
Comparing and synchronizing SQL Server databases on remote locations with a SQL Server database in the data center using ApexSQL Data Diff, can be done regardless of the versions of SQL Servers used on the remote and central locations, with no programming knowledge and under complete control, down to the row level.
April 19, 2013


