


In this article, four methods will be shown on how to export MySQL data to a CSV file. The first method will explain the exporting process by using the SELECT INTO … OUTFILE statement. Next, the CSV Engine will be used to achieve the same. After that, the mysqldump client utility will be used and in the end, the Export to CSV feature from the ApexSQL Database Power Tools for VS Code extension will be used to export MySQL data.
Throughout this article, the following code will be used as an example:
CREATE DATABASE `addresses`

    CREATE TABLE `location` (
      `address_id` int(11) NOT NULL AUTO_INCREMENT,
      `address` varchar(50) NOT NULL,
      `address2` varchar(50) DEFAULT NULL,
      PRIMARY KEY (`address_id`)
    ) ENGINE=InnoDB DEFAULT CHARSET=latin1

    INSERT INTO location VALUES
    (NULL, '1586 Guaruj Place', '47 MySakila Drive'),
    (NULL, '934 San Felipe de Puerto Plata Street', NULL),
    (NULL, '360 Toulouse Parkway', '270, Toulon Boulevard');
Using SELECT INTO … OUTFILE to export MySQL data
One of the commonly used export methods is SELECT INTO … OUTFILE. To export MySQL data to a CSV file format simply execute the following code:
SELECT
    address,
    address2,
    address_id
    FROM location INTO OUTFILE 'C:/ProgramData/MySQL/MySQL Server 8.0/Uploads/location.csv';
This method will not be explained in detail since it is well covered in the How to export MySQL data to CSV article.
Using the CSV Engine to export MySQL data
MySQL supports the CSV storage engine. This engine stores data in text files in comma-separated values format.
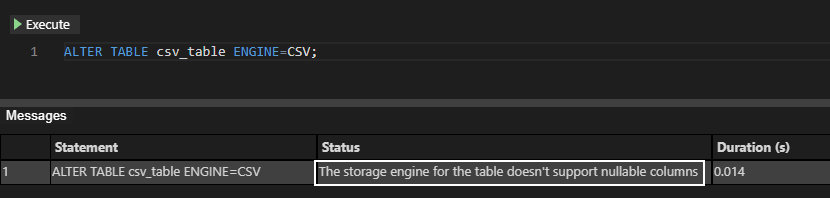
To export MySQL data using this method, simply change the engine of a table to CSV engine by executing the following command:
ALTER TABLE location ENGINE=CSV;
When executing the above code, the following message may appear:
- The storage engine for the table doesn’t support nullable columns
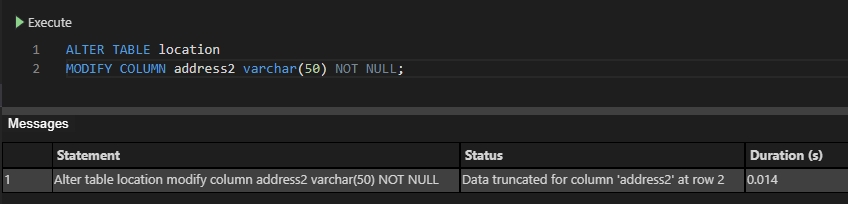
All columns in a table that are created by the CSV storage engine must have NOT NULL attribute. So let’s alter the location table and change the attribute of the column, in our case that is the address2 column.
When executing the ALTER statement for the address2 column:
ALTER TABLE location
        MODIFY COLUMN address2 varchar(50) NOT NULL;
The following message may appear:
- Data truncated for column ‘address2’ at row 2
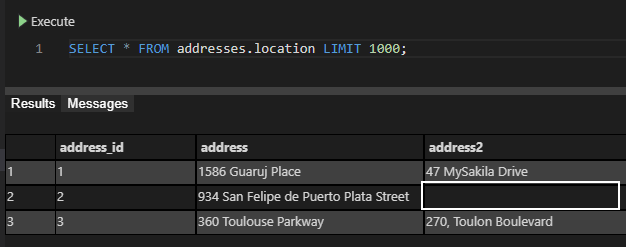
This message appears because NULL already exists in the column address2:
Let’s fix that by adding some value in that field and try again to alter the column.
Execute the following code to update the address2 column:
UPDATE `addresses`.`location`
    SET
    `address2` = "Test"
    WHERE `address_id`=2;
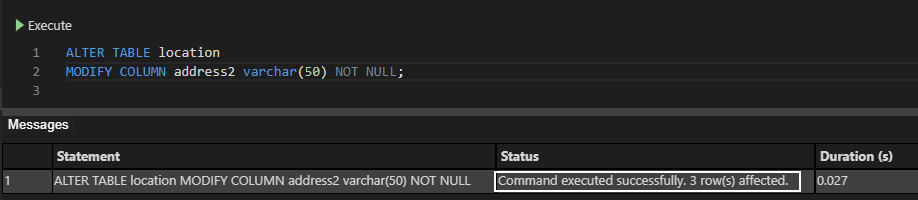
Now, let’s try again to execute the ALTER statement:
ALTER TABLE location
    MODIFY COLUMN address2 varchar(50) NOT NULL;
The address2 columns will successfully be modified:
After the column has been successfully changed, let’s execute the ALTER statement for changing the storage engine and see what happens:
ALTER TABLE location ENGINE=CSV;
A new problem appears:
- The used table type doesn’t support AUTO_INCREMENT columns
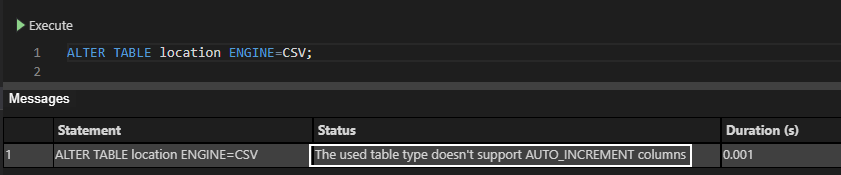
As can be assumed, the CSV engine does not support columns with the AUTO_INCREMENT attribute. Execute the code below to remove the AUTO_INCREMENT attribute from the address_id column:
ALTER TABLE location MODIFY address_id INT NOT NULL;
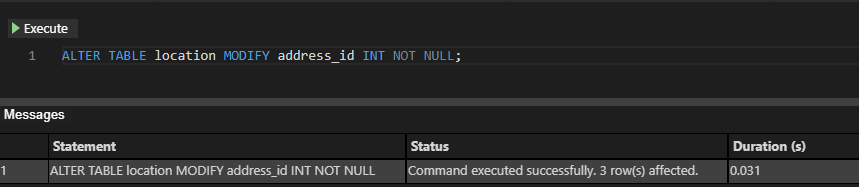
Now, when the AUTO_INCREMENT attribute is removed, try again to change the storage engine:
ALTER TABLE location ENGINE=CSV;
This time a new message appears:
- Too many keys specified; max 0 keys allowed
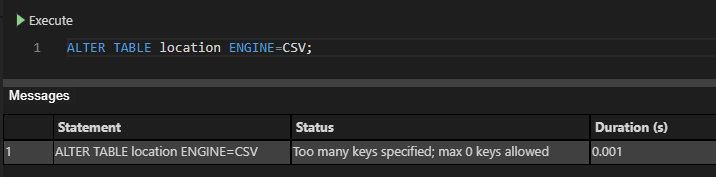
This message is telling us that the CSV storage engine does not support indexes (indexing). In our example, to resolve this problem, the PRIMARY KEY attribute needs to be removed from the location table by executing the following code:
ALTER TABLE location DROP PRIMARY KEY;
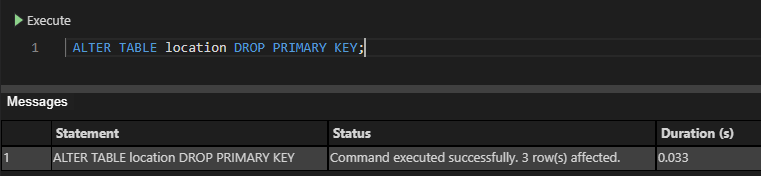
Execute the code for changing the table storage engine one more time:

Finally, we managed to successful change (alter) the storage engine:
- Command executed successfully. 3 row(s) affected.
After the table engine is changed, three files will be created (CSV, CSM, and FRM) in the data directory:
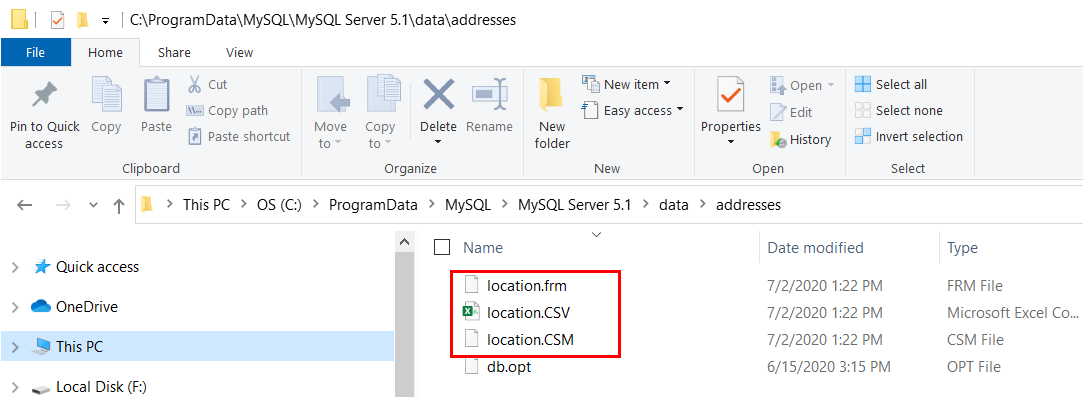
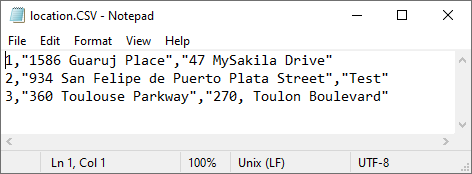
All data will be placed in the CSV file (location.CSV):
- Note: When exporting MySQL data to CSV using the CSV storage engine, it is better to use a copy of the table and convert it to CSV to avoid corrupting the original table.
Now, let’s create a table without indexes:
CREATE TABLE csv_location AS SELECT * FROM location LIMIT 0;
Then change the storage engine of the newly created table to CSV:
ALTER TABLE csv_location ENGINE=CSV;
And then load data into the newly created table from the location table:
INSERT INTO csv_location SELECT * FROM location;
Using the mysqldump client utility to export MySQL data
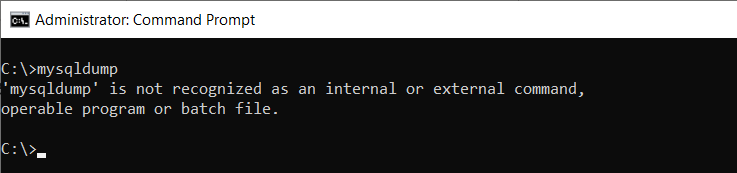
Another way to export MySQL data is to use the mysqldump client utility. Open the Windows command-line interface (CLI) not MySQL CLI. In case the MySQL CLI is opened, type and execute the mysqldump command, and the following error message may appear:
- ERROR 1064 (42000): You have an error in your SQL syntax; check the manual that corresponds to your MySQL server version for the right syntax to use near ‘mysqldump’ at line 1

This happens because mysqldump is an executable command, not MySQL syntax command.
Let’s switch to Windows CLI and execute the mysqldump command. As can be seen from the image below, a new problem appears:
- ‘mysqldump’ is not recognized as an internal or external command, operable program or batch file.
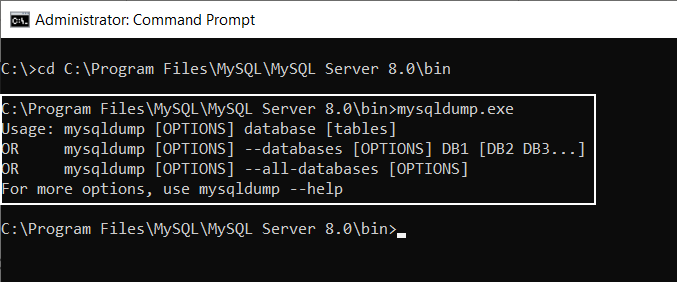
To resolve this, navigate to the directory where is the mysqldump.exe is located:
cd C:\Program Files\MySQL\MySQL Server 8.0\bin
Now, execute the mysqledump.exe command. If the results are the same as from the image below, it means that mysqldump works correctly:
To export MySQL data execute the following code:
mysqldump -u <username> -p -T </path/to/directory> <database>
The -u is used as a flag after which you need to specify a username that will be connected to MySQL server.
The -p is used as a flag for a password for the user that wants to connect to the MySQL server.
The -T flag create a tab-separated text file for each table to a given path (create .sql and .txt files). This only works if mysqldump is run on the same machine as the MySQL server.
Note that specified path (directory) must be writable by the user MySQL server runs as, otherwise, the following error may appear when exporting data:
- mysqldump: Got error: 1: Can’t create/write to file ‘ H:/ApexSQL/Test/location.txt (Errcode: 13) when executing ‘SELECT INTO OUTFILE’

By executing the following command:
mysqldump -u root -p -T H:/ApexSQL/Test addresses
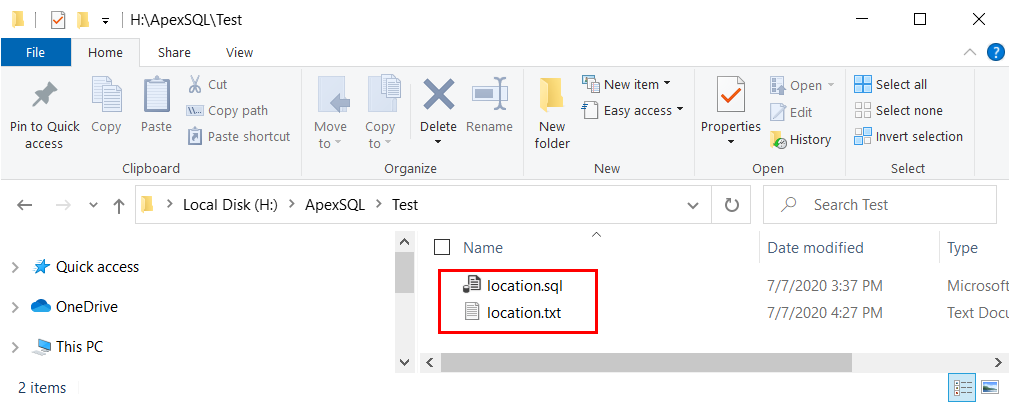
All tables from the specified MySQL database (addresses) will be exported in the directory that you named. Every table will have two files; one is .sql and another is .txt:
The .sql files will contain a table structure (SQL for creating a table):

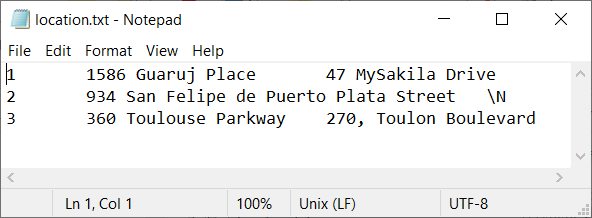
And the .txt files will contain data from a table:
If you want to export MySQL tables only as .txt files, then add -t flag to mysqldump command:
mysqldump -u root -p -t -T H:/ApexSQL/Test addresses
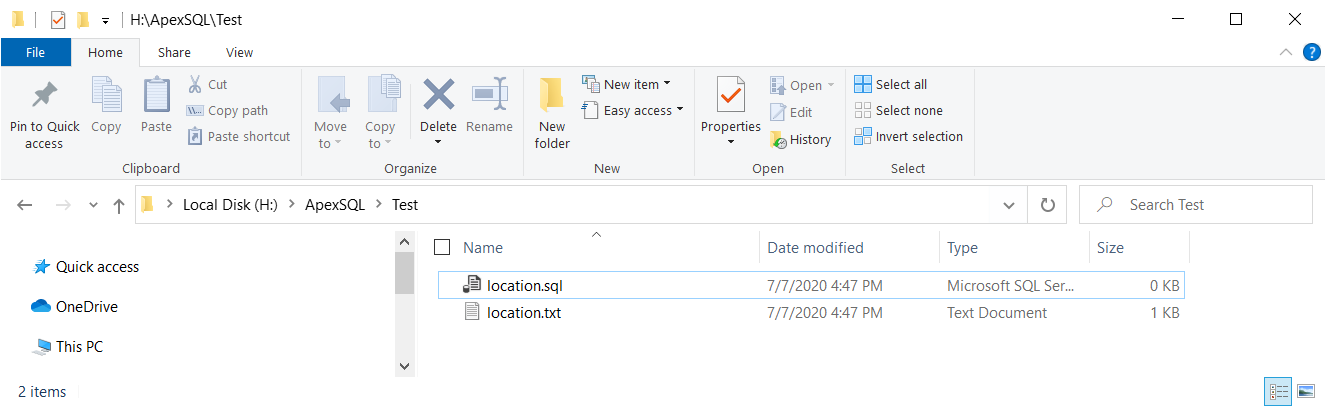
This will create a .sql file, but it will be empty:
In case, that want to export just one table from a MySQL database rather than all tables, in the mysqldump command add a name of the table that want to export next to a specified MySQL database:
mysqldump -u root -p -t -T H:/ApexSQL/Test addresses location

With -T flag in mysqldump command, exported data in the files will be separated with tab delimiter. A delimiter can be changed by using the –fields-terminated-by= flag.
In the example below comma (,) is used as value separator:
mysqldump -u root -p -t -T H:/ApexSQL/Test addresses location –fields-terminated-by=,
With the –fields-enclosed-by= flag it can be put quotes around all values (fields):
mysqldump -u root -p -t -T H:/ApexSQL/Test addresses location –fields-enclosed-by=” –fields-terminated-by=,
When executing the above code, the following error may appear:
- mysqldump: Got error: 1083: Field separator argument is not what is expected; check the manual when executing ‘SELECT INTO OUTFILE’

To fix that, add \ in front of the quote “ under the –fields-enclosed-by flag:
mysqldump -u root -p -t -T H:/ApexSQL/Test addresses location –fields-enclosed-by=\” –fields-terminated-by=,
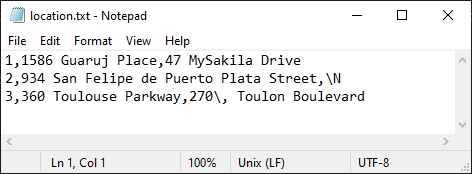
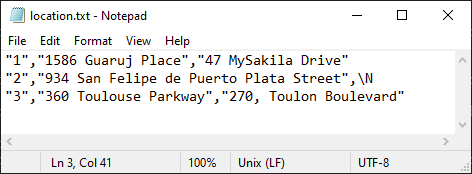
The exported MySQL data will look like this:
Using a third-party extension to export MySQL data
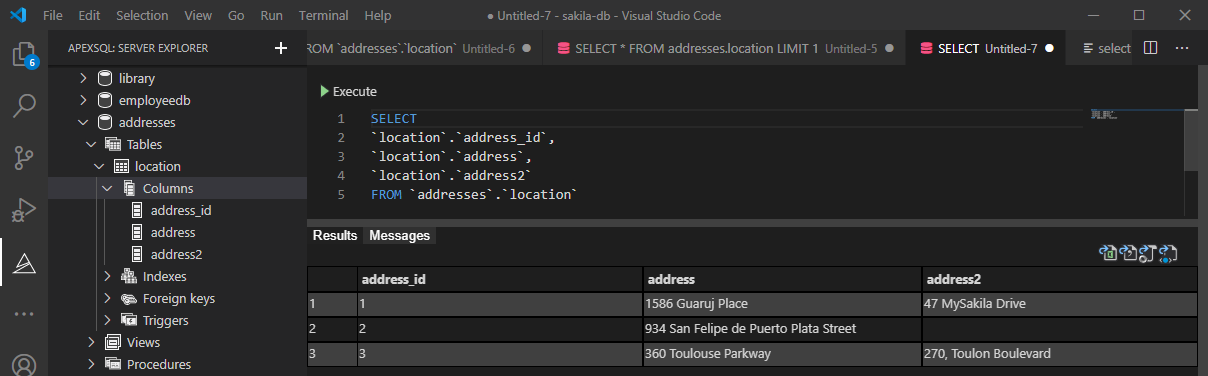
In this VS Code extension, execute a query from which results set wants to be exported:
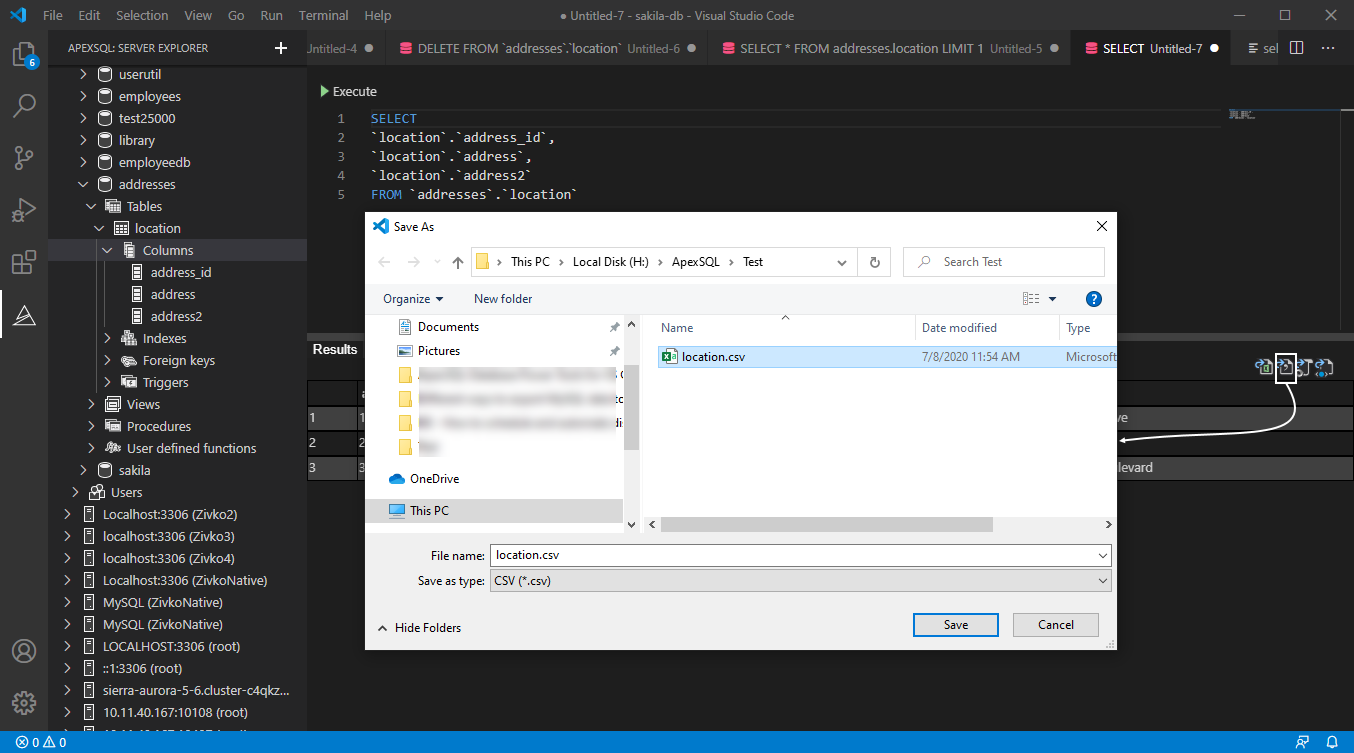
In the top right corner of the result grid, click the Export to CSV button and in the Save As dialog enter a name for a CSV file, and choose a location where data should be saved:
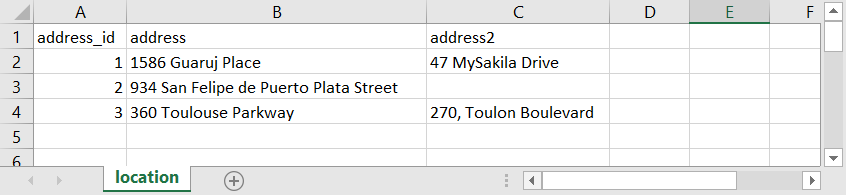
Just like that, in a few clicks, data from the result set will be exported to CSV:
July 10, 2020


