


Challenge
When working on a SQL database development, there is sometimes a requirement to keep two databases in sync. For example, in a development environment there is a need to automatically synchronize changes with a QA database frequently, so that tests can always be run on the most recent version. The implemented mechanism should handle this by detecting a specific schema change in the DEV database and automatically synchronizing with the QA database, fully unattended and on a schedule. The whole process should be run unattended and to be fully automated and the databases will be updated in near real time as we’ll schedule the process to run every 15 minutes.
Solution
In this article, how a system including a SQL Server database schema compare tool will be described, along with some PowerShell and a scheduler can keep the QA database in sync and up to date, and run automatically and unattended.
In this system, the two databases will be polled every 15 minutes. Since a SQL Server database schema compare tool is used, it can ensure that only changed objects are updated in the synchronization and that if nothing is changed, the job will go back to “sleep” without doing anything, only to “wake up” again 15 minutes.
For a SQL Server comparison tool, we’ll use ApexSQL Diff. ApexSQL Diff is a 3rd party tool for comparing and synchronizing schemas between SQL Server databases, database backups, ApexSQL snapshots, script folders, and source control projects. The comparison and synchronization process of data sources can be scheduled and run at the desired date/time, so that databases are kept in sync, almost in real-time. In the following example, let’s schedule the comparison on every 15 minutes, and the synchronization will be performed if there are any schema changes between compared databases.
Setup
To set up the whole process, follow these steps:
-
Run ApexSQL Diff
-
In the Project management window, click the New button:

-
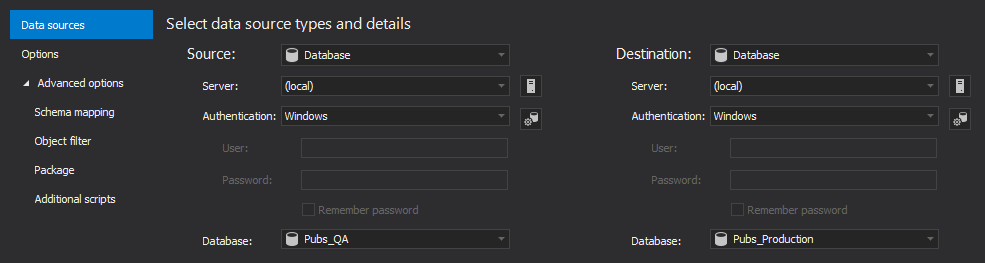
Under the Data sources tab, of the New project window, set up the source and destination database:
-
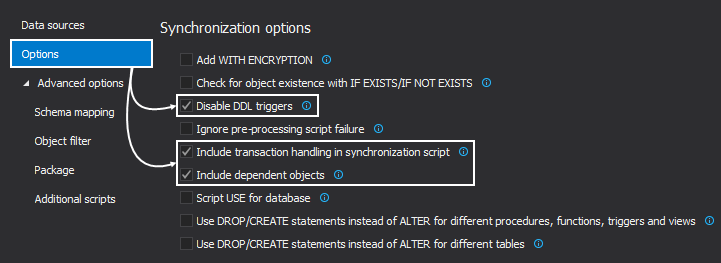
Switch to the Options tab, if a specific comparison/synchronization options need to be set up and to ensure an error free synchronization, without dependency issues, check the marked synchronization options:
-
If everything is set up, click the Compare button from the bottom-right corner and the comparison process will start
-
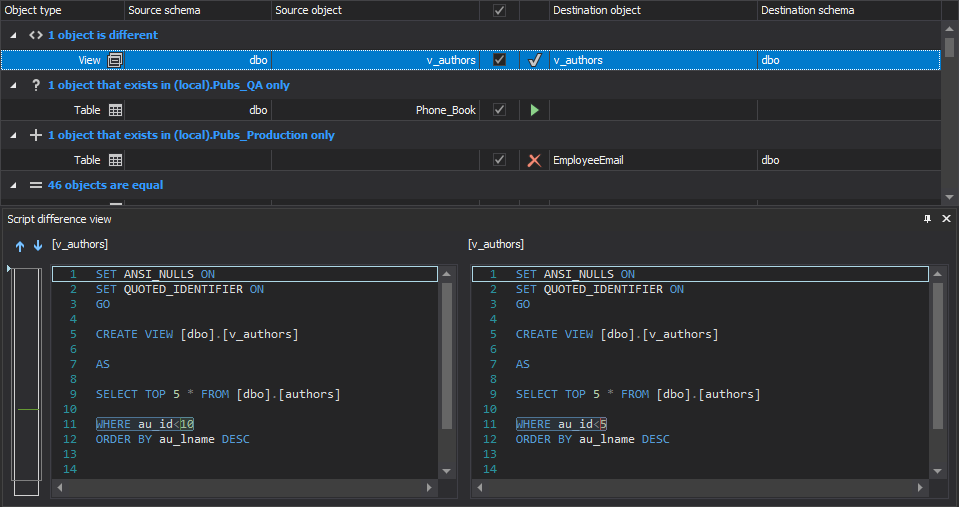
After the comparison process is finished, all schema changes will be shown in the Results grid and schema change for each object can be reviewed in the Script difference view panel:
-
Once all changes are reviewed, check all objects for the synchronization process and click the Save button from the Home tab:

In this way, the project file is saved and it contains all selected objects and options and it will be used later on for the scheduling schema synchronization.
-
Since everything is saved, click the Synchronize button from the Home tab:

-
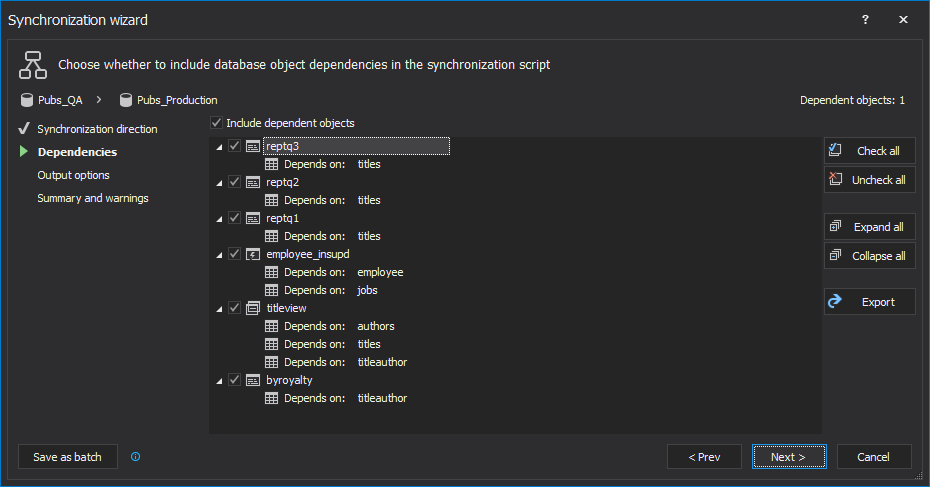
In the Dependencies step of the Synchronization wizard, dependent database objects can be reviewed:
-
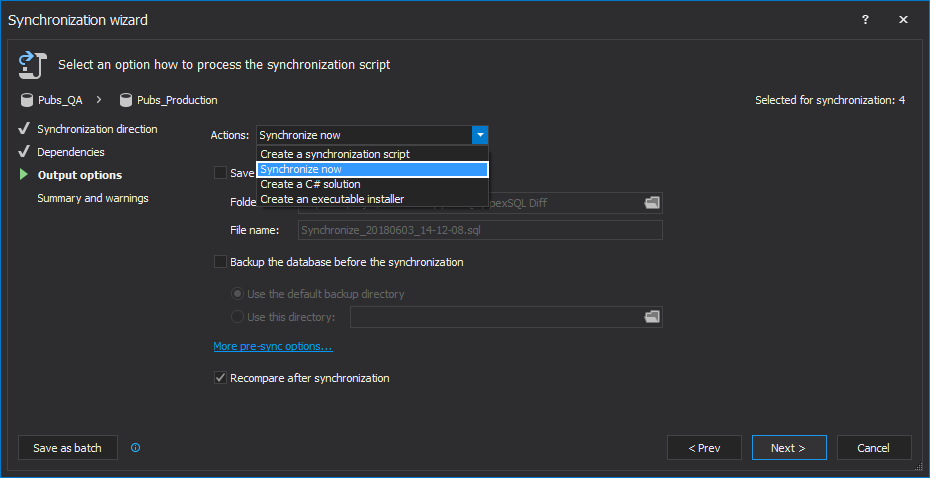
Select the Synchronize now action, in the Output options step of the Synchronization wizard, and all schema changes will be executed directly on the destination database:
-
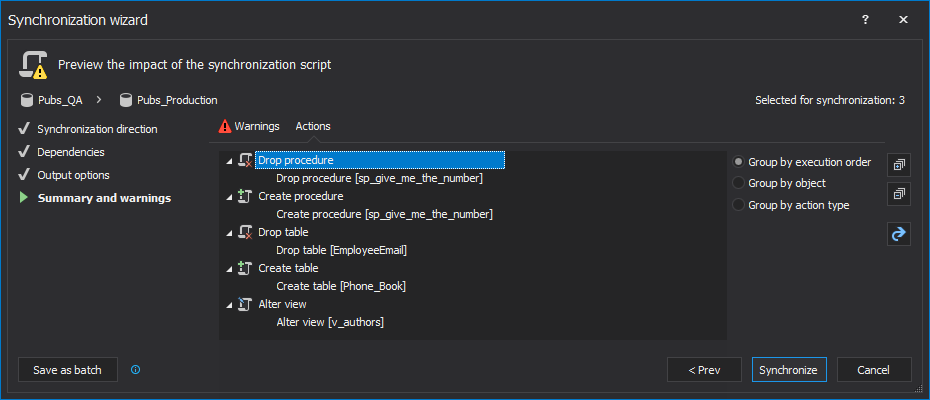
In the last step of the Synchronization wizard, actions that will be performed in the synchronization process are shown:
-
Click the Synchronize button in the bottom-right corner to imitate the synchronization process
-
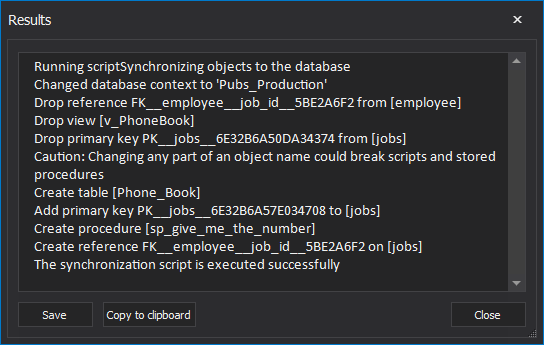
Upon finishing the synchronization process, the Results window will be shown with all information:
Automating the process
Since the first schema synchronization was successfully processed, and the project file with all required information was saved, we can move on with automating this process by setting up a PowerShell script.
This automation example will assume that Integrated security is used, but stored and encrypted database and repository credentials can be easily used from the project file. To learn about options for handling credentials in the context of unattended jobs, please see this article.
The following are just some highlights of the PowerShell script used to automate this process, that may be interesting. Otherwise, skip right to downloading the script (see below) and testing it out.
Let’s create a function that will check for the existence of the Outputs folder, in which the data stamped commit summaries will be saved:
#check for the existence of the Outputs folder
function CheckAndCreateFolder($rootFolder, [switch]$Outputs)
{
    $location = $rootFolder

    #setting up location
    if($Outputs -eq $true)
    {
        $location += "\Outputs"
    }

    #if the folder doesn't exist it will be created
    if(-not (Test-Path $location))
    { mkdir $location -Force:$true -Confirm:$false | Out-Null }

    return $location
}
The next step will be to define a root folder along with the date stamped schema output summaries location:
#root folder for the schema sync process
$rootFolder = "SchemaSync"

#schema output summaries location
$outsLoc = CheckAndCreateFolder $rootFolder -Outputs

#output log file path
$logPath = "$outsLoc\SchemaOutput_$stamp.txt"
After setting up all prerequisites, let’s define ApexSQL Diff location, data stamped variable, application’s parameters, and return code variable:
#ApexSQL Diff location, date stamp variable is defined, along with tool’s parameters
$diffLoc   = "ApexSQLDiff"
$stamp = (Get-Date -Format "MMddyyyy_HHMMss")
$Params = "/pr:""MyProject.axds"" /out:""$logPath"" /sync /v /f"
The next part of the PowerShell script is to call ApexSQL Diff and execute its parameters:
#initiate the schema comparison and synchronization process
(Invoke-Expression ("& `"" + $diffLoc +"`" " +$Params))
$returnCode = $LASTEXITCODE
$message = ""
The last part of the PowerShell script is to define all potential outcomes:
- Schema changes are detected, e.g. return code 0 – Success
- There are no schema changes, e.g. return code 102 – No differences detected
-
An error is encountered and the output summary will be opened. The complete list of potential return error codes can be reviewed here
#schema changes are detected
if($returnCode -eq 0)
{
    $message = "`r`n $returnCode - Schema changes were successfully synchronized"
}
else
{
    #there are no schema changes
    if($returnCode -eq 102)
    {
        $message = "`r`n $returnCode - There are no schema changes. Job aborted"
    }
    #an error is encountered
    else
    {
        $message = "`r`n $returnCode - An error is encountered"

    #output file is opened when an error is encountered
    Invoke-Item "$logPath"
    }

}
$message >> $logPath
Scheduling
Once the PowerShell script is created and the whole process is automated, it can be scheduled in different ways. Find out more about different ways of scheduling ApexSQL tools.
Viewing results
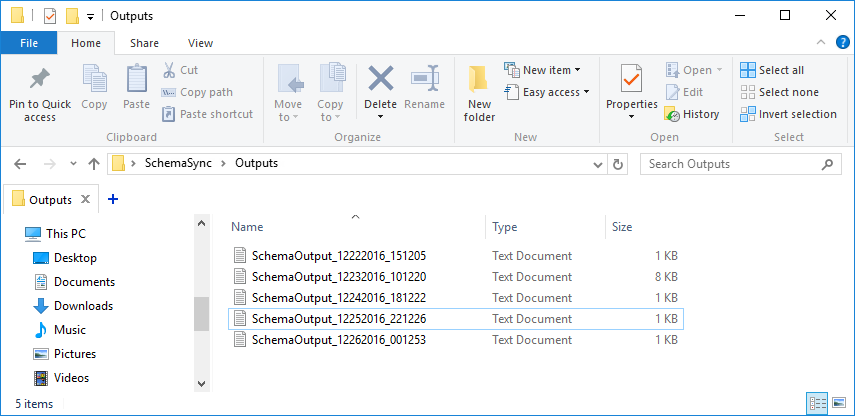
After everything is set up and the job has been running for a while, schema output summaries can be viewed anytime. In used example, schema output summaries were defined with the $outsLoc variable that was defined here, and each schema output summary will be saved to $rootFolder\$outsLoc, e.g. in this example SchemaSync\Outputs:
If an error is encountered, for example, if a project file is not entered with the appropriate extension (letter “s” is missing at the end of the project file’s extension), the schema output summary will be opened and the following will be shown:
Connecting:
Loading project
Specified project file “MyProject.axd” is not a valid project file for ApexSQL Diff
An error is encountered – ApexSQL Diff return error code: 10
By checking the list of return error codes from the article on this link for the return error code 10, we get the information that the project file is invalid due to an incomplete/wrong extension.
The complete PowerShell script can be downloaded from here.
If any questions or problems are encountered while setting this up or using it, please contact us at support@apexsql.com
January 9, 2017


