


First thing first, a little background on triggers. Although often maligned, in certain circumstances they can be very helpful… once you get to know them. For example, sending an email from SQL Server could be done with a trigger based on some anticipated event.
In this article, we will focus on a case with T-SQL data modification when an Insert, Update or Delete statement hits the data in our table. As the name applies the trigger will fire and then we can make decisions on what next based on new data that is coming in or old data that is getting replaced. This is what triggers are most used for.
The downside of triggers is that people can kind of get into trouble with recursive triggers and nested looping triggers which could lead to some performance implications, but we will stick to simple triggers in this article keeping in mind that it’s important to know when, where, and how to use them.
Looking from a performance side of view, it’s best to keep triggers small and simple. Just like programming, when creating a trigger go by logic that the less is more.
In this article we are going to review three examples of using a trigger using different combinations of operations e.g. insert and trigger types e.g. INSTEAD OF, including:
- Sending an email, based on an Insert operation for a particular table. The table is infrequently updated and we have a stakeholder who wants to know when any new data is added to it
- Tracking all changes to the table by writing changes to an auditing table
- Preventing deletions of data in the table with an execution guard
DML triggers overview
We should mention that there are also DLL and CLR triggers which are also a special type of T-SQL objects, but the focus here is on DML (data manipulation language) such as an Insert, Update and Delete statement.
Trigger types
- AFTER – triggers fire off when DML statements finishes
AFTER states that the DML trigger is fired only when all operations specified in SQL statement have executed successfully. All referential cascade actions and constraint checks also must succeed before this trigger fires. AFTER triggers cannot be defined on views. - INSTEAD OF – triggers fire off prior to DML statements
INSTEAD OF states that the DML trigger is executed before the DML statement goes all the way through overriding the actions of the triggering statements. INSTEAD OF triggers cannot be specified for DDL or logon.
Enough talk, let’s see how to create simple DML triggers for Insert and Update statements and then another trigger for a Delete statement on an important table that will act as fatal action guard and prevent the user from deleting data.
Change tracking/auditing trigger (update)
We are going to start with the Update trigger. The precondition here is that we have a database with some information about products stored in tables. One of the tables has a column with information about the price of products. Let’s say we want to monitor the products table and whenever an Update hits the table we want the trigger to fire because we want to track information about the price history. Furthermore, we need one additional table in which we will store monitored information gathered from changes to an existing table.
You can create a simple table that meets your needs, but below is an example of the table used in this case:
USE AdventureWorks2014;
GO
IF OBJECT_ID('Purchasing.StandardPriceHistory', 'U') IS NOT NULL
    DROP TABLE Purchasing.StandardPriceHistory;
GO
CREATE TABLE Purchasing.StandardPriceHistory
(PriceHistoryID  UNIQUEIDENTIFIER NOT NULL PRIMARY KEY,
 ProductID       INT NOT NULL,
 PreviousPrice   DECIMAL(19, 4),
 NewPrice        DECIMAL(19, 4),
 PriceChangeDate DATETIME NOT NULL
)
ON [PRIMARY];
GO
Now that the table is created, we can proceed with the creation of the trigger. An example of the above described trigger is shown below:
USE AdventureWorks2014;
GO
IF OBJECT_ID('Purchasing.uStandardPriceHistory', 'TR') IS NOT NULL
    DROP TRIGGER Purchasing.uStandardPriceHistory;
GO
CREATE TRIGGER uStandardPriceHistory ON Purchasing.ProductVendor
FOR UPDATE
AS
     INSERT INTO Purchasing.StandardPriceHistory
(PriceHistoryID,
 ProductID,
 PreviousPrice,
 NewPrice,
 PriceChangeDate
)
            SELECT NEWID(),
                   pv.ProductID,
                   d.StandardPrice,
                   i.StandardPrice,
                   GETDATE()
            FROM Purchasing.ProductVendor pv
                 JOIN INSERTED i ON pv.ProductID = i.ProductID
                 JOIN DELETED d ON pv.ProductID = d.ProductID;
GO
This trigger is created on the Purchasing.ProductsVendor table for the Update statement and it will basically take a snapshot of the Price column of the old price and the new price and put it inside the previously created ProductPriceHistory table needed for this to happen.
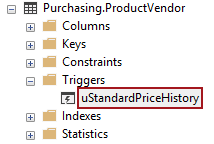
After executing the code from above, if we navigate to the ProductsVendor table and expand the Triggers folder there should be our newly created trigger. When it fires, it will record old data that it’s being replaced with new data and insert this information into the ProductPriceHistory table:
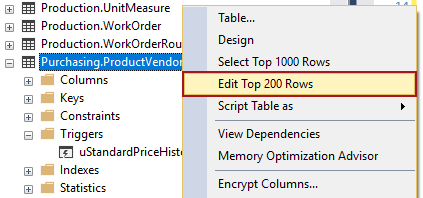
Now, all we have to do is issue an Update statement against the ProductsVendor table to see how it works. Rather than writing code and because it quicker, use the Edit Top 200 Rows option by right-clicking the table in Object Explorer which will open a new tab in Editor:
Here we have a product with ID 1 that has a value of 47.87. Let’s say the item is on sale and change it by entering the new value of 39.99 and hit the Enter key:
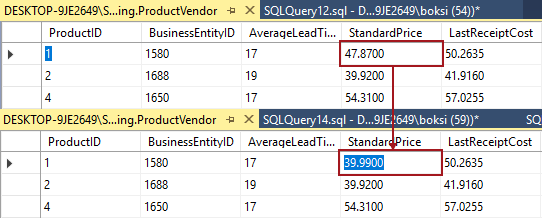
This action is the same as writing an Update statement. It issues the statement in the background and if nothing is wrong with the entered data it updates the records. Otherwise it will pop-up an info message on what went wrong.
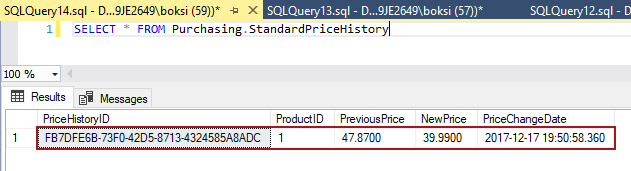
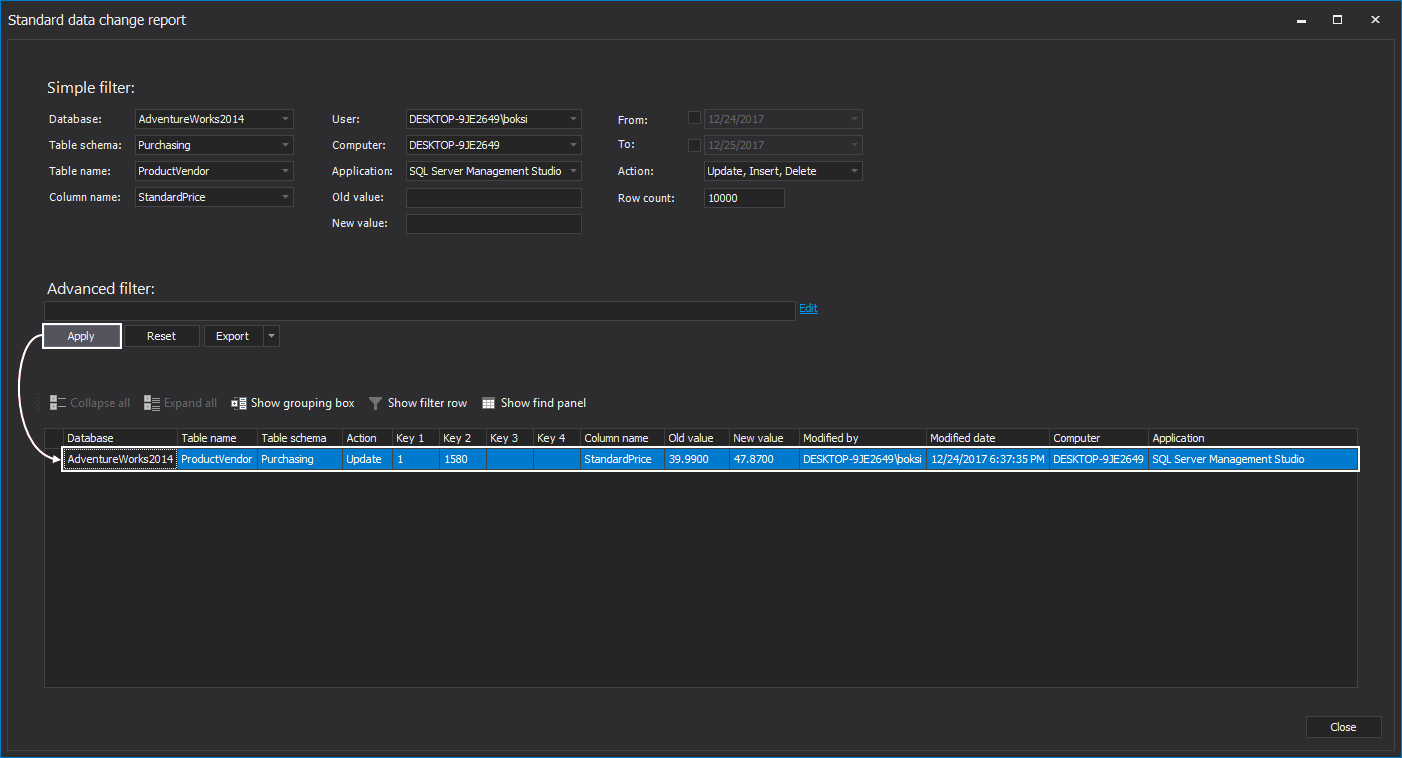
The statement went through and a quick Select from the table used for storing monitored data shows changes:
New record notification (insert trigger)
Next is the Insert trigger. Let’s use the Insert statement in combination with a trigger as a notification mechanism. We are actually going to send an email from an Insert trigger. The idea behind this one is e.g. to let customers know when a new product is available. The precondition here is that the Database Mail is set up and configured correctly.
Note: If you’re new to Database Mail, this is an enterprise solution for sending email messages from the SQL Server Database Engine and it’s highly recommended to check out the following detailed article on how to set this up and troubleshoot known issues that may occur: How to configure database mail in SQL Server
When this precondition is meet, an example for the Insert trigger that can be used is shown below:
USE AdventureWorks2014;
GO
IF OBJECT_ID('Production.iProductNotification', 'TR') IS NOT NULL
    DROP TRIGGER Purchasing.iProductNotification;
GO
CREATE TRIGGER iProductNotification ON Production.Product
FOR INSERT
AS
     DECLARE @ProductInformation NVARCHAR(255);
     SELECT @ProductInformation = 'A new product, '+Name+', is now available for $'+CAST(StandardCost AS NVARCHAR(20))+'!'
     FROM INSERTED i;
     EXEC msdb.dbo.sp_send_dbmail
          @profile_name = 'Notifications',
          @recipients = 'Use a valid e-mail address',
          @body = @ProductInformation,
          @subject = 'New product notification';
GO
This time we are attaching the trigger to the Production.Product table. Note that this time the trigger is FOR INSERT statement. You can also use AFTER INSERT, as for and after are basically the same thing. This is one of those backward compatibility things. One has been from the very beginning, and then they added another one.
So, as soon as a new product is inserted, this will fire off the trigger which will then gather some basic information, wrap that information in a form of an email message and execute the stored procedure for sending the email which will ultimately place the message in the Database Mail queue. This is an excellent example of how a trigger can be used in a chain reaction.
A quick summary of those two is that you should keep in mind both Update and Insert triggers belongs to the group of AFTER triggers. In both examples above, they fire off when DML statements finishes.
Action guard (delete trigger)
Moving on to the Delete trigger, this is when we can show an example of INSTEAD OF triggers that fire off prior to DML statements. Let’s see what we can do with this type of trigger.
Well as this trigger can prevent a DML statement from executing, why not use it as an “action guard” against accidental data loss for important information. An example is described and shown in another article that explores also alternative ways to prevent accidental data loss: How to prevent accidental data loss from executing a query in SQL Server aka “Practicing safe coding”
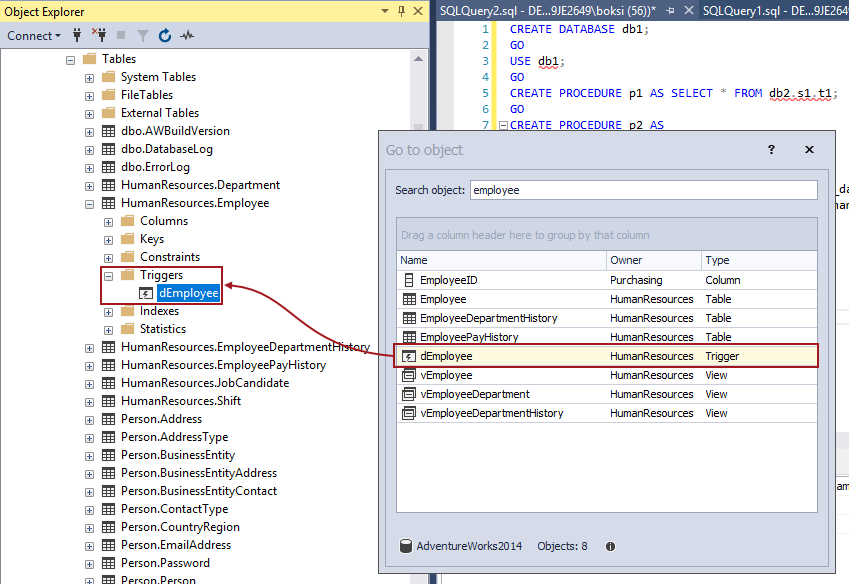
Alrighty then, we highly recommend checking the code from the article above, but let’s also show another example here. Microsoft actually has a really good trigger inside the AdventureWorks2014 database. Navigate through Object Explorer and locate the dEployee trigger under the HumanResources.Employee table or use a neat ‘Go to object’ feature in ApexSQL Complete to quickly find the object and highlight it inside the Object Explorer:
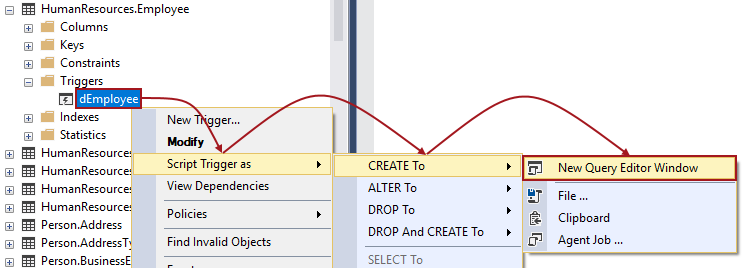
Right-click the dEmployee trigger and navigate to Script Trigger as > CREATE To and then click the New Query Editor Window command:
This action will open a new tab in Editor with the following code:
USE [AdventureWorks2014];
GO

/****** Object:  Trigger [HumanResources].[dEmployee]    Script Date: 12/18/2017 12:27:41 PM ******/

SET ANSI_NULLS ON;
GO
SET QUOTED_IDENTIFIER ON;
GO
CREATE TRIGGER [HumanResources].[dEmployee] ON [HumanResources].[Employee]
INSTEAD OF DELETE
NOT FOR REPLICATION
AS
         BEGIN
             DECLARE @Count INT;
             SET @Count = @@ROWCOUNT;
             IF @Count = 0
                 RETURN;
             SET NOCOUNT ON;
             BEGIN
                 RAISERROR(N'Employees cannot be deleted. They can only be marked as not current.', -- Message
                 10, -- Severity.
                 1); -- State.

        -- Rollback any active or uncommittable transactions
                 IF @@TRANCOUNT > 0
                     BEGIN
                         ROLLBACK TRANSACTION;
                     END;
             END;
         END;
GO
ALTER TABLE [HumanResources].[Employee] ENABLE TRIGGER [dEmployee];
GO
EXEC sys.sp_addextendedproperty
     @name = N'MS_Description',
     @value = N'INSTEAD OF DELETE trigger which keeps Employees from being deleted.',
     @level0type = N'SCHEMA',
     @level0name = N'HumanResources',
     @level1type = N'TABLE',
     @level1name = N'Employee',
     @level2type = N'TRIGGER',
     @level2name = N'dEmployee';
GO
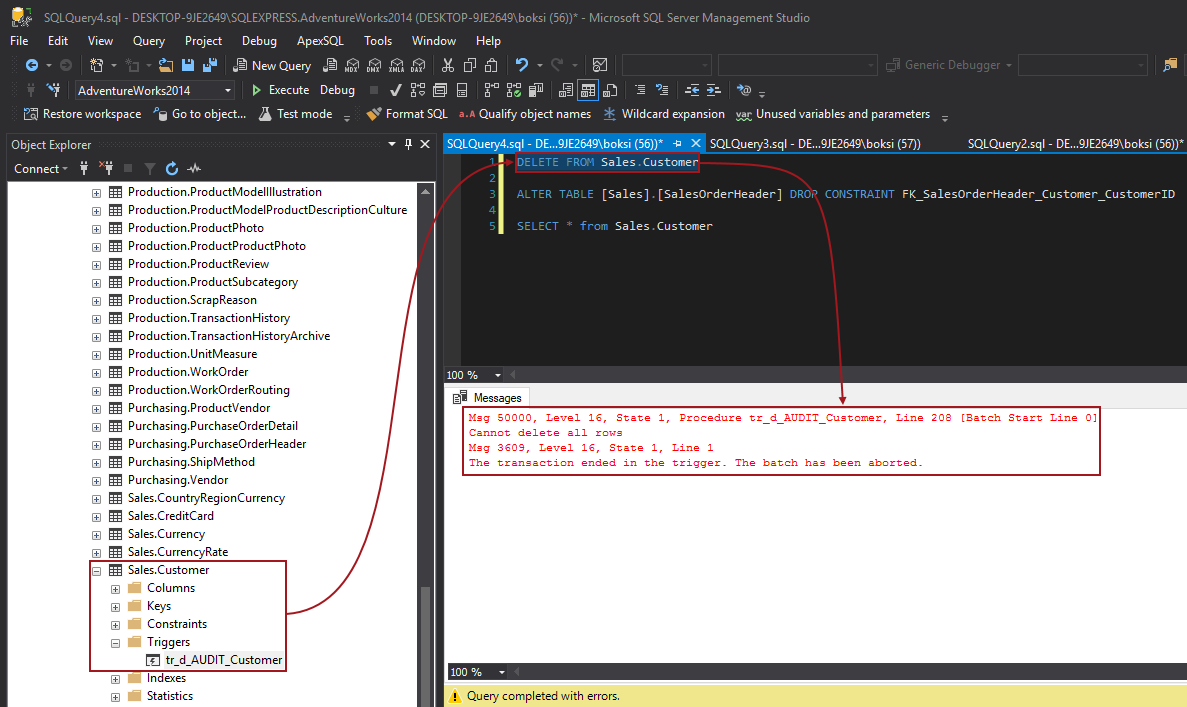
Now, we got a few things going on here. First of all, not all code is needed, however, it’s a perfect example of a trigger that has it all. We got an INSTEAD OF trigger for a Delete statement which mean that when a Delete hits the data in our table, the trigger first executes the code that checks the data before it’s actually executed and give us a chance to roll things back.
The @@ROWCOUNT function is useful in this case because it checks the number of rows affected by the Delete statement. It basically says if the row count is zero do not fire the trigger at all. This is great from a performance side of view.
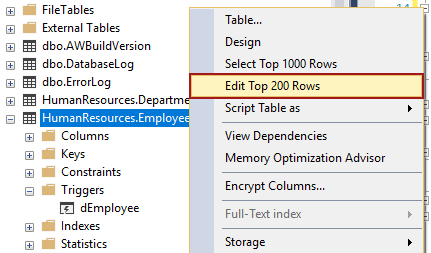
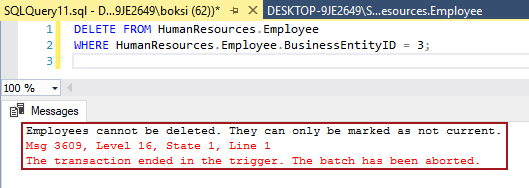
If we came to the point where the Delete statement actually came through, and actual rows have been affected, the RAISERROR function will show a user-defined message. To see this in action, use the Edit Top 200 Rows command again on the HumanResources.Employee table:
Select any row like shown below and press the Delete key from the keyboard. A warning confirmation dialog will appear. Click the Yes button to proceed with the action:
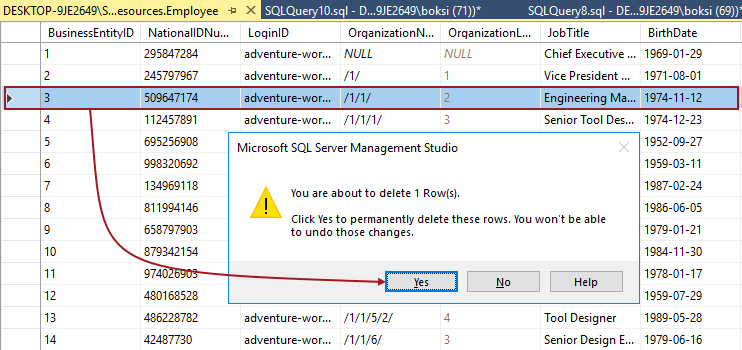
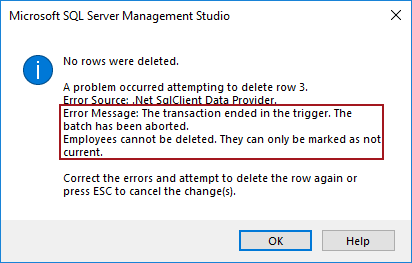
Another information dialog will pop-up with the error message that the transaction ended in the trigger. Furthermore, it displays the string that was specified by user itself:
This is where the ROLLBACK TRANSACTION function kicks in to erase all data modifications made from the start of the transaction.
The same will happen from Editor as well. Remember, the above example and the code from below does the exact same thing:
Potential gotchas
“With great power comes great responsibility” is oft-quoted from Uncle Ben’s words from the Spider-Man movie. Now that we have seen the true power of DML triggers, let’s get back to the very beginning of the article where we mentioned recursive trigger and nested looping triggers. We will skip the examples as the purpose of this article is to gain a better understanding of how the triggers can be useful overall and see when, where and how to use them, not to show the downside. But it’s also important to at least briefly describe the possible cons as well.
Nested triggers
Nested triggers are cases in which a trigger from one table performs an action that initiates another trigger in another table, etc. Furthermore, if the trigger from the second table calls back to our table and updates data, then we have an infinite looping process. Lucky for us, SQL Server has a safeguard and triggers can be nested up to as many as 32 levels limit (INSTEAD OF triggers can be nested regardless of the setting of this option). This setting is turned on by default in SQL Server and what it means is that if this nesting limit is exceeded the trigger terminates.
Just to verify the nested triggers option, in Object Explorer, right-click a database, and then select Properties. Under the Options page, there is the Nested Triggers Enabled option and it should be set to True:
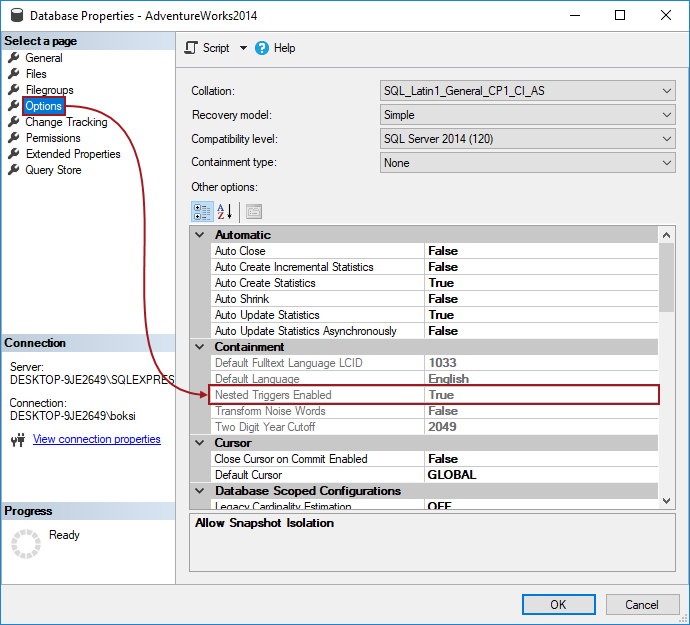
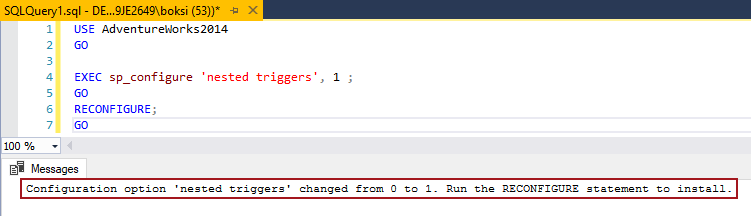
Note that this option is grayed out which means it’s not configurable in GUI. If for some reason this option is disabled which is not recommended, except in some rare cases, execute the following code to enable it:
USE AdventureWorks2014
GO

EXEC sp_configure 'nested triggers', 1;
GO
RECONFIGURE;
GO
The setting takes effect immediately without restarting the server. If you encounter an error, it’s most likely because this is an advanced option. Add the code from below before the system stored procedure to fix this:
USE AdventureWorks2014 ;
GO
EXEC sp_configure 'show advanced options', 1;
GO
RECONFIGURE ;
GO
Recursive triggers
Recursive triggers are cases in which a trigger calls itself repeatedly. This usually happens when there is no any logic inside the trigger that can break the recursion. This is also known as an infinite loop. Thankfully, the recursive triggers in SQL Server are disabled by default. As before, you can check this option in Object Explorer, right-click a database, and then select Properties. Under the Options page, there is the Recursive Triggers Enabled option and it’s set to False:
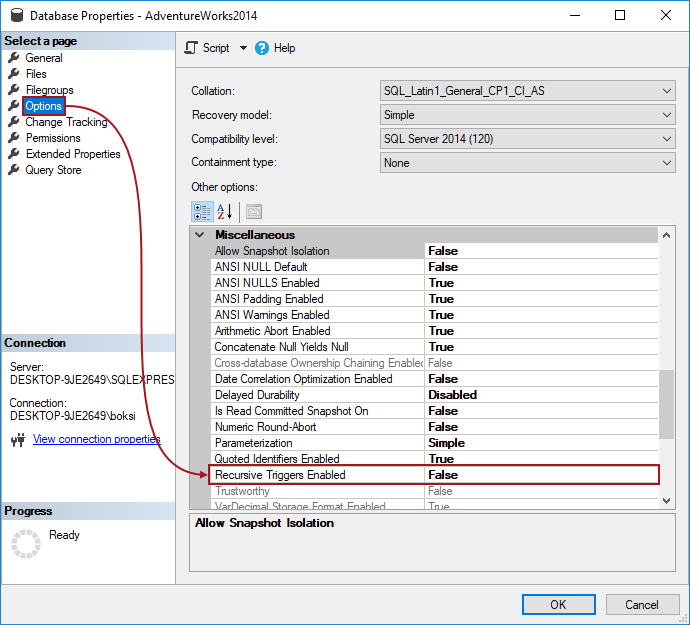
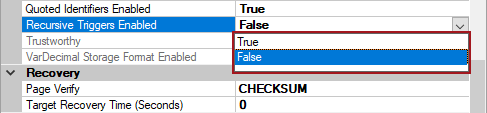
When set to False, only direct recursion is prevented. This option can be changed directly from GUI:
Remember that the triggers are attached to tables. On large databases with many tables, writing triggers for each table can be very time-consuming. Now that we have covered each DML statement, let’s see an out-of-the-box solution for automatic trigger creation to meet the goals from above.
Automatic, template based trigger creation
ApexSQL Trigger is an auditing tool for SQL Server databases which captures DML changes that have occurred in a database. So, let’s see how to implement trigger based SQL auditing, using a more complex version of our Update trigger for change tracking/auditing, with this tool in a few steps.
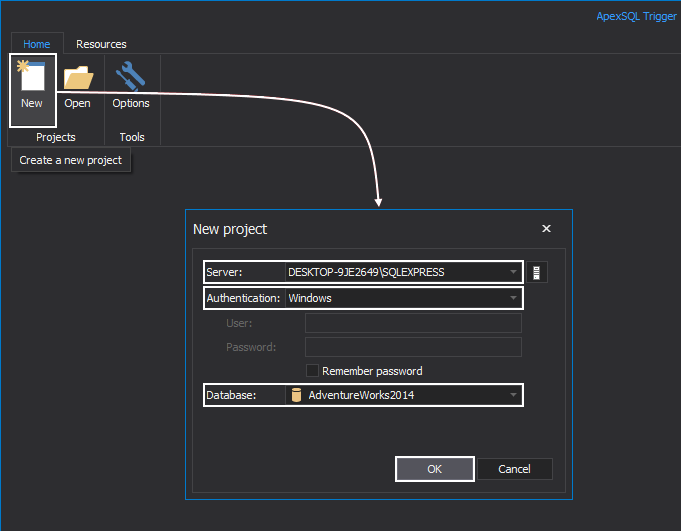
Startup ApexSQL Trigger, click the New button to create a new project. This will open a New project dialog where we will select the server, authentication method and database on which we want to audit changes. Once set, click the OK button to continue to the next step:
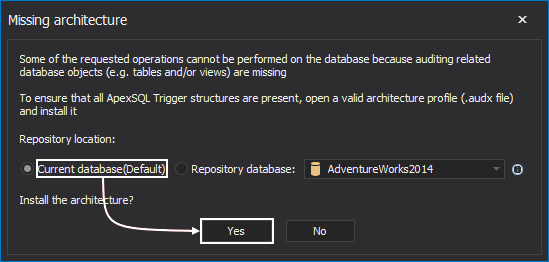
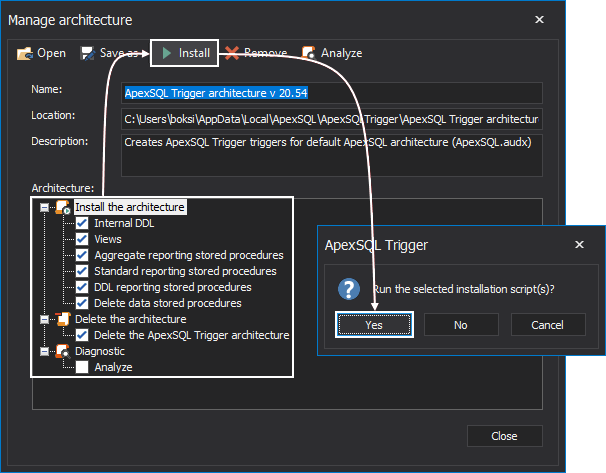
The application will then pop-up a dialog about missing architecture. This is normal as this is the first-time application is connected to this database. This is essential step as application requires a specific architecture of SQL objects installed prior to start auditing (similar to the creation of our table before). Select the default option and click the Yes button to install the architecture:
Next step, leave default settings and click the Install button and then confirm running the script by clicking the Yes button to install the auditing architecture on the database:
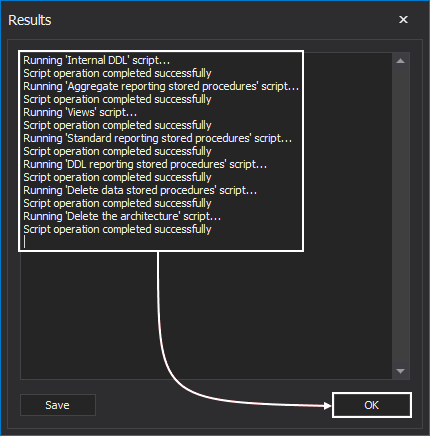
Running the script only takes a few seconds and once finished successfully, click the OK button to close the window and get back to the Manage architecture window:
Close this window as we no longer need it and you will see the application’s home window:
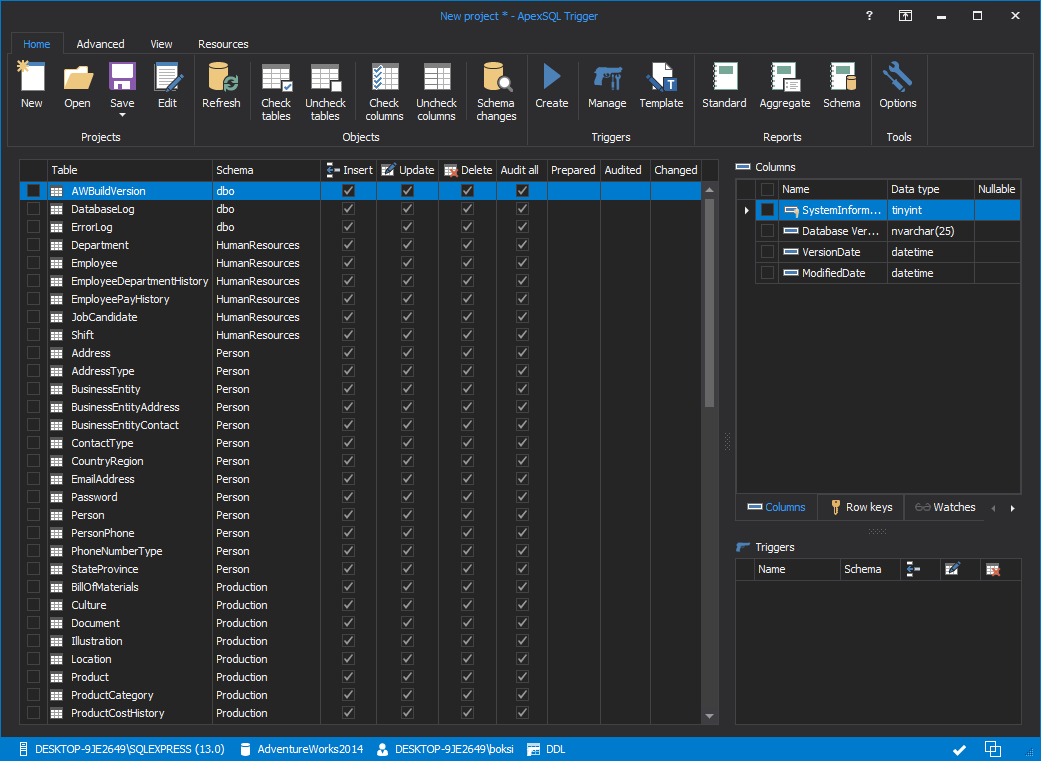
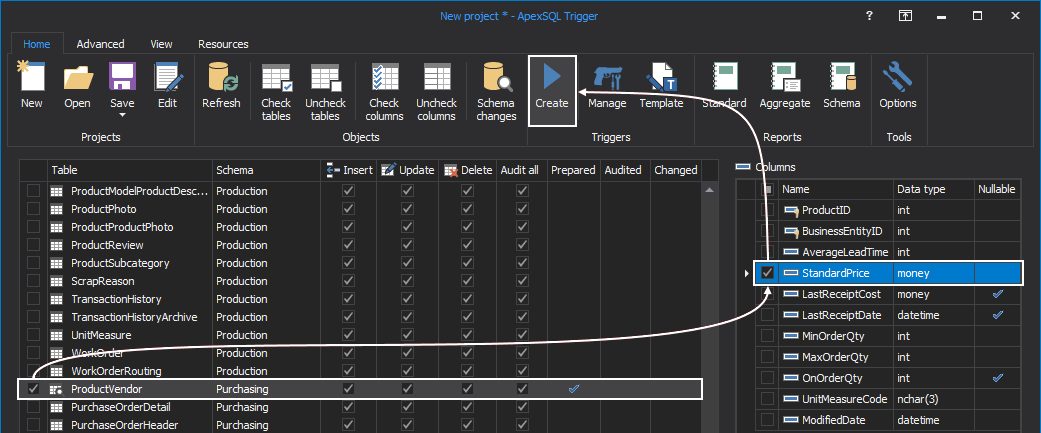
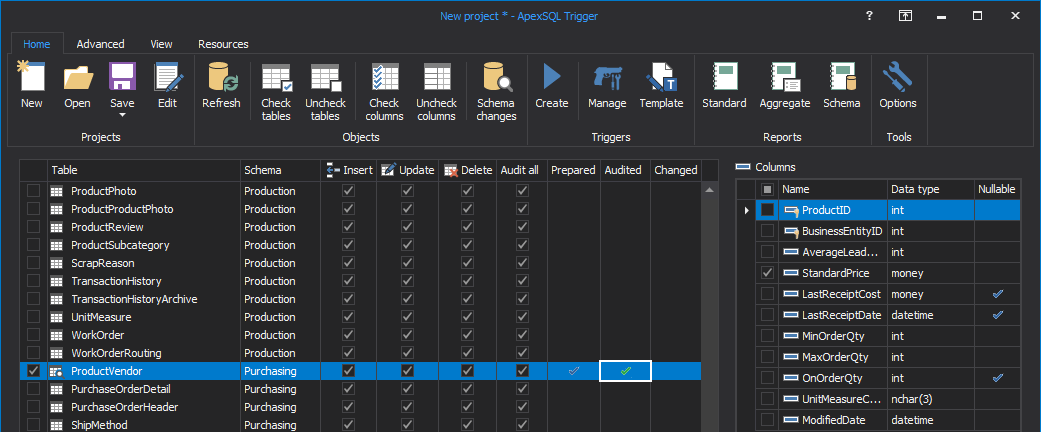
Find the Purchasing.ProductsVendor table, check the option on the left and you will see all the columns under the Columns pane. Check the StandardPrice column, and then click the Create button to create the trigger:
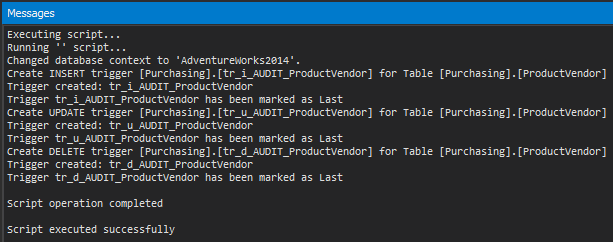
Click the Execute button in the Script window to create the trigger:

Next, you should see the message that all operation completed and script executed successfully:
Back to the home screen, note that the table now has a green checkmark which means that this table is being audited:
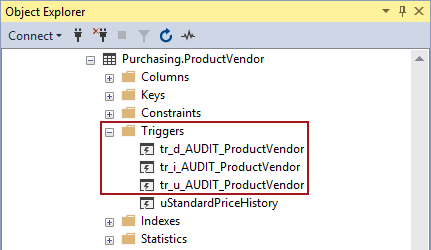
If we go back to Object Explorer and refresh the Triggers folder, there will be three new triggers created by ApexSQL Trigger:
Each trigger is for one DML statement. Why? Because why not, it’s not like we had to type the code. And this provides more granularity, in case we wanted to make operation specific mods in any of the three templates. However, it’s up to you which changes you want to audit and you can decide this with a single click.
We can now delete the uStandardPriceHistory trigger as we no longer need it. Also, remember that having multiple triggers on one table can lead to performance implications (especially in this case when two triggers does the exact same thing). We should also delete the previously created Purchasing.StandardPriceHistory table as it’s useless without the trigger.
Let’s say the item is no longer on sale, change the price to old value using the steps from before, so we can see how to view changes. Unlike writing the Select statement and pulling the data manually from a table, ApexSQL Trigger does this by generating user customizable reports.
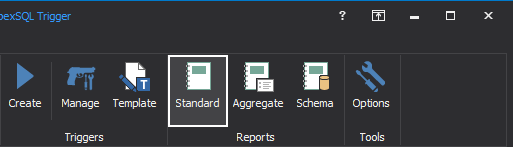
Click the Standard button under the Reports group:
In the next window, just click the Apply button and the change will be shown below:
Now, sending an email can be done in a few ways. One way is already described in an article on how to customize ApexSQL Trigger architecture, so that email alerts are sent when changes are made to a database record: How to send email alerts when a change is made to a database record
If you apply the method from the article above, Database Mail will send emails for all DML changes on a table. In our case, we only need it for the Insert statement. The user may freely edit and modify the templates which means inserting your custom code for the trigger is possible. In this case, we can just create a new Insert trigger and edit existing template by putting our piece of code, so the trigger will not only record the changes but also execute the sp_send_dbmail stored procedure and send an email.
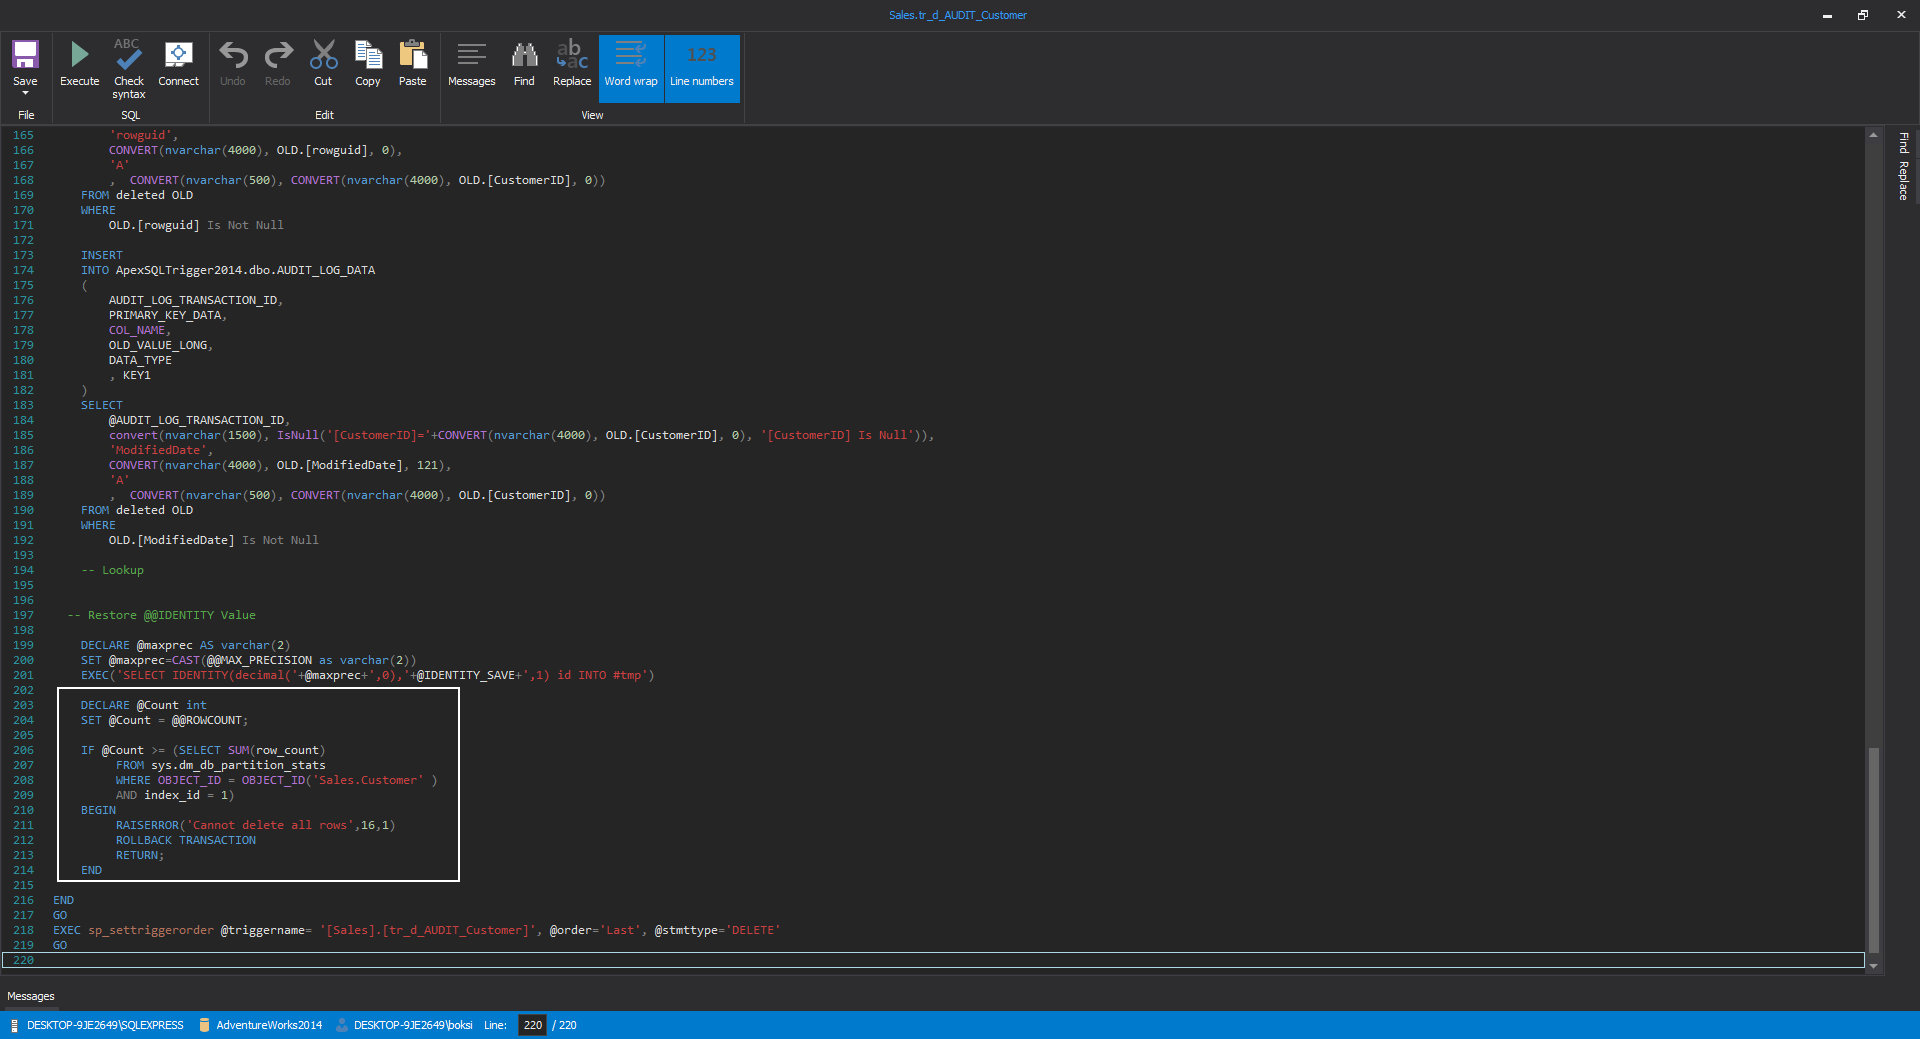
The same goes for a Delete statement. Just by adding a few lines of code, you can create a prevention mechanism that will guard your data by not letting you accidentally delete all data in a table. All we did in this case is we added the following code to achieve the goal:
DECLARE @Count int
    SET @Count = @@ROWCOUNT;

    IF @Count >= (SELECT SUM(row_count)
         FROM sys.dm_db_partition_stats
         WHERE OBJECT_ID = OBJECT_ID('Sales.Customer')
         AND index_id = 1)
    BEGIN
         RAISERROR('Cannot delete all rows',16,1)
         ROLLBACK TRANSACTION
         RETURN;
	END
The edited template looks like this:
The execution of the edited code, creates a trigger that will prevent wiping out the entire table:
Saving the template can be useful for future use and creating this on multiple tables simultaneously.
I hope you find this article useful. For more information on ApexSQL Trigger, please visit the product page
Useful links
- How to prevent accidental data loss from executing a query in SQL Server aka “Practicing safe coding”
- How to set different connection colors in SSMS
- Fatal action guard: guarding against inadvertent execution of code that may damage or destroy data in SQL Server
January 12, 2018


