


SQL databases can contain a lot of data, including a lot of sensitive data. This sensitive information can easily be misused. Mask SQL Server data is of great importance when the SQL database contains a lot of sensitive data. Microsoft has offered a dynamic data masking feature that has been implemented in SQL Server 2016 and later versions, as one of the solutions for protecting sensitive data in SQL databases.
The dynamic data masking feature allows certain SQL database users to hide the original data while deciding which of the users will be privileged to see the original data and which will not. It is very important to note that using the Dynamic data masking feature does not change permanently data in the database, but only hides them.
In the article below, the usage of dynamic data masking feature will be explained throw:
- Azure portal
- ApexSQL Mask
Mask SQL Server data on the Azure SQL database
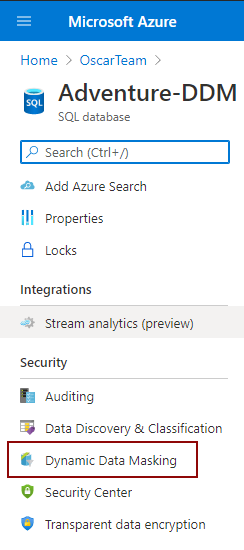
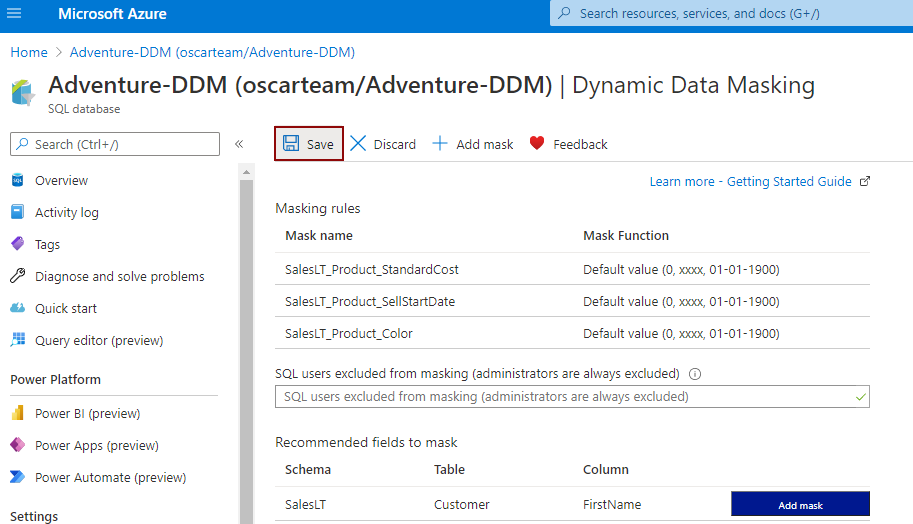
How to mask SQL Server data with the dynamic data masking feature on the Azure SQL Database will be explained on the AdventureWorksLT sample database. To start using the Dynamic data masking feature on the Azure portal, click on the desired database, and, then in the Security tab, click on the Dynamic Data Masking option:
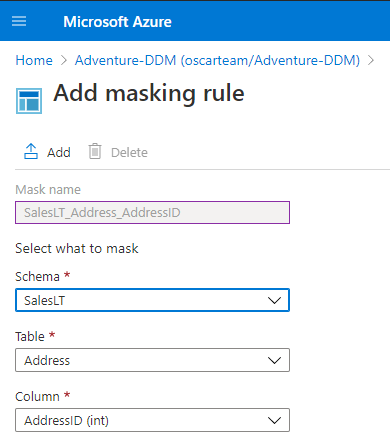
That action will open a new page, where will be presented recommended fields to mask. Besides those recommended fields, Azure portal allows to add a mask to any other column in the database by clicking on the Add mask button:

The Add masking rule page will be shown, where a user can choose Schema, Table, and Column which data will be hidden. When all of that is set, the Azure portal will make the name of the mask in which will be presented the names of the selected Scheme, Table, and Column:
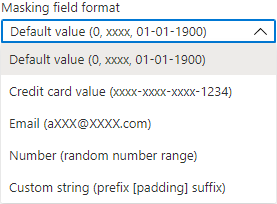
The next step is to choose the type of mask, from the Masking field format drop-down list for masking sensitive data. Depending on the data type of the selected column, Azure portal will be offered the next type of mask:
- Default value (0, xxxx, 01-01-1900)
- Credit card value (xxxx-xxxx-xxxx-1234)
- Email (aXXX@XXXX.com)
- Number(random number range)
- Custom string (prefix [padding] suffix)
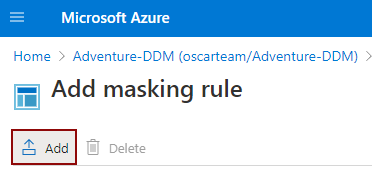
When the masking method is selected by clicking on the Add button, the dynamic data mask will be created:
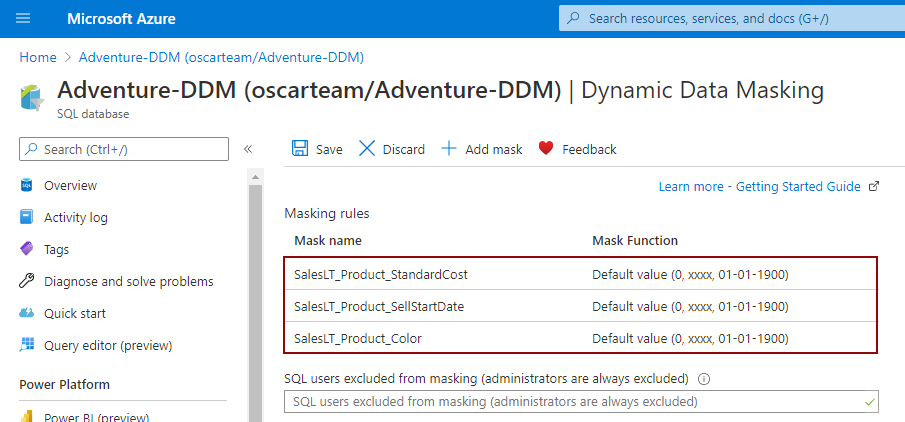
The newly added dynamic data mask will appear in the Dynamic data masking page, whereby clicking on the Save button, the mask will be applied on the selected column:
To see how dynamic data masking features work for Azure SQL Databases, in SSMS, login will be created and the user which will have data reader privileges.
By executing the following script on the master database, the new login and user Test will be created:
CREATE LOGIN Test
WITH PASSWORD = 'Password.'
GO

CREATE user Test FOR LOGIN Test
Then, open a new query for the desired database where need to mask SQL Server data and execute the following script which will create a Test user on that database with data reading permissions:
CREATE user Test FOR LOGIN Test

ALTER ROLE db_datareader ADD MEMBER [Test];
GO
This action will create the user with a limited permission, who will see only hidden sensitive data.
Further in the article, using the dynamic data masking feature through different masking methods will be explained with comparing original and hidden sensitive data.
Masking field formats using to mask SQL Server data
Default value
The Default value type of mask is used for masking columns with different data types. Different characters are used to hide sensitive data in columns with different data types:
- xxxx – is used for the string data type (nchar, ntext, nvarchar)
- 0 – zero value is used for numeric data types (bigint, bit, decimal, int, money, numeric, smallint, smallmoney, tinyint, float, real)
- 01-01-1900 – is used for date/time data types (time, smalldatetime, datetimeoffset, date)
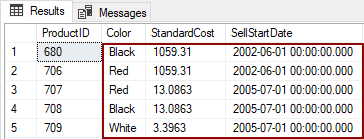
This dynamic data masking method will be explained on the SalesLT.Product table, where will be chosen Color (nvarchar), StandardCost (money), and SellStartDate (datetime) columns for hidden sensitive data:
When connecting to the Azure SQL Database like Admin and when executing the next script:
SELECT TOP (5) [ProductID]
	,[Color]
	,[StandardCost]
	,[SellStartDate]
FROM [SalesLT].[Product]
The original data will be presented:
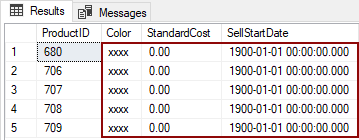
But when connect to Azure SQL Database as a Test user with data reading permission, the sensitive data will be hidden:
When the user chooses the Email type of dynamic data masking, the first character of the email will be shown, while the residue of the email will be hidden with the next string XXX@XXXX.com.
For presentation, the Email dynamic data masking type will be used for the SalesLT.Customer table and EmailAddress column. Connect to the Azure SQL Database like Admin and execute the script below. Original sensitive data will be shown:
SELECT TOP (5) [EmailAddress] FROM [SalesLT].[Customer]
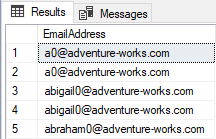
When the Email type of dynamic data masking is used for hidden sensitive data, and when login is as the Test user, masked data will look like this:

Random number
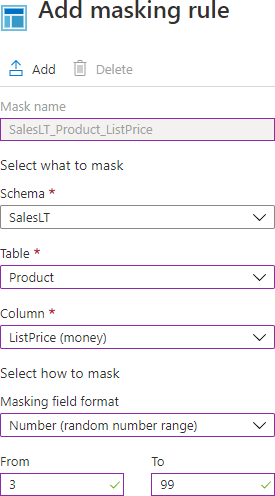
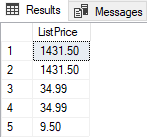
A Random number is a masking method where a random number will be generated within a certain range that can be selected when creating this mask. The range can be chosen in From and To text boxes.If it is the same number inside both text boxes, the sensitive data will be hidden with only that number. For example, this masking method will be used to mask SQL Server data on the ListPrice column from the SalesLT.Product table, in the range from 3 to 99:
By executing the following script in SSMS, the Admin can see the original data:
SELECT TOP (5) [ListPrice] FROM [SalesLT].[Product]
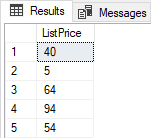
But if in SSMS log in like Test user, executing the previous script will give data that will hide the numbers in the range from 3 to 99:
Custom text
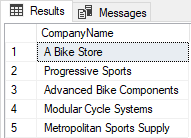
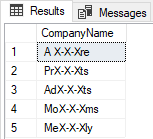
This type of dynamic data masking exposes the first and last characters and puts a custom string in the middle. How many of the first and last characters will be exposed is set in the Exposed Prefix and the Exposed suffix text box, while a custom string will be inserted in the Padding string. Data from the CompanyName column from the SalesLT.Customer table will be used for presenting the results of masking, and, for purpose of this example, the first two and last two characters will be exposed with X-X-X custom string in the middle:
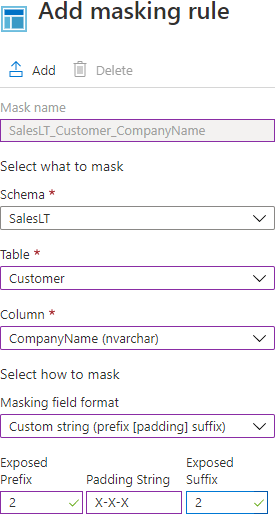
Executing the following script in SSMS will show how the sensitive data will look in the original state:
SELECT TOP (5) ,[CompanyName] FROM [SalesLT].[Customer]
While in a hidden state, data will be looked at:
Credit card
The credit card type of mask exposing the last four digits of the designated fields when mask SQL Server data, and a constant string xxxx-xxxx-xxxx- is added as a prefix in the form of a credit card. The masked credit card number will look like xxxx-xxxx-xxxx-1234. On the Credit_Card_Number column of SalesLT.Persons, the process of changing data from original to masked one will be followed. Original data will appear when connecting to the Azure SQL Database like admin and when executing the following script:
SELECT TOP (5) [Credit_Card_Number] FROM [SalesLT].[Persons]
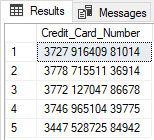
Hidden sensitive data from the same column will be got when connecting to the Azure SQL Database like Test user with data reading permission:

In this way, the Azure portal allows the users to mask SQL Server data by applying these dynamic data masks on the columns which contain sensitive data. If there is a need for non-privileged users to see hidden data, by deleting that mask from the Dynamic data masking page, users will be able to see original data.
Mask SQL Server data with dynamic data masks using ApexSQL Mask
ApexSQL Mask is a data masking tool which uses static and dynamic data masks to mask SQL Server data. This article will explain how easy dynamic data masking feature can be used through this tool to hide sensitive data.
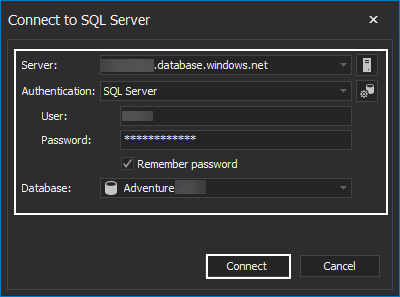
Connect to SQL Server
On starting the application, the Connect to SQL Server window will be opened, where SQL Server instance, type of Authentication, and the Database are needed to be set up. When all is set, click on the Connect button to connect to a desired database:
Creating dynamic data masks
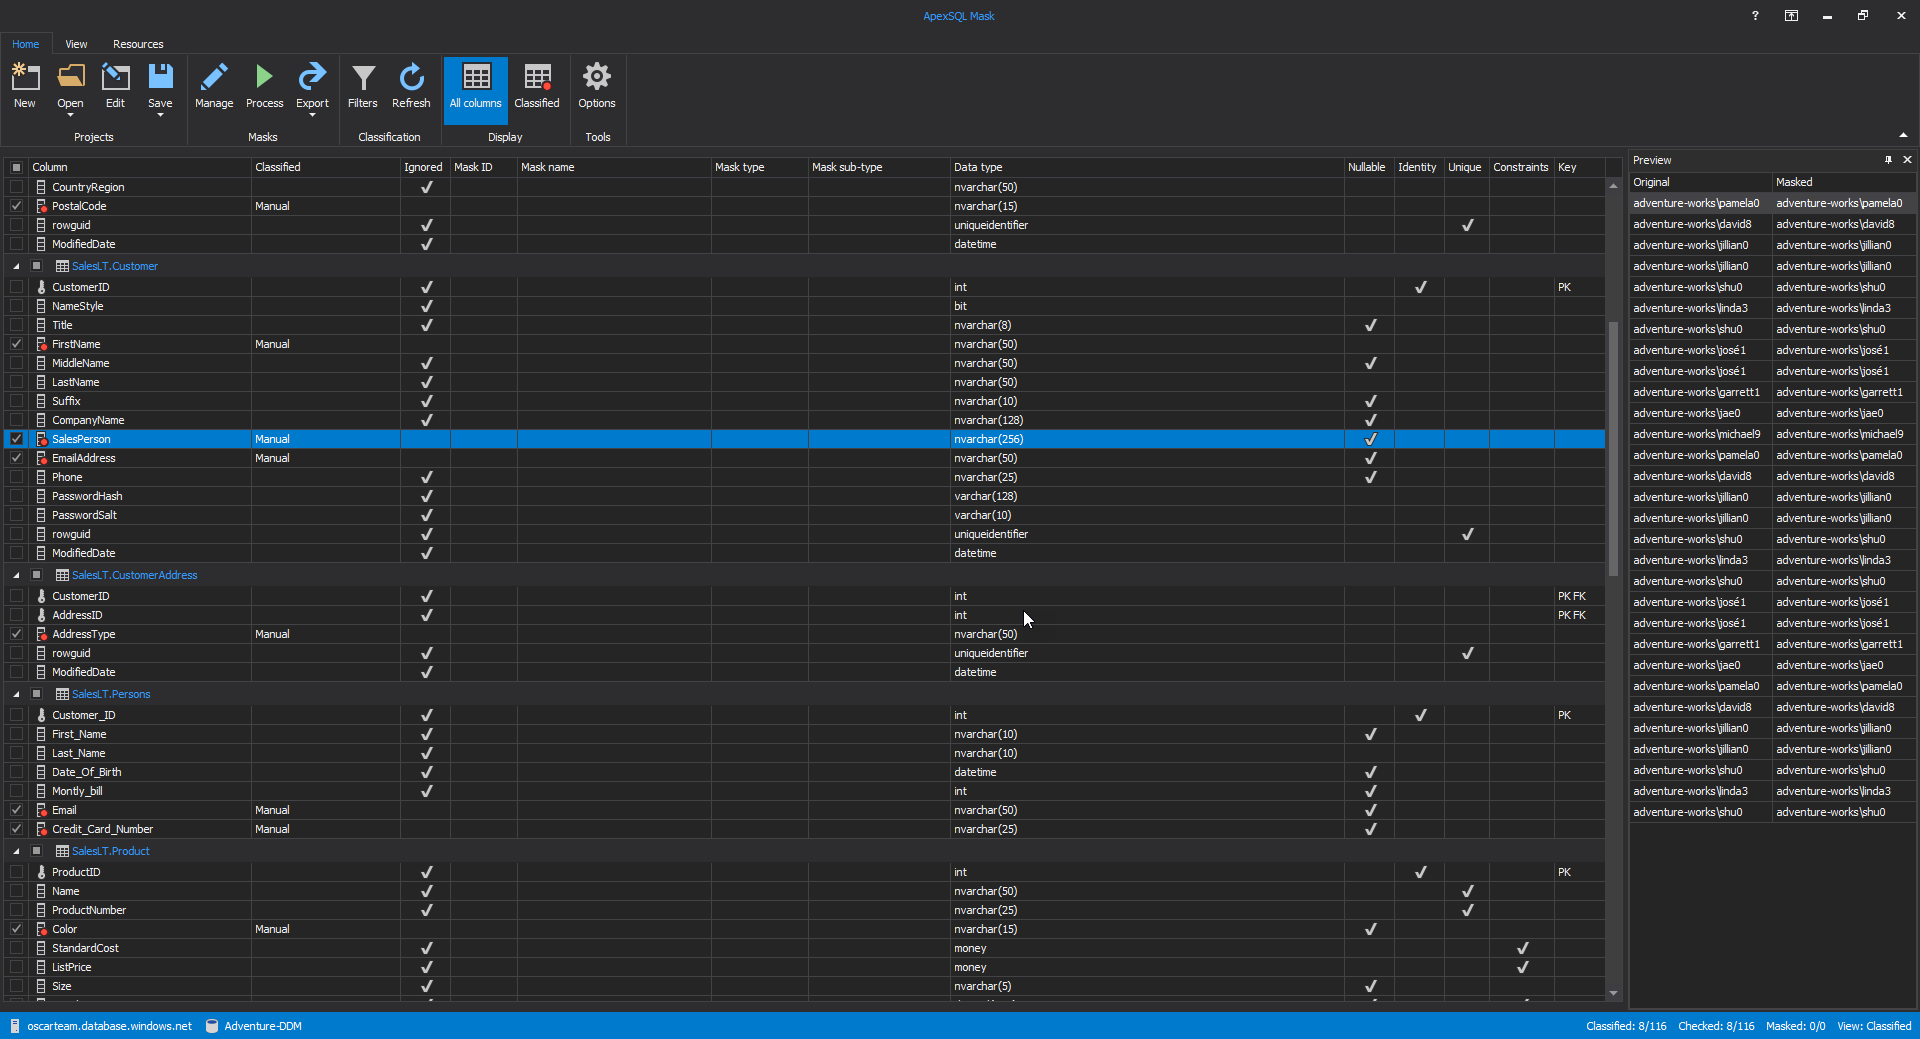
The main grid of ApexSQL Mask will appear, with all columns presented. The first step to mask SQL Server data is to tick columns which data will be hidden. For example, the ListPrice column from the SalesLT.Product table will be used:
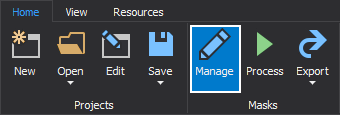
To add masks to the selected columns, click on the Manage button in the Home tab:
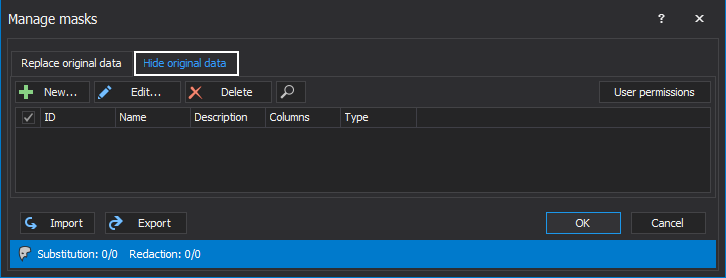
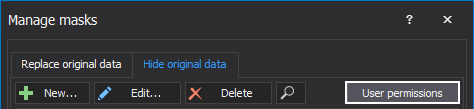
The Manage masks window will be opened. To create the dynamic data mask, go to the Hide original data tab:
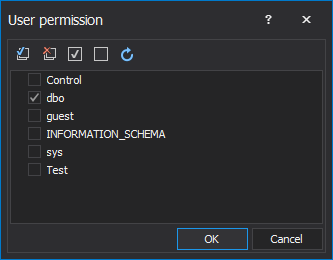
To select which user will have a permission to see original data, click on the User permission button in the Hide original tab:
The User permission window will be opened, whereby ticking the check box in front of the name of the user will be allowed which user can see original data and which not:
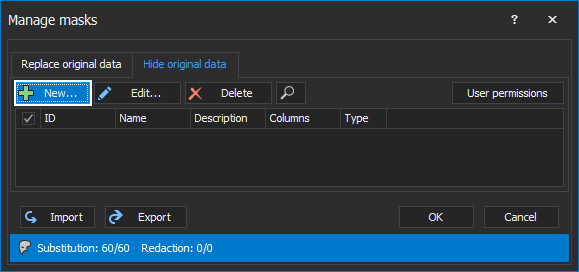
When it is defined which user can see the original data, the next step is to click on the New button to start creating the dynamic data mask:
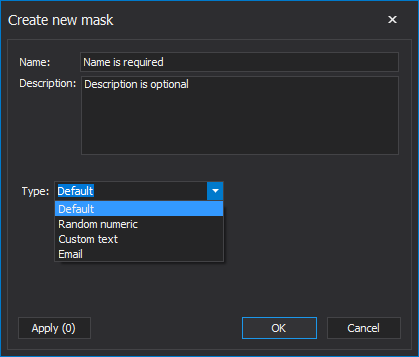
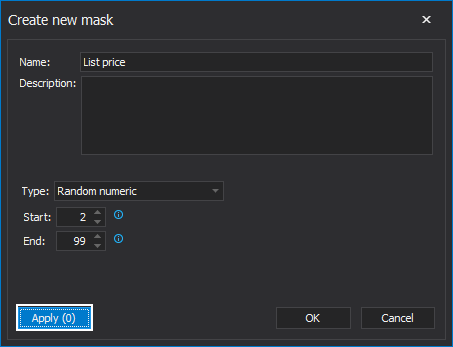
The Create new mask window will be opened, where it is required to give a name of the mask while the description of the mask is optional. By clicking on the Type dropdown list, ApexSQL Mask will offer the previously mentioned types of Dynamic data masking that will be used to mask SQL Server data:
When the right masking method has been chosen, for example, Random numeric method with which the sensitive data will be hidden with value in the range from 3 to 99, the next step is to click on the Apply button:
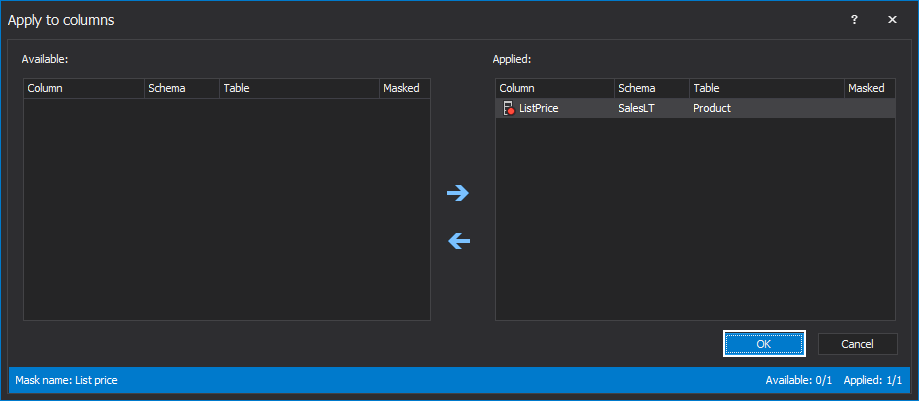
The Apply to columns window will be shown, where, from the Available grid, will move the selected column which data need to be masked to Applied grid, in this case, ListPrice column. When the column is selected, click on the OK button:
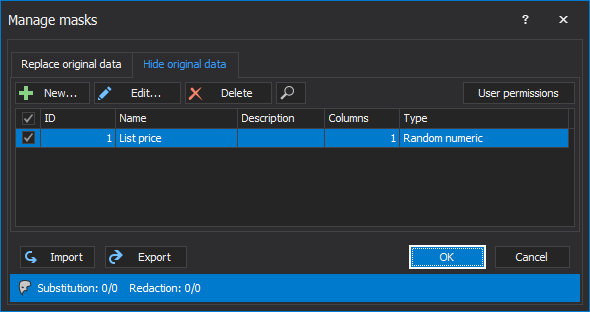
Again the Create new mask window will appear; clicking on the OK button will close that window, and the new dynamic mask will be created and appear in the Manage masks window. By clicking on the OK button, the view will move to the main grid:
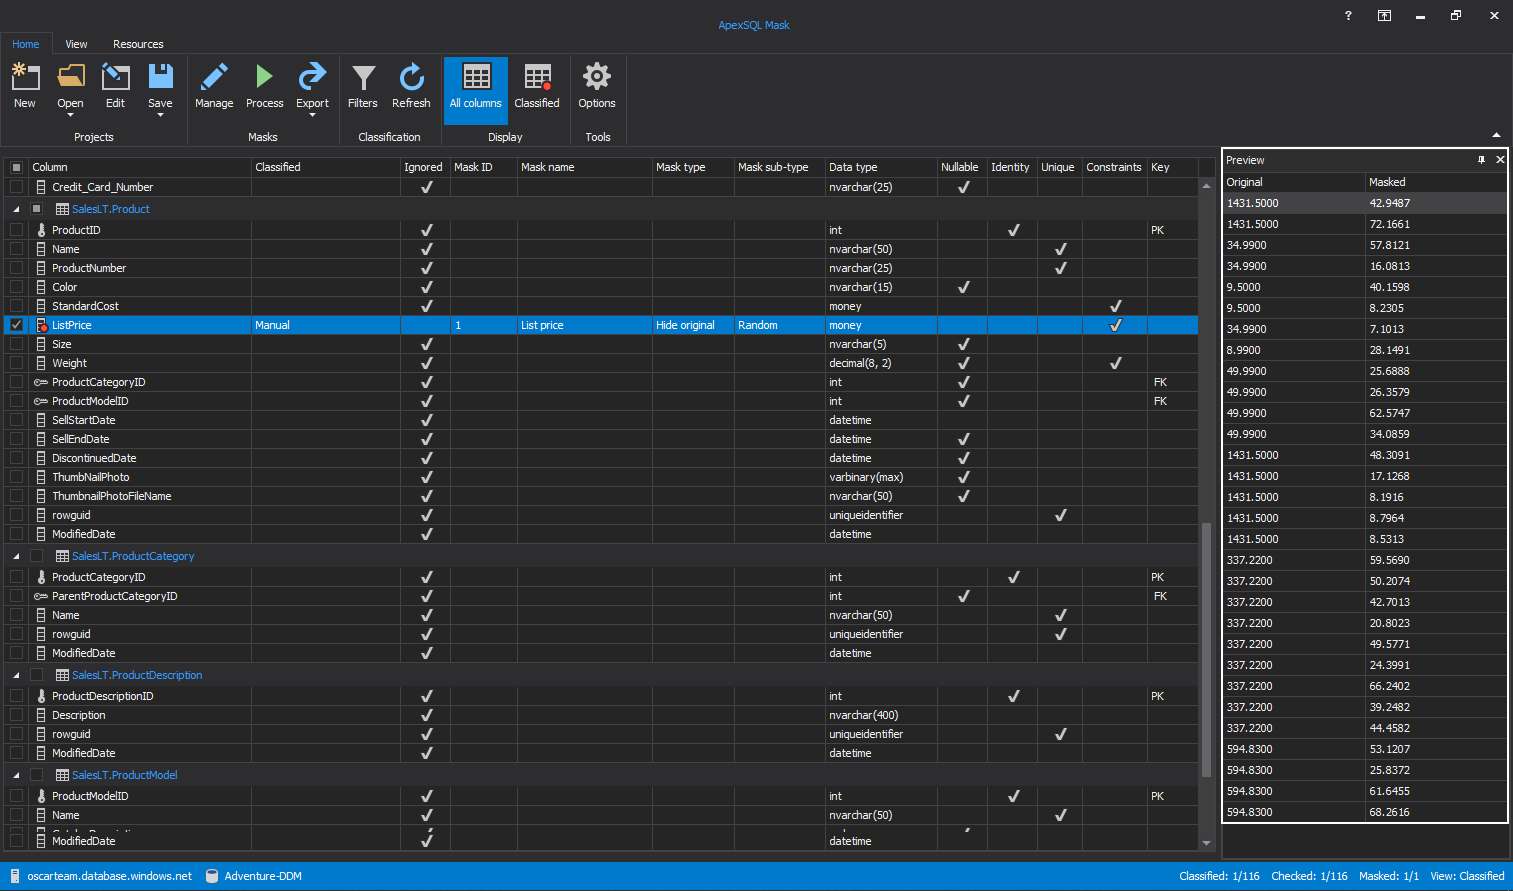
In the main grid, the new masked column will appear. Click on that column from the Preview window and it can be seen how masked will look after masking:
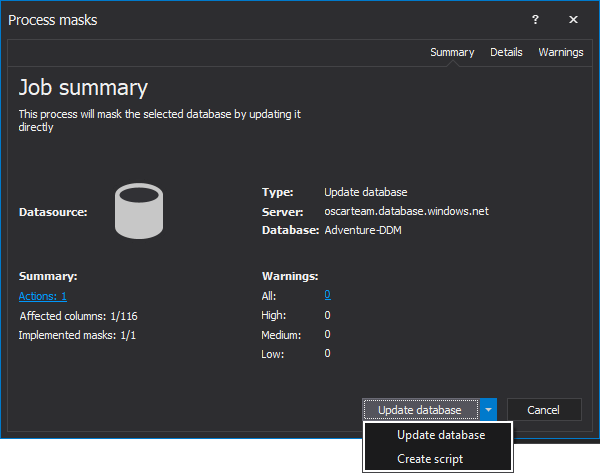
When all columns are selected and masked, click on the Process button in the Home tab:

The Process mask window will be opened, whereby clicking on the dropdown list the user can choose whether Update database or Create script:
Conclusion
To protect sensitive data and to prevent security breaches, Azure portal and ApexSQL Mask have the similar functionality, and those tools allow users to mask SQL Server data without changing data in the database. Azure portal by using dynamic data masking feature protects data only in Azure SQL database while ApexSQL Mask can be used on Azure SQL database and the MS SQL Server database. Besides availability to the updated database directly, ApexSQL Mask allows users to create and mask scripts.
December 22, 2020


