Challenge
One of the most important things for a DBA when it comes to managing databases is schema change auditing. This involves tracking changes over time, identifying differences between two versions and even rolling back changes to a previous baseline.
Various native tools exist to version a database for purposes of auditing from simply taking periodic backups to examine SQL profiler results for schema change operations.
A more advanced approach database schema change auditing is versioning database via source control, which enables the recreation of a database at a certain point in the past. Learn more on How to automate batch SQL object scripting and committing to source control and How to work with SQL database source control labels.
Database snapshots are another way of database versioning, where the whole database schema is saved to a snapshot file, which can be reused later on to recreate the captured state of a database. For example, a desired snapshot is opened, compared against a database and that particular state will be synchronized to a live SQL database. As snapshot is a binary file that contains only the SQL database schema scripts, and as such it requires only a fractional amount of space as a backup file or script files.
The whole system should work as follows:
- Auditing
- The last created snapshot file (aka the “baseline”) is compared to a database
- If there were changes, a new date stamped snapshot, schema difference report, and an output file are created as the new baseline. In this way, new snapshots are created only if the version is different from the previous. This saves from having potentially hundreds of duplicate snapshots.
- Rollback
- If there was a problem with a live database, compare it to a recent schema snapshot to see changes
- Revert the change for the particular object that caused the issue by synchronizing a snapshot with a live database
Solution
ApexSQL Diff is a third-party tool that compares and synchronizes live databases, backups, script folders, source control projects, and snapshots. In addition, it can create and synchronize specific SQL database version from/to source control project.
When using ApexSQL schema snapshots, there are no restrictions in terms of SQL Server editions or if it has to be located in the same SQL Server instance as the source database, while that’s the case with SQL Server snapshots.
Creating the script
The first part in setting up this system is to set a function in the PowerShell script to find a snapshot file that has the highest value for the date stamped parameter:
#find the file which has the highest value for the "created date" parameter
function  FindSnapshotByStamp($folder, $server, $database)
{
    #find all files whose name starts with [Server].[Database] and ends with .axsnp
    $Files = Get-ChildItem -Path $folder -Filter "$server.$database*.axsnp"
    if ($Files.Length -eq 0)
    {
        #if such snapshot is not found, then it means that there isn't any snapshot previously created
        return $null
    }
    $mostRecentFile = $Files | Sort-Object -Property "CreationTime" -Descending | Select-Object -First 1
    return $mostRecentFile.FullName
}
The next step is to check for existence of required folders, for the root location, snapshots, reports, and outputs:
#checks for existence of Snapshots, Reports or Output folders, and creates it if it is not created
function CheckAndCreateFolder
{
    param
    (
        [string] $rootFolder,
        [switch] $snapshots,
        [switch] $reports,
        [switch] $outputs
    )

    $location = $rootFolder

    #set the location based on the used switch
    if ($snapshots -eq $true)
    {
        $location += "\Snapshots"
    }
    if ($reports -eq $true)
    {
        $location += "\Reports"
    }
    if ($outputs -eq $true)
    {
        $location += "\Outputs"
    }
    #create the folder if it doesn't exist and return its path
    if (-not (Test-Path $location))
    {
        mkdir $location -Force:$true -Confirm:$false | Out-Null
    }
    return $location
}
Also, let’s set the location of the root folder, in our example we’ll use the current location where the PowerShell script is located, and the location of ApexSQL Diff installation:
#defining variable for the recognizing current location
$currentPath = (Split-Path $SCRIPT:MyInvocation.MyCommand.Path)

#root folder of the system
$rootFolder = "$currentPath"

#installation location of ApexSQL Diff
$diffLocation = " ApexSQLDiff"
Depending on how many servers and databases there is a need to keep the track on, a simple text file can be created that will contain the names of servers and databases. The script will iterate through these and process a schema snap shot audit for each database:

This text file will be processed by the PowerShell script for each line (server, database), its names will be captured by variables, passed as a login to ApexSQL Diff and use them as a snapshot file name.
In this example, Windows authentication is used, but SQL Server authentication is also possible. Learn more from the article about Four ways of handling database/login credentials during automated execution via the CLI.
A variable for this text file needs to be defined as well:
#location of the text file with server and database names:
$serversDatabaseLocation = "servers_databases.txt"
Now, that all basics are set, we can start with defining all required variables, for the whole process and the first part that will check and create a snapshot if no previous snapshot is found:
foreach($line in [System.IO.File]::ReadAllLines($serversDatabaseLocation))
{

#defining all required variables

    $server   = ($line -split ",")[0]
    $database = ($line -split ",")[1]

    $snapshotsLocation = CheckAndCreateFolder $rootFolder -Snapshots
    $reportsLocation   = CheckAndCreateFolder $rootFolder -Reports
    $outputsLocation   = CheckAndCreateFolder $rootFolder -Outputs

    $cleanServerName   = ($server -replace "\\","")
    $stamp             = (Get-Date -Format "MMddyyyy_HHMMss")
    $latestSnapshot    = FindSnapshotByStamp $snapshotsLocation $cleanServerName $database

    $snapshotName = "$cleanServerName.$database.Snapshot_$stamp.axsnp"
    $reportName   = "$cleanServerName.$database.Report_$stamp.html"
    $outputName   = "$cleanServerName.$database.Log_$stamp.txt"

    $exportSnapshotSwitches  = "/s1:""$server"" /d1:""$database"" /sn2:""$snapshotsLocation\$snapshotName"" /export /f /v"
    $compareSnapshotSwitches = "/s1:""$server"" /d1:""$database"" /sn2:""$latestSnapshot"" /ot:html /hro:d s t is /on:""$reportsLocation\$reportName"" /out:""$outputsLocation\$outputName"" /f /v /rece"
    $returnCode = $lastExitCode

    #create snapshot for the current state if no previous snapshot is found
    if($latestSnapshot -eq $null)
    {
        "`r`nSnapshot is not found in the '$snapshotsLocation' folder.`r`nInitial snapshot will be created automatically`r`n`r`n" >> "$outputsLocation\$outputName"
        #create a snapshot for the current state of a database
        (Invoke-Expression ("& `"" + $diffLocation +"`" " +$exportSnapshotSwitches)) >> "$outputsLocation\$outputName"
        "`r`n`r`nInitial snapshot has been automatically created and named '$snapshotName'.`r`n`r`nReturn code is: $lastExitCode" >> "$outputsLocation\$outputName"
        exit
    }
If it’s preferred to create the first snapshot manually, check out the article about Exporting SQL data sources.
The next step is to create the part that will compare the latest exported snapshot and create a date stamped report and output file:
#compare the database with latest snapshot and create a report
    (Invoke-Expression ("& ""$diffLocation"" $compareSnapshotSwitches"))
    $returnCode = $lastExitCode
The final part of this script is to check for differences and act upon. ApexSQL Diff offers 23 return codes and based on the these, there could be three possible outcomes:
- Differences are detected and date stamped snapshot of the current database state is created
- There are no differences detected, so we’ll remove the newly created report
- An error has occurred and the output file will be opened for reviewing
#differences are detected
    if($returnCode -eq 0)
    {
        #create snapshot of current database state
        (Invoke-Expression ("& `"" + $diffLocation +"`" " +$exportSnapshotSwitches)) >> "$outputsLocation\$outputName"
        "`r`nSchema changes are detected and a snapshot is created. Return code is: $lastExitCode" >> "$outputsLocation\$outputName"
    }
    else
    {
        #remove the newly created report, since no differences are detected
        if(Test-Path "$reportsLocation\$reportName")
        { Remove-Item -Path "$reportsLocation\$reportName" -Force:$true -Confirm:$true }
        "`r`nThere are no differences and latest report is deleted. Return code is: $lastExitCode" >> "$outputsLocation\$outputName"

        #an error occurred
        if($returnCode -ne 102)
        {
            "`r`nAn error is encountered. Return error code is: $lastExitCode" >> "$outputsLocation\$outputName"
            #open the output file as an error is encountered
            Invoke-Item "$outputsLocation\$outputName"
        }
    }
}
Check out all return codes and more from the article about General usage and the common Command Line Interface (CLI) switches for ApexSQL tools. Also, learn more about ApexSQL Diff Command Line Interface (CLI) switches.
Scheduling the system
Now that the PowerShell script is finalized and saved, the whole process is automated and it can be run with a click. Furthermore, this process can be scheduled to execute this PowerShell script each night at 1AM for example. Learn more about scheduling from the article Four ways of scheduling ApexSQL tools.
Rolling back the process
If there is a problem with SQL database on which schema changes are constantly applied, for example a specific procedure is causing issues, compare it to a recent snapshot to see changes for that particular object.
The process will be:
- Locate the most recent snapshot in which that procedure worked
- Run ApexSQL Diff
- Set the most recent snapshot as the source and SQL database as the destination:
- Click the Compare button
- In Results grid the changed procedure will be shown, along with its differences in the Script difference view panel:
-
If a detected version of this procedure is correct, check it in the Results grid, and click the Synchronize button from the Home tab:

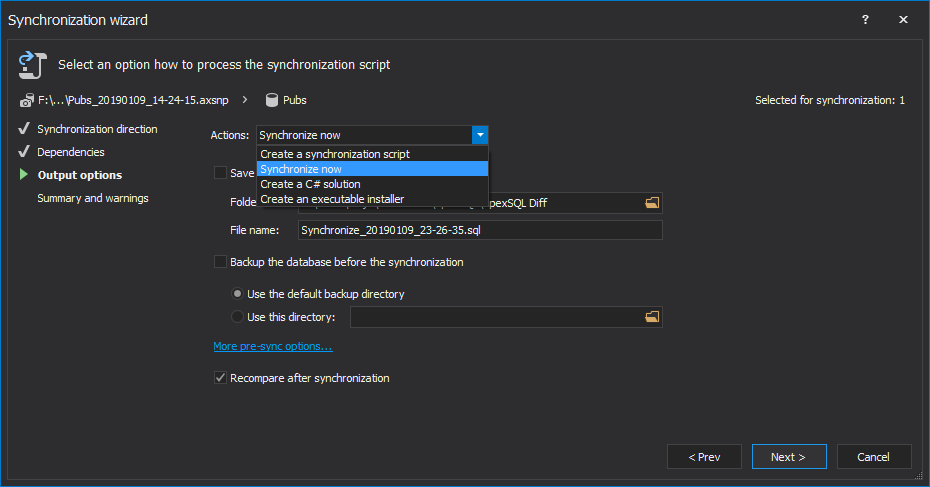
- Go through the Synchronization wizard and in the Output options step, choose the Synchronize now action, to perform direct synchronization on a SQL database:
-
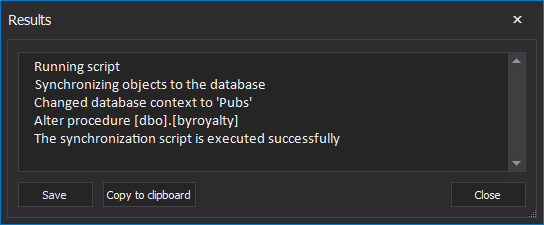
In the last step, click the Synchronize button from the bottom-right corner of the Synchronization wizard and upon finishing synchronization the Results window will be shown:

In this way, any problematic change can be rolled back to SQL database and have the last know working version.
Downloads
Please download the script(s) associated with this article on our GitHub repository.
Please contact us for any problems or questions with the scripts.
March 1, 2017


