


Challenge
In previous article, it was explained how to automatically compare and synchronize a shared SQL script folder with SQL Server database data, while in this article the solution for the reverse process will be explained, in case when data changes needs to be pulled from a shared SQL script folder to SQL Server database. Since a “poor man’s source control repository” is already set up and a SQL script folder already contains data changes commits from other developers, it’s time to set the reverse process in order to pull data changes from SQL script folder to a developer’s local database.
As described in the above-mentioned article, a created system uploaded all data changes that developers made on their local databases are uploaded to a shared SQL script folder.
Now, let’s say that one or more developers were out of office for some time (vacation for example) and during that time the system was working for them, so they’ll be “welcomed” with brand new data changes. Also, all created reports and outputs will be date/time stamped, so they can be reviewed on demand if there is a need to check what others have done in the meantime and to catch up with the team.
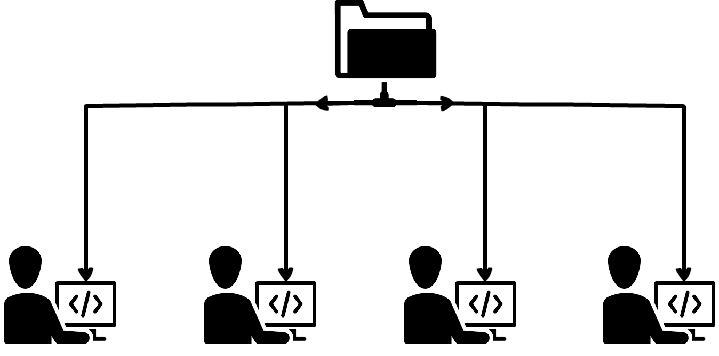
So, now a new challenge is to keep all developer databases updated with latest data changes, which are located in the shared SQL script folder:
Going forward, the system should be also capable to filter data before the comparison process, so that only relevant data changes are included in the comparison and synchronization process. In this way, time saving will be achieved, as it won’t be needed to compare entire databases, rather than only desired data changes made in specific time period. At the end, the complete process should be able to be run unattended, automated, scheduled, or to run it on a click.
Solution
As in previous article, a third-party tool – ApexSQL Data Diff, will be used in this example as well, as it’s a tool that can achieve the above-mentioned reverse process of pulling data from a SQL script folder, compare and synchronize it with developer database. ApexSQL Data Diff can compare and synchronize data between source control projects and backups and it can create comparison reports. The whole process can be automated via the CLI and it can be scheduled and run unattended at desired time.
The following part of the article will describe how to set up scheduled comparison that will be run on each 20 minutes and if a tool detects any data differences between shared SQL script folder and developer database, it will perform data synchronization on all developer databases, along with creating data comparison reports with date/time stamp. Also, the output file for each process will be created for later review.
Automation script will be created for automating the complete system, along with a text file that will be iterated, it will be created in the automation part as well, containing the complete list of all developer servers and databases.
As in the above-mentioned article, installation topography is the same one as for ApexSQL Diff and how it was explained in the article on how to automatically compare and synchronize SQL Server database objects with a shared script folder.
System setup prerequisites
Before going forward with system setup, let’s check if the following requirements are met:
- A shared SQL script folder is created that contains the complete database schema (structure). If this requirement is not met, check out the article on how to export SQL data sources and update a shared SQL script folder with latest changes, as explained in the article on how to automatically compare and synchronize SQL Server database objects with a shared script folder
- Once all schema (structure) changes are applied on a shared SQL script folder, make sure that the latest data changes are applied as well, as it was explained in article on how to automatically compare and synchronize a shared SQL script folder with SQL Server database data
Setting up the system
After all system prerequisites are fulfilled, let’s move on with setting up the complete system in the ApexSQL Data Diff’s GUI:
- Run ApexSQL Data Diff
-
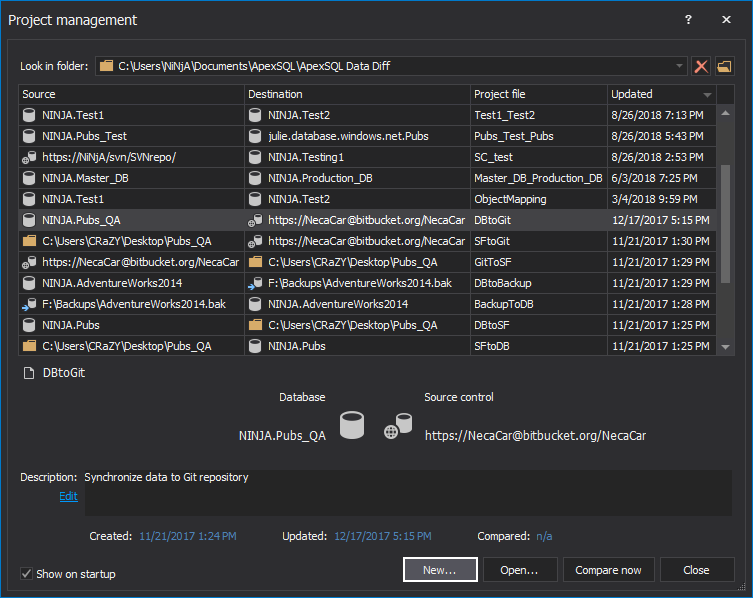
In the Project management window, along with previously saved projects that will be shown and buttons to open or compare them now, click the New button, from the bottom-right corner of the Project management window, to initiate the new project setup:
-
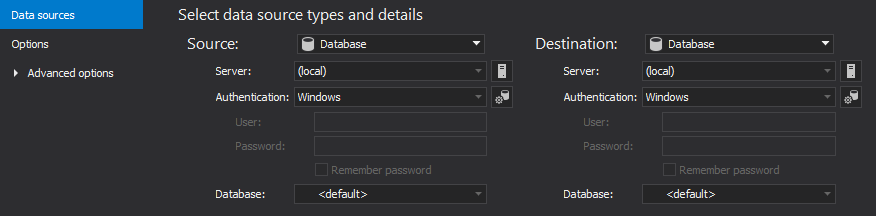
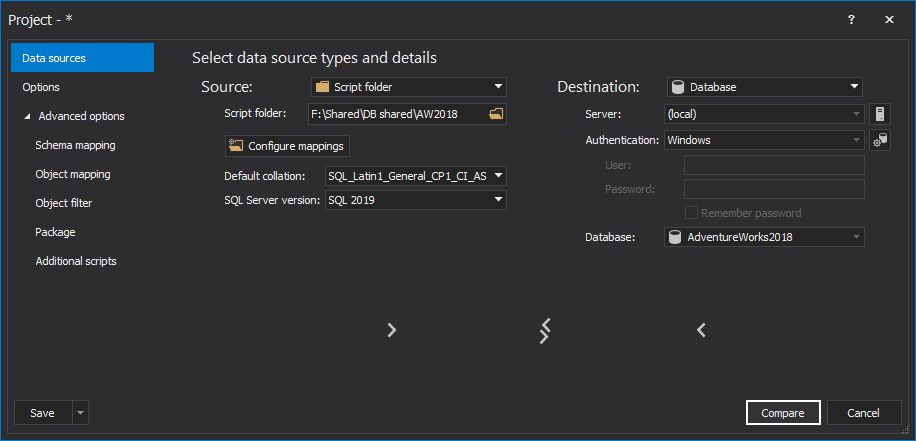
The New project window will be shown, along with the Data sources tab:
-
On the left side – the Source side, choose the Script folder data source from the drop-down list and browse or enter the path to a shared SQL script folder:
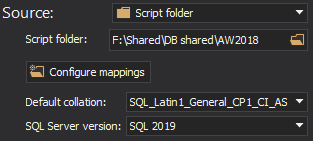
Default collation and SQL Server version will be automatically loaded, based on the previously set ones.
-
On the right side – the Destination side, choose the Database data source from the drop-down list and locate a developer’s server and database:
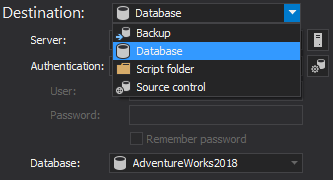
As for the Authentication options, Windows authentication is used in this example, but SQL Server authentication can be also set, along with three new Azure Active Directory authentication options.
-
Click the Options tab and make sure that the below marked options are checked under the Synchronization options section, so that any potential synchronization fails are avoided and error free:
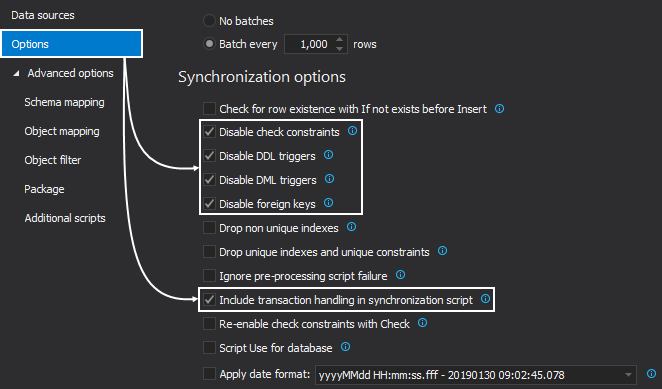
If there is a need, check any other desired comparison or synchronization options. -
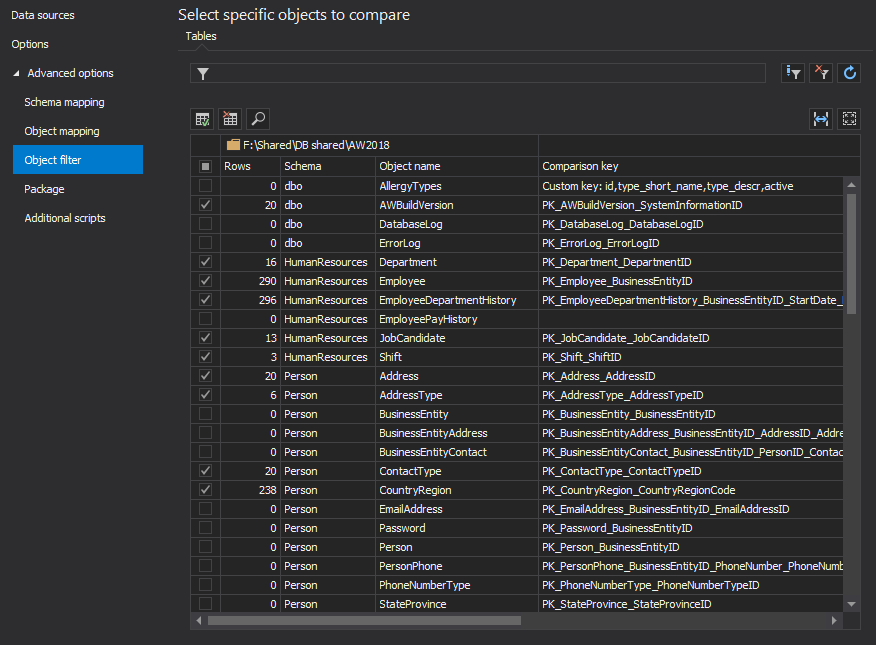
As mentioned above, this system needs to be able to filter out data, so that only desired changes can be compared and synchronized, instead of whole shared SQL script folder and developer database. Click the Advanced options tab and when expanded, it will show five new tabs. Switch to the Object filter tab and check out article on how to narrow a data comparison to affected rows only:
-
Now, when all pre-comparison options are set, click the Compare button from the bottom-right corner of the New project window:
-
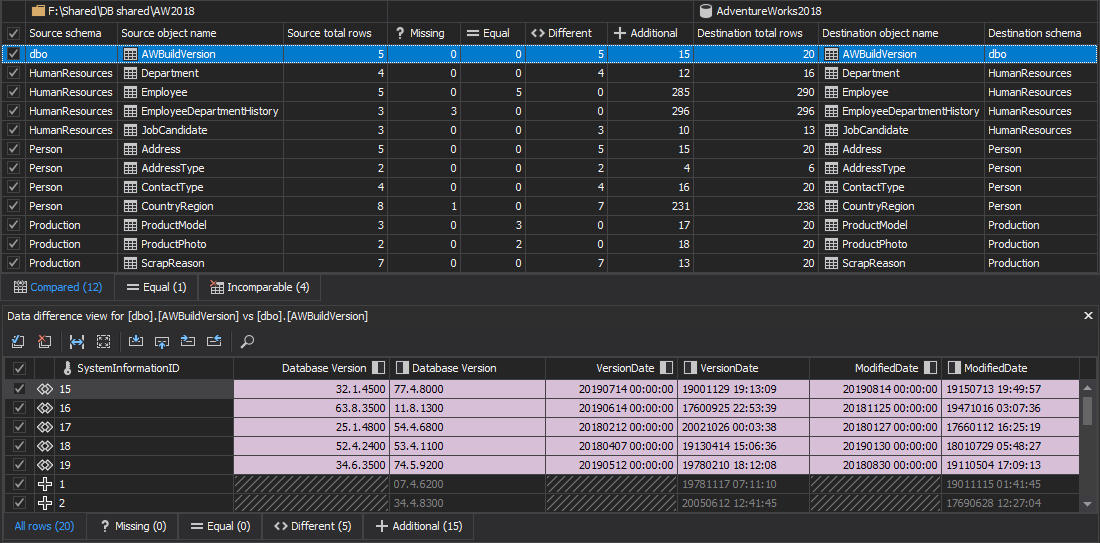
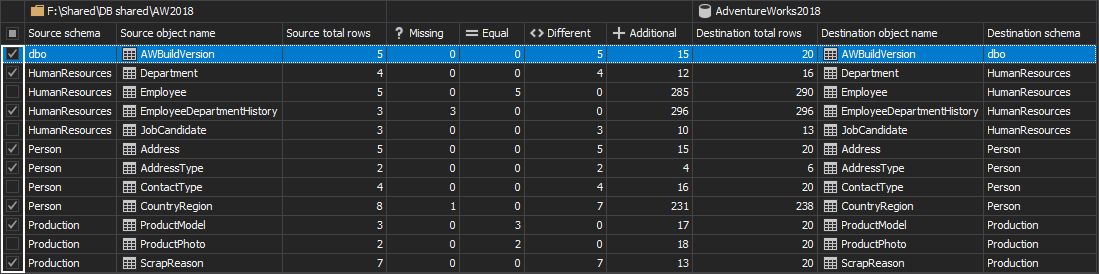
Upon the finished comparison process, the main application window will be shown, along with the Results grid that will contain all compared objects with their respective data between a shared SQL script folder and developer database:
-
Additional filter of objects can be done in the top panel of the Result grid with a simple check/uncheck:
-
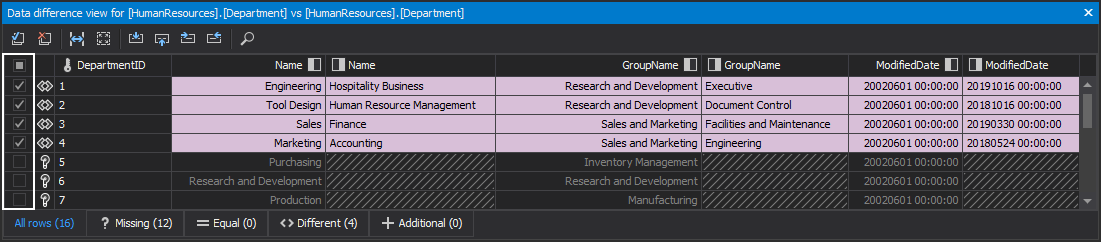
Additionally, rows for each selected object can be checked/unchecked to include/exclude them for the synchronization process between a shared SQL script folder and developer database in the Data difference view panel:
-
One of the useful options for additional filtering, before the synchronization process, can be obtained from the Home tab with the click on the Check/uncheck button and from the drop-down list it can be selected to check/uncheck all missing, different, or additional rows:
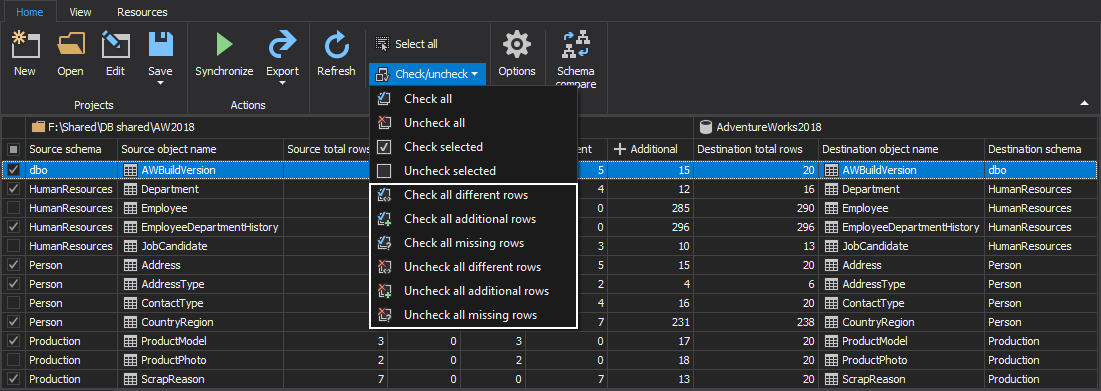
For example, one of the frequent use cases is when there is no need to delete data from the destination side (developer database) in the synchronization process, which doesn’t exist in the source side (shared SQL script folder), so in that case just uncheck all additional rows and data that exists only in destination side will be preserved.
-
Once all desired objects and rows are selected for the synchronization process, click the Save button from the Home tab, so that all previous settings are saved to a project file:

The saved options in this project file can be used in the automation script for all developer databases, since there will be a text file with complete list of all developer servers and databases that will be used to override the destination data source (developer database) that was set in this saved project file.
-
To initiate the Synchronization wizard, click the Synchronize button from the Home tab:

-
The first step of the Synchronization wizard is the Synchronization direction step, and by default direction will be from left to right, in this case from a shared SQL script folder to a developer database:
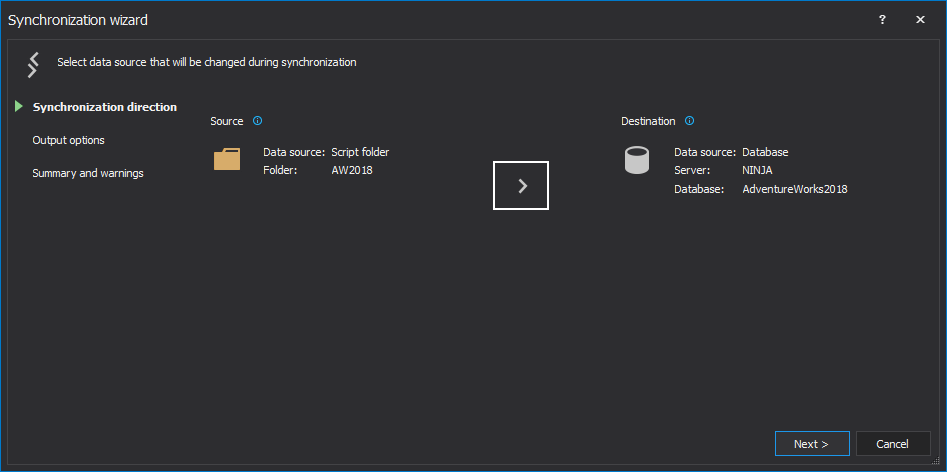
If needed, direction can be changed with a click on the arrow button and then it will be from right to left.
-
The second step is the Output options step, in which the Synchronize now action will be chosen from the Action drop-down list, so that direct synchronization from a shared SQL script folder to a developer database is performed:

Additionally, the synchronization script can be saved to a specified location, along with creating a rollback SQL script, or to backup a developer database before the synchronization.
-
The third and the last step in the Synchronization wizard is the Summary and warnings step, where both of these can be reviewed in separate tabs with a click on them, in order to check if everything looks good before the synchronization:
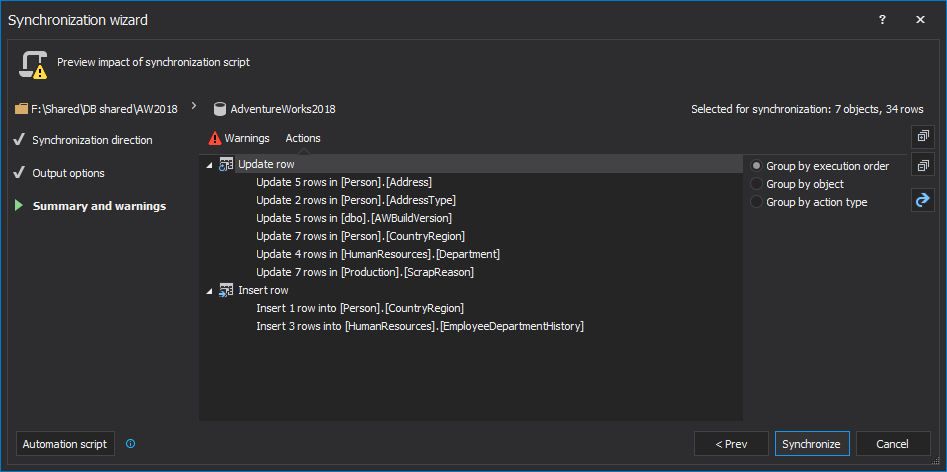
- After the pre-synchronization options are set and the review is finished, click the Synchronize button from the bottom-right corner of the Synchronization wizard to run the synchronization from a shared SQL script folder to a developer database
-
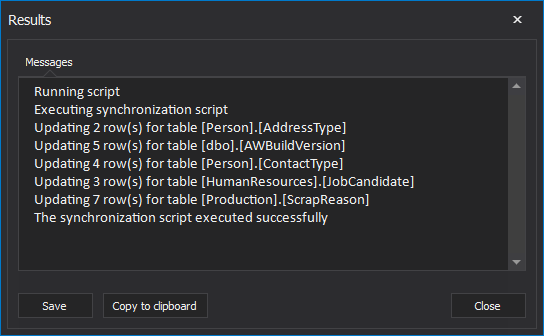
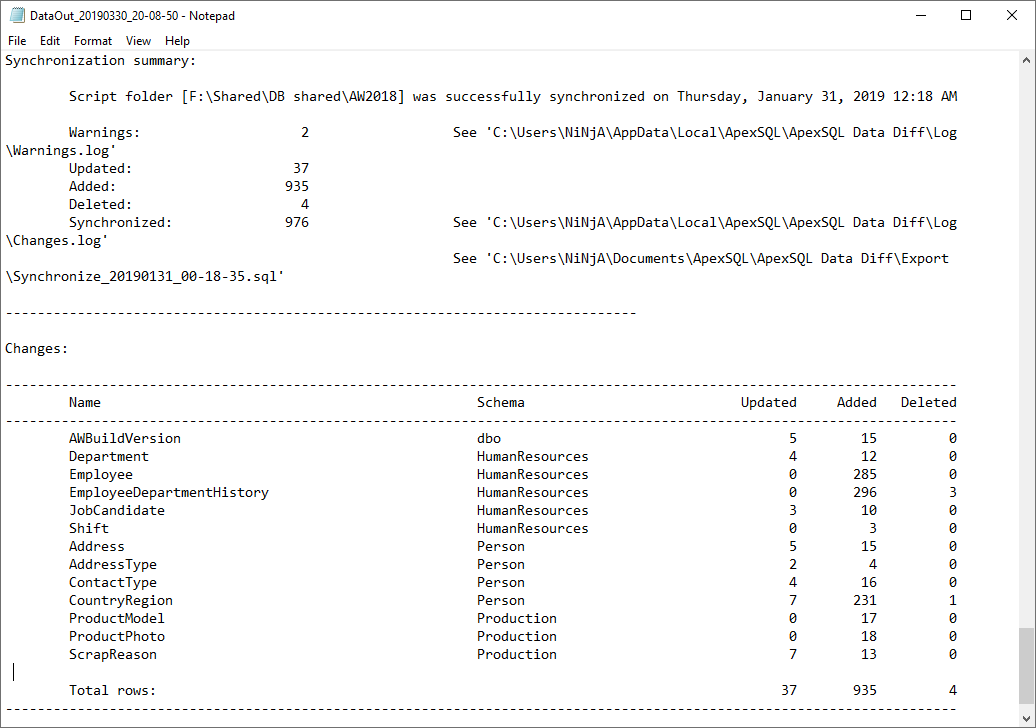
The Results window will be shown once the synchronization process is done, with all execution process information and messages:
System automation
The next part in this article, after all prerequisites are set including the saved project file and initial synchronization of a developer database data changes, is to create a text file that contains all servers and databases from all developers.
In each line, this text file should contain server and database name for each developer. The automation script will go through each line and system will initiate the comparison and synchronization for each one to synchronize them with a shared SQL script folder:

As it was mentioned above, Windows authentication was used in this example, so there was no need to provide login credentials, but if there is a need to handle this differently, check out the article about ways of handling database/login credentials.
Now is the time to create the PowerShell script, which will be used in this system to iterate thru the above saved text file with all servers and databases from all developers, perform synchronization where differences are detected and create date/time stamped comparison reports and execution outputs.
Let’s move on with reviewing and explaining the PowerShell script parts that are the most important and that need to be edited, in order to make the system work.
From the link below at the end of this article, the full PowerShell script can be downloaded and set up based on user’s needs. Furthermore, check out the explanation in the Appendix A for the root folder set up, creating folders automatically, saving outputs and setting up locations.
The first step in the PowerShell script is to provide ApexSQL Data Diff’s installation path and location of the server and database text file:
#installation path of ApexSQL Data Diff and server and database
 file locations
$dataDiffLoc  = "ApexSQLDataDiff"
$serverDbsLoc = " SQLServersDBs.txt"
Now, date/time stamped variable needs to be defined with desired format, along with the ApexSQL Data Diff’s CLI switches, and return code variable:
#date/time stamp variable, ApexSQL Data Diff's switches, and return
code variable
$dateTimeStamp  = (Get-Date -Format "MMddyyyy_HHMMss")
$dataDiffSwitches = "/s1:""$server"" /d1:""$database""
 /pr:""DevDBSync.axdd"" /rts:m d /ot:html /dhtmo:d co ro dr /on:
""$dataRepLoc\DataRep_$dateTimeStamp.html"" /out:""
$dataOutLoc\DataOut_$dateTimeStamp.txt"" /sync /v /f"
$returnCode = $LastExitCode
The next part is to create a function that will go thru the text file that contains servers and databases of all developers and to run ApexSQL Data Diff’s CLI switches for each line in the file:
#function to go through each server and database, and execute
ApexSQL Data Diff's CLI switches
foreach($line in [System.IO.File]::ReadAllLines($serverDbsLoc))
{

    $server   = ($line -split ",")[0]
    $database = ($line -split ",")[1]

#call ApexSQL Data Diff to run the data comparison and synchronization
process
    (Invoke-Expression ("& `"" + $ dataDiffLoc +"`" " +$dataDiffSwitches))

}
If there is a need, there is a different way to handle any possible outcome. Check out the article on utilizing the “no differences detected” return code to find out how to handle different outcomes.
E-mail system notification
To add a bit more on improving this whole system and get notified when any change in system occurs, whether if it’s a successful synchronization or an error occurred, an e-mail system of notification can be set. By adding e-mail system of notification, an e-mail will be sent to all developers from the list, along with the notification of success or fail, with attached comparison report and execution output that can be used for reviewing changes or errors further on. Check out the article on how to setup an e-mail alert system for ApexSQL tools, to learn more about it.
If this e-mail system of notification is set, two kind of e-mails can be got with their corresponding subjects and here is a short explanation:
- ApexSQL Data Diff sync results – the system detected differences on a shared SQL script folder, the process is initiated to synchronize developer databases and e-mail is received after the synchronization is finished, along with the comparison report of that particular comparison and the execution output file
- ApexSQL Data Diff error occurred – the system detected error during the execution process (comparison or synchronization), an e-mail was sent with attached execution output file that can be reviewed by developers to locate the issue
For example, let’s say that an e-mail was received with the second subject, which indicates that error occurred. If the attached execution output file is opened the following can be spotted:
An error occurred during the application execution at: 03302019_132635.
Return code: 6
Error description: Switch /backup is missing its dependent switch /synchronize
Return codes for each tool can be found in their own CLI help, but they can be also found in the article about General usage and the common Command Line Interface (CLI) switches for ApexSQL tools, where the complete list of return codes is explained, along with other useful information.
By further examining the PowerShell script, it can be noticed that the /synchronize switch is missing and it’s needed to perform direct synchronization on a developer database. In this case, if the article about ApexSQL Data Diff Command Line Interface (CLI) switches is reviewed, it can be noticed that when the /backup switch is used to backup developer database, before the synchronization, the /synchronize switch must be provided as its dependent CLI switch.
System scheduling
After the PowerShell script for automating system is completed and all desired additional setups are made, one more thing can be added to improve this system furthermore – ability to run the system unattended, by scheduling the complete process of synchronization developer databases with a shared SQL script folder. Check out the article about ways of scheduling ApexSQL tools to learn more about it.
System outputs
Since the complete system was set and time passed by, there were several system executions and therefore system outputs were created in process of synchronizing developer databases. To locate system outputs, check out their locations in Appendix A. Once located, any developer can access them and if there is a need to check a specific comparison report, the DataReps folder should be opened:
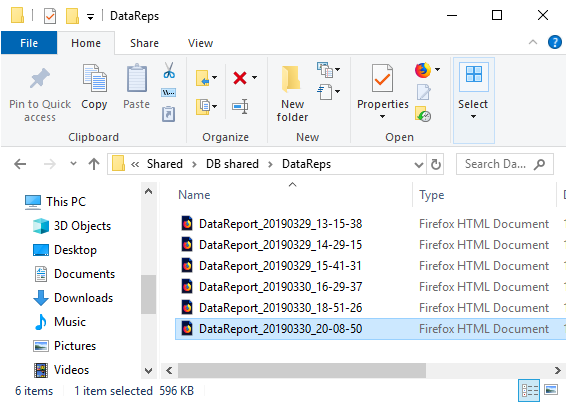
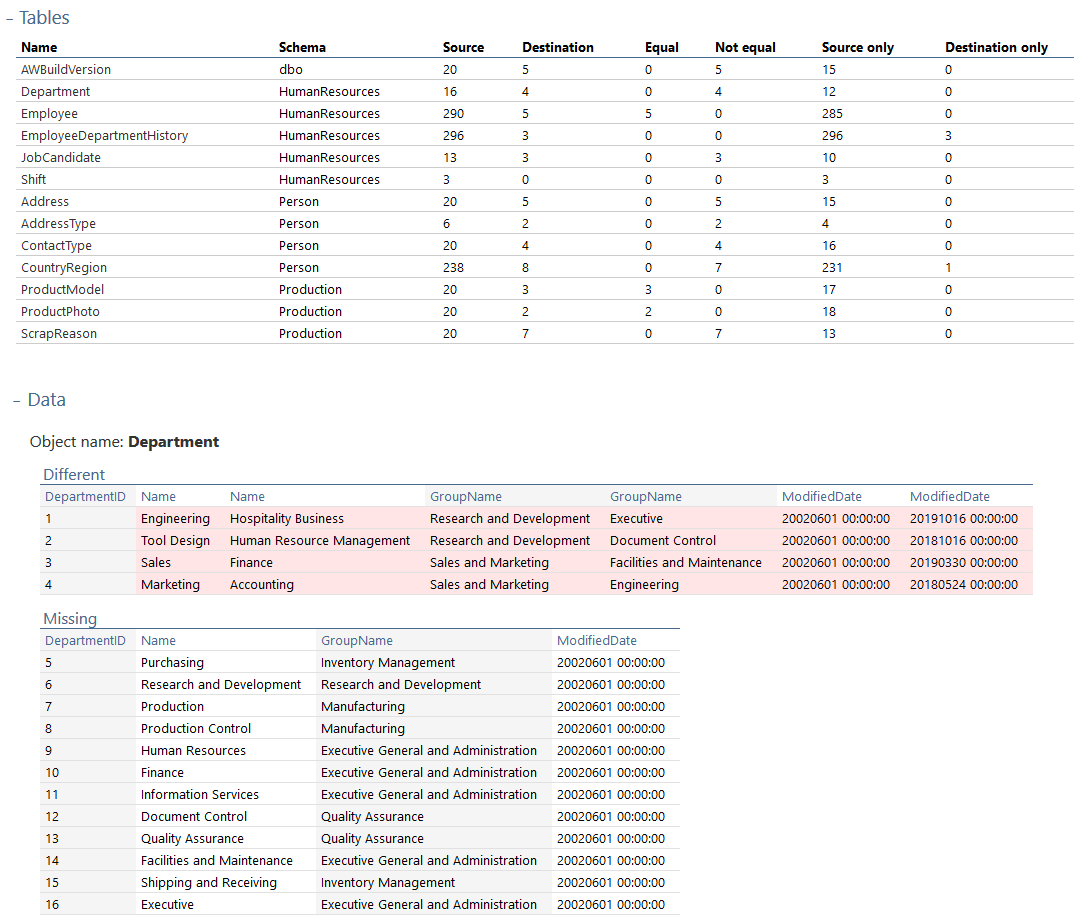
Here, a developer can locate desired comparison report by its date/time stamp and open it. When a Tables section is expanded and a table name is clicked, the Data section will be expanded automatically where a developer can review desired database data changes:
Furthermore, a developer can review execution output that contains complete information of comparison and synchronization, or if error occurred during the execution. To check out execution outputs, open the DataOuts folder:
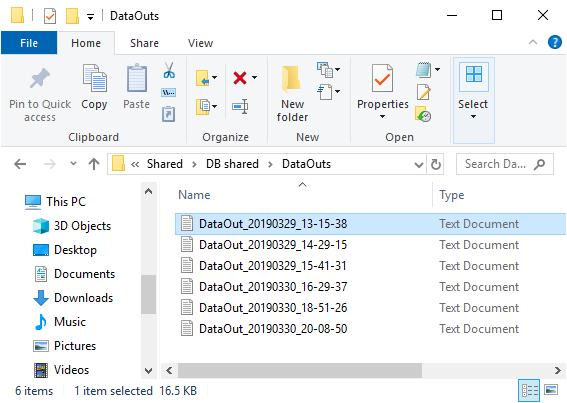
As for the comparison reports, the execution outputs are also date/time stamped, and a developer can open a desired one in which the complete execution process can be reviewed:
Download
Please download the script(s) associated with this article on our GitHub repository.
Please contact us for any problems or questions with the scripts.
Appendix A
First thing is to define a root folder of this automation system, along with location of the comparison reports and execution outputs:
#root folder
$folderRoot = \\host\Shared SQL script folder\AutoSF
|
Quick tip: For the purpose of this article, a shared network location was used for the root folder, so that all developers can review comparison reports and execution outputs |
#comparison reports location
$dataRepLoc = CheckAndCreateFolder $rootFolder -DataReps

#execution outputs location
$dataOutLoc = CheckAndCreateFolder $rootFolder -DataOuts
For further process automation, as mentioned above, the next part is to create a function that will check if folder exists and to create necessary folders for comparison reports and execution outputs:
#folder existence check and DataOuts and DataReps folders creating
function CheckAndCreateFolder
{
    param
    (
        [string] $rootFolder,
        [switch] $dataReps,
        [switch] $dataOuts
    )

    $location = $folderRoot

    #set the location based on the used switch
    if ($dataReps -eq $true)
    {
        $location += "\DataRepLoc"
    }
    if ($dataOuts -eq $true)
    {
        $location += "\DataOutLoc"
    }
    #create the folder if it doesn't exist and return its path
    if (-not (Test-Path $location))
    {
        mkdir $location -Force:$true -Confirm:$false | Out-Null
    }
    return $location
}
April 4, 2019


